I’m starting a new series called Garbage to Gorgeous and this is the first episode/post! I was out for work and came across a stool that looked like it was dirty and had peeling paint, but otherwise in good shape. I hopped out of the car and sure enough, it seemed pretty sturdy. Into the back of the car it went, and off I went. Be sure to follow my blog and YouTube channel, to make sure you don’t miss any episodes!
Here are a few other Garbage To Gorgeous® projects you may enjoy:
- Garbage to Gorgeous Episode #16 | Furniture Makeover | Kids Table to Coastal Table DIY
- Garbage to Gorgeous Episode #11 | Nautical Stool Makeover DIY
- Garbage to Gorgeous ® Episode #12: Little Girl Rocking Chair Makeover DIY
- Garbage to Gorgeous Episode #6 | I Built a Doghouse Out of What?!
- Garbage to Gorgeous Episode #8: Bathroom Makeover on a Budget
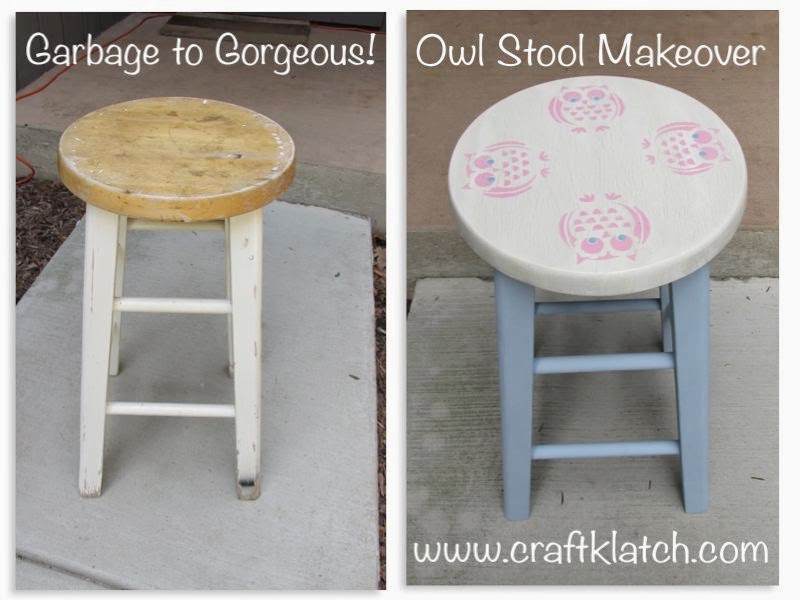
Here is the transformation:

Supplies you will need:
- Stool
- Chalk paint ~ I found the blue paint at Home Depot
- White and tapioca acrylic paint
- Baby pink acrylic paint
- Parchment or tapioca and white acrylic paint
- Clear protective sealer
- Owl stencils ~ I found them at Hobby Lobby
- Paint and stencil brushes
Here is the video tutorial:
Directions:
- Clean your item. If it’s new you can skip this step, if you garbage picked it, clean it! I use warm water mixed with a little bit of bleach.
- Scrape off any loose paint. I also used 100 grit sandpaper and went over the whole thing to rough it up a little and get any remaining loose paint and dirt off, and then I used a damp cloth to wipe up any dust on the piece.
- I began by painting the legs with a chalk paint I found at Home Depot. It’s called American Decor. I did two coats, letting it dry between.
- I had to fill a hole with wood filler, as there was a hole on the top of the stool. I let it dry and did a quick sand to let even out the surface. Again, I took a damp cloth to wipe up any dust.
- I took parchment colored and white acrylic paint and put them side by side in a dish. I took my paint brush and put both colors (side by side) on my brush. Then, I painted the stool seat with both colors at the same time. It gave it a very subtle streaked look. I did not want a solid white. It took two coats.
- I took the stencil and stenciled on four owls. I used the same owl because I wanted to stay consistent with the size.
- I let the stencils dry and with the end of a marker, I dipped it into the chalk paint and made dots for eyes on each of the owls.
- After the eyes were dry, I used a clear gloss protective finish over the whole seat. I did two coats. When I did the third coat, I took a paper towel and lightly wiped it off. That gave me a little more of a satin finish that I was going for.
That’s it! It can be used as a stool, a plant stand, or even as a small side table.
Stool Makeover Alternatives
Life gets hectic and maybe just don’t have the time to give a stool a makeover, but like the idea and need a stool. Here are some amazing alternatives to doing a stool makeover on your own!

Thanks for stopping by! Remember: Life’s too short not to shimmer, so grab your glue gun and your glitter!™ Stay safe!
Mona