The best way to stay on top of my latest crafts is to
subscribe to my
subscribe to my
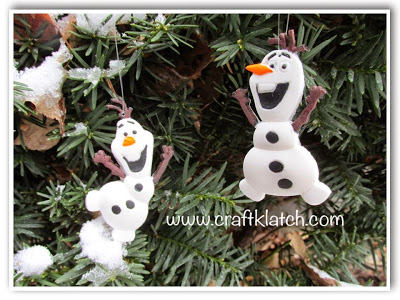
It’s time for more Christmas and holiday crafts and Olaf is a perfect ambassador for this time of year! I found this cute silicone mold online and HAD to give it a try!

You will need:
– Silicone mold
– Resin (I used Easy Cast)
– Acrylic paint – orange, black and brown
– White resin pigment dye
– Fishing line
Here are some of the items I used, available from Amazon, incase you want to give it a try:
Here is the video tutorial:
Directions:
1. Paint your mold. You need to paint the carrot nose orange, the buttons black and the arms and twig hair brown or black. This will take multiple coats. If you are having trouble painting the details with a brush, consider using a toothpick as well. Allow to fully dry.
2. Mix your resin, according to the package directions, mix in a small amount of resin pigment.
3. Slowly pour it into the mold. Allow it to seep into the details.
4. Allow to cure at least 12 hours before unmolding it.
5. Drill a small hole into the resin piece.
6. Add a length of fishing line and tie a knot. If you want to give it a little extra insurance, so it doesn’t come untied, add a dab of crazy glue.
That’s it! Now you have two cute ornaments!
Happy Holidays and Happy Crafting!
Mona
What adorable Olaf Christmas ornaments……….the kids will love them. Thank you for sharing with the Clever Chicks Blog Hop! I hope you’ll join us again next week!
Cheers,
Kathy Shea Mormino
The Chicken Chick
The-Chicken-Chick.com