I know I’m late getting this up! It was actually done on time, but I didn’t get the video edited quick enough. So, this is a Saturday edition of Another Coaster Friday!!
I decided to do a set for the holidays and I wanted something fun. What could be funner than lollipops?!?!?!?!
Here are some of the items available through Amazon, incase you want to give it a try:
Here is the video tutorial:
Directions:
1. Take a half of the white clay and knead it until it is soft. Then, roll it into a snake and set aside.
2. Repeat with the red clay.
3. Put the red and white lay next to each other and gently squeeze them together. You are trying to combine them to make a rope.
4. Roll the clay and twist it. Roll and twist until you get the desired effect and it looks similar to a candy cane. You are going to need a good amount of working space because you need a long snake.
5. Once you get it to the desired length, trim off the imperfect ends. Begin to coil it. You are now making the coaster. While you are coiling it, remember to gently squeeze it together and gently press it down. You don’t want any gaps, or it won’t be a very effective coaster. You want it somewhat flat so a glass will sit steady on it.
6. Once you reach the end, pinch the end to a point and then finish the lollipop. It will give it more of a tapered end.
7. Take your skewer stick and gently insert it into the clay. Use a drilling motion and gently insert it until you reach close to the center. Repeat with remaining red clay and green clay. Put them on a pan lined with parchment paper and pop them in the oven. Bake according to the clay package directions.
8. In the meantime, drill holes into the wood, so you can later insert the skewer sticks. Cut the skewer sticks to the desired lengths. Paint the skewer sticks white.
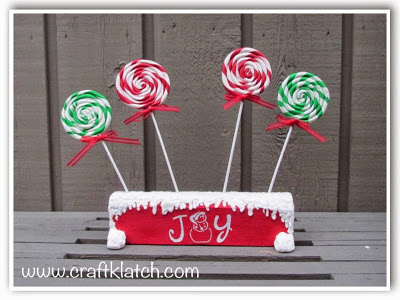
9. Paint the block of wood red.
10. Stencil or decorate the block of wood as you wish. I used a J and a Y stencil with a snowman in between to make it look like JOY. You can use stickers or anything you would prefer.
11. Insert the skewer sticks in the holes. Put the clay lollipops on the sticks. I inserted the skewer sticks, with the pointy end in the base. Take the dimensional white paint and paint the block to look like snow has fallen on it.
12. While wet, sprinkle with glitter, to give it and icy effect.
13. The block of wood was kind of wobbly, so I also made four white balls out of clay, baked them, glued them onto the base and added the paint and glitter. Add ribbons. I put a dab of hot glue on the ribbon, to help keep it in place.
Now you have a festive and fully functional coaster set. Just take the lollipop head off and use as a coaster. When you are done, put it back. The sticks always stay in the base. Polymer clay is non-porous, so you don’t need to seal it. If you did want a shiny effect, I would suggest painting it with resin, because that will give it a durable finish.
That’s it! Thanks for stopping by! Happy Holidays! Remember: Life’s too short not to shimmer, so grab your glue gun and your glitter!™ Stay safe!
Mona
1 thought on “DIY Lollipop Christmas Coaster Set – Another Coaster Friday!”
What a festive idea you have with the Lollipop Coaster set. Great Tutorial! Thank you for sharing with the Clever Chicks Blog Hop! I hope you’ll join us again next week!
Cheers,
Kathy Shea Mormino
The Chicken Chick
The-Chicken-Chick.com


What a festive idea you have with the Lollipop Coaster set. Great Tutorial! Thank you for sharing with the Clever Chicks Blog Hop! I hope you’ll join us again next week!
Cheers,
Kathy Shea Mormino
The Chicken Chick
The-Chicken-Chick.com