Furniture makeovers are a fun way to express your style and decorate on a budget. I especially enjoy a good chair makeover because everyone usually has a place begging for an accent chair.
Even if the style and form of the chair don’t match your room decor, once you paint it and pretty it up, it will be a valued addition!
If you are doing a home office, you can use a chair with more style than an average office chair. If you are working on a home office, I have a post that might help you out: Home Office Decor
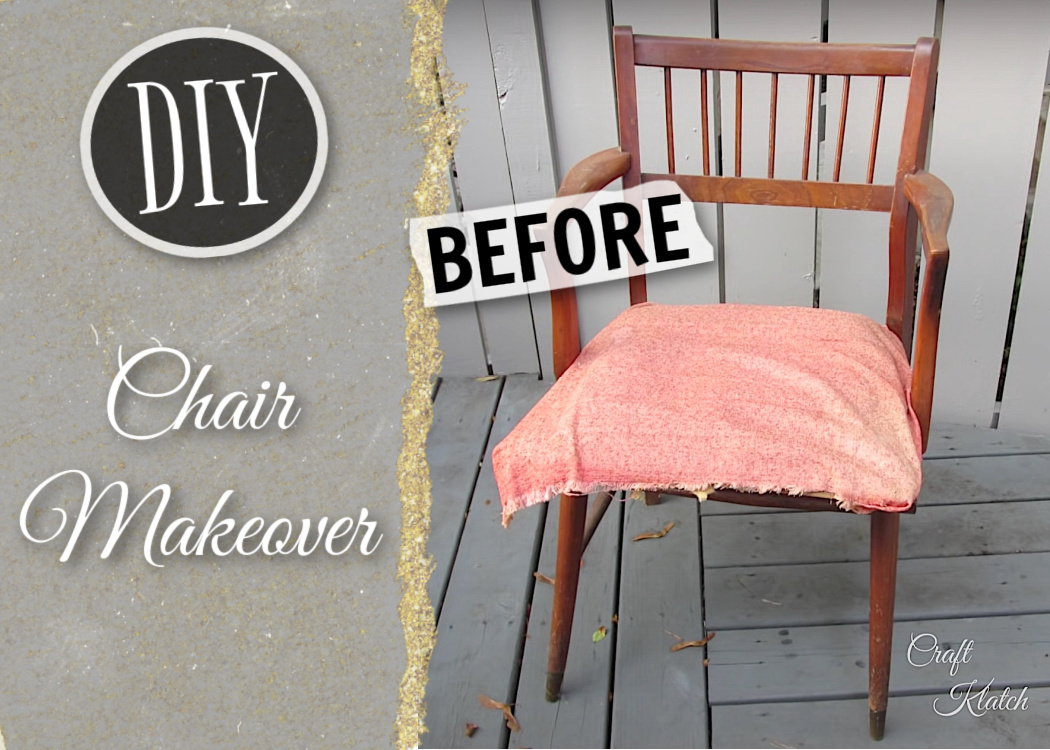
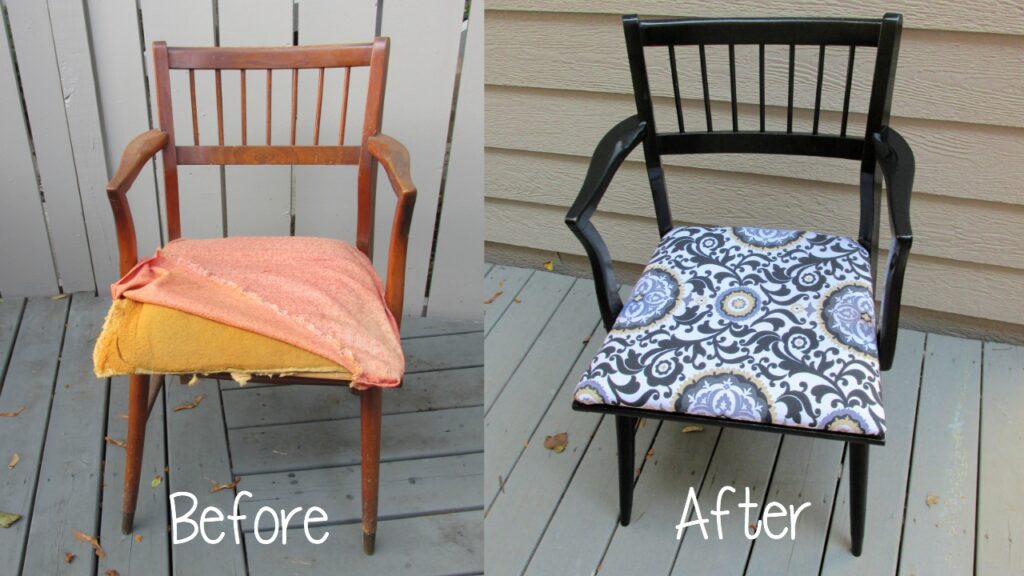
I found this disgusting beauty on the curb a couple of years ago. Since then, it has been taking up residence in my garage. I liked the shape and the promise it held, but its time had come. Bloom or face your doom!
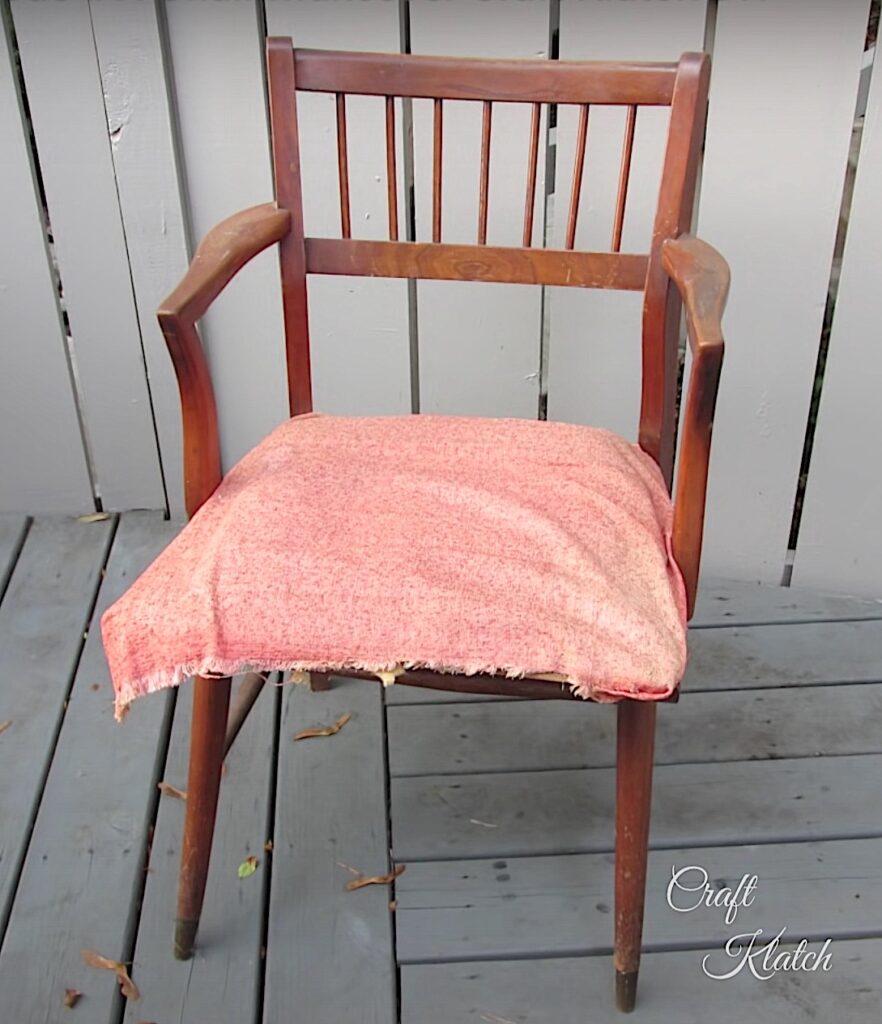
It was a 10+ on the gross meter. It was filthy and the cushion was literally crumbling and disintegrating before my eyes. I didn’t really want to touch it, but I still had the faith!
Materials I Used For The Chair Makeover
Here are the items I used in my project:
*This blog uses affiliate links. As an Amazon Associate I earn from qualifying purchases.

As for the fabric, I used a canvas because it is pretty durable and can withstand a lot of wear and tear.
Check these out:
Amazon canvas by the yard.
Walmart canvas by the yard.
Here is the video tutorial where I show you exactly how I did it! It’s quick:
Directions For the Chair Makeover
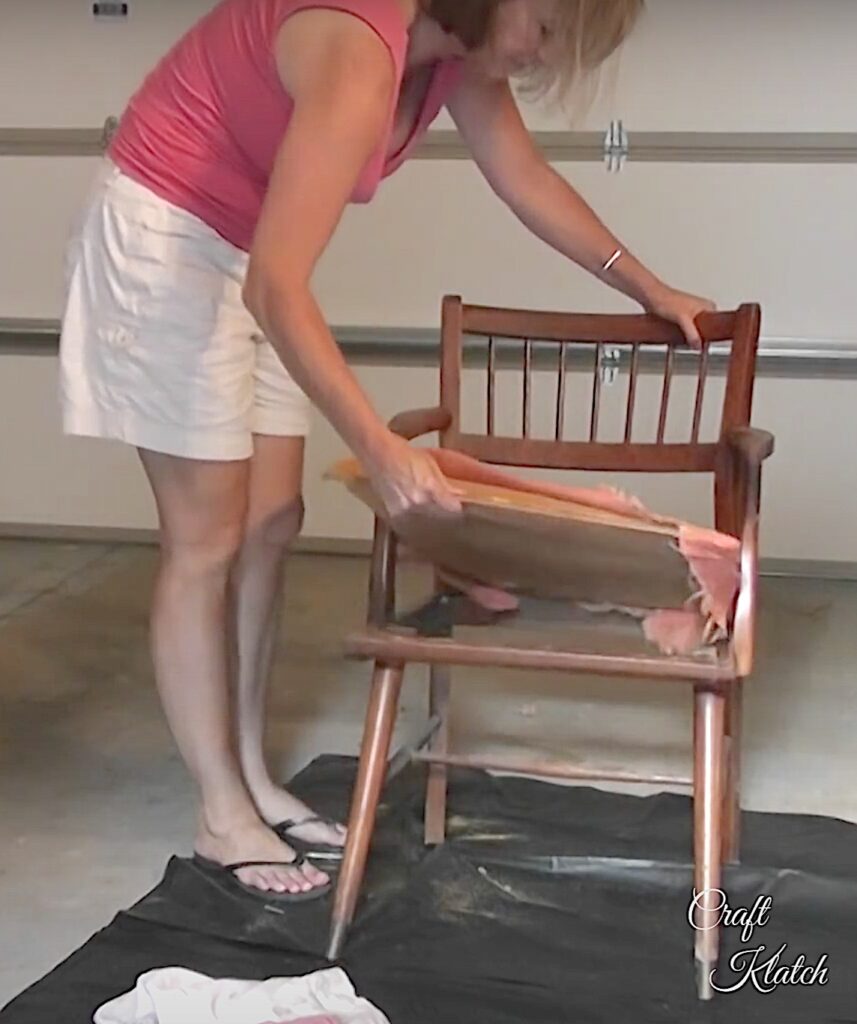
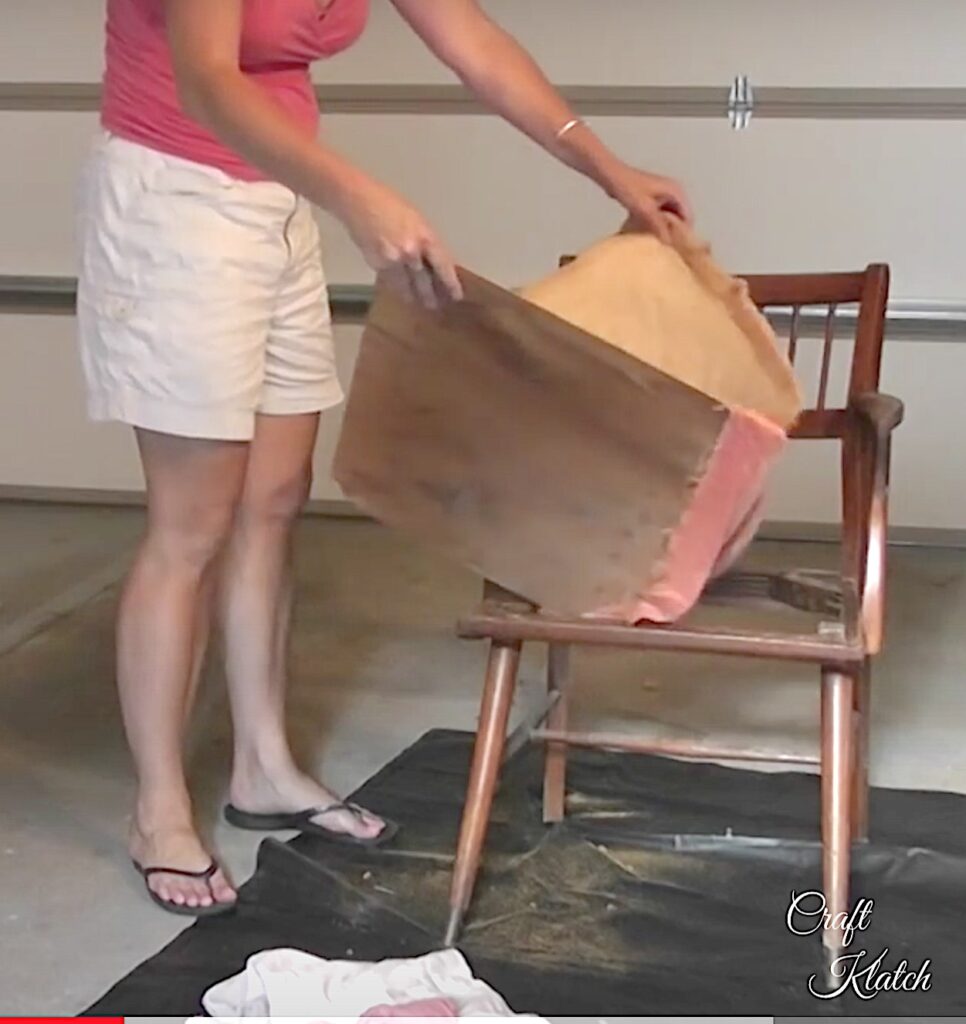
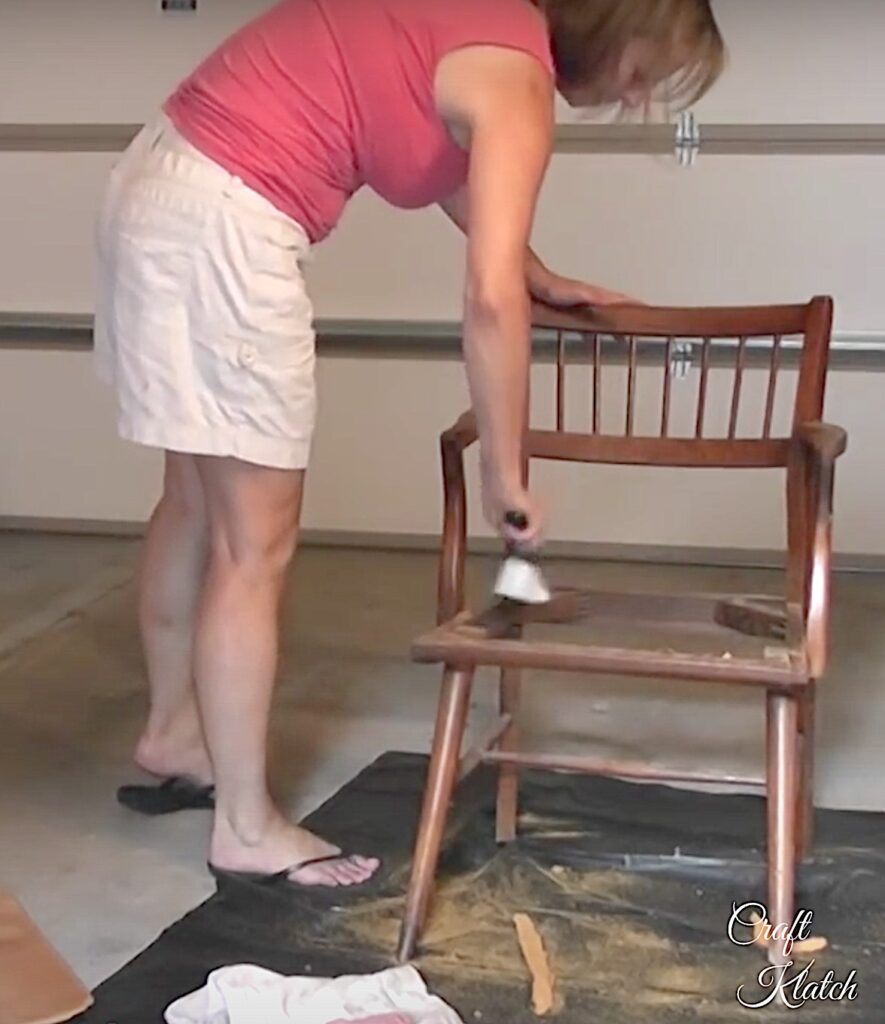
Step 1: Take the chair apart and get the makeover started.
To start the chair makeover, I removed the musty, grungy, nasty cushion, and got rid of it!! In cases like this, don’t try to salvage any of it! You want to give a chair new life, so let it be fresh. Who knows what has been on the foam and fabric, when a chair gets that bad.
Step 2: Clean the chair.
I first brushed it off. Then I used some elbow grease, soap, and water and left it to dry.
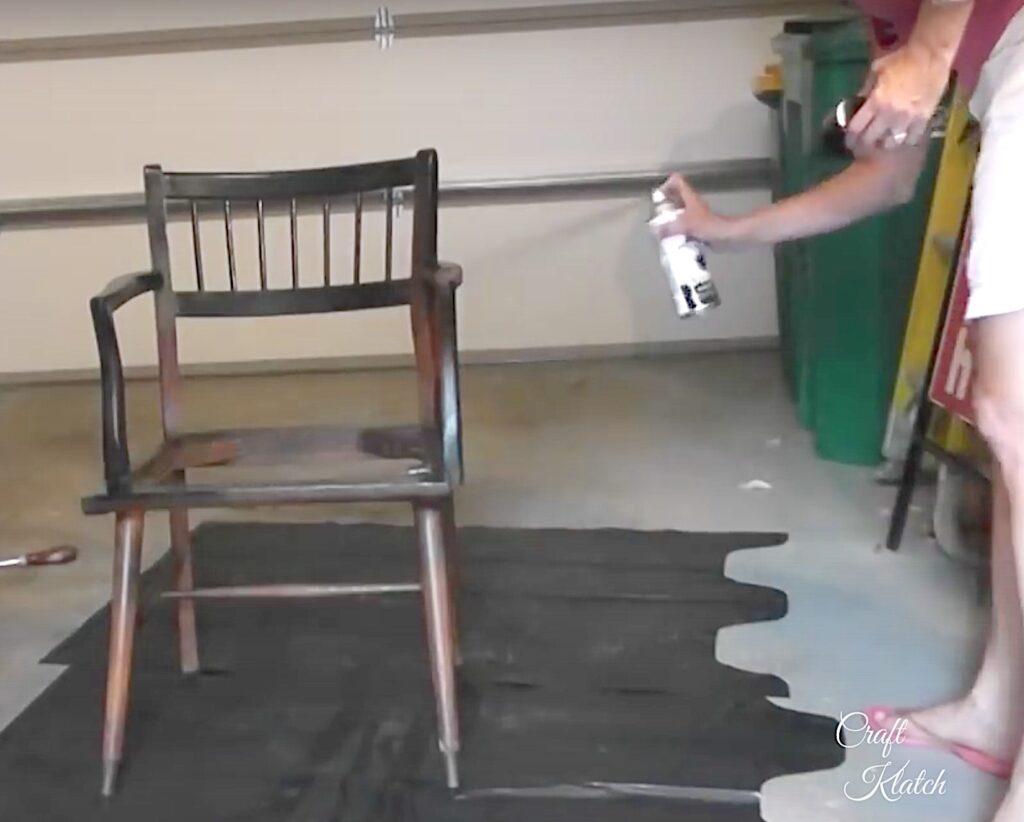
Step 3: Paint the chair. Now it’s starting to look like a makeover.
It wouldn’t be much of a makeover if I left the chair the same color. So, I used spray paint that has a primer built-in and would adhere to all surfaces. It took about a can and a half for good coverage. I let it dry.
Step 4: Start working on the cushion.
While the paint was drying, I worked on the chair cushion. I used duck cloth, which is a canvas type of fabric, which is pretty durable. I cut out the foam for the cushion and I also cut quilt batting. Putting a layer of quilt batting over the foam helps smooth the edges.
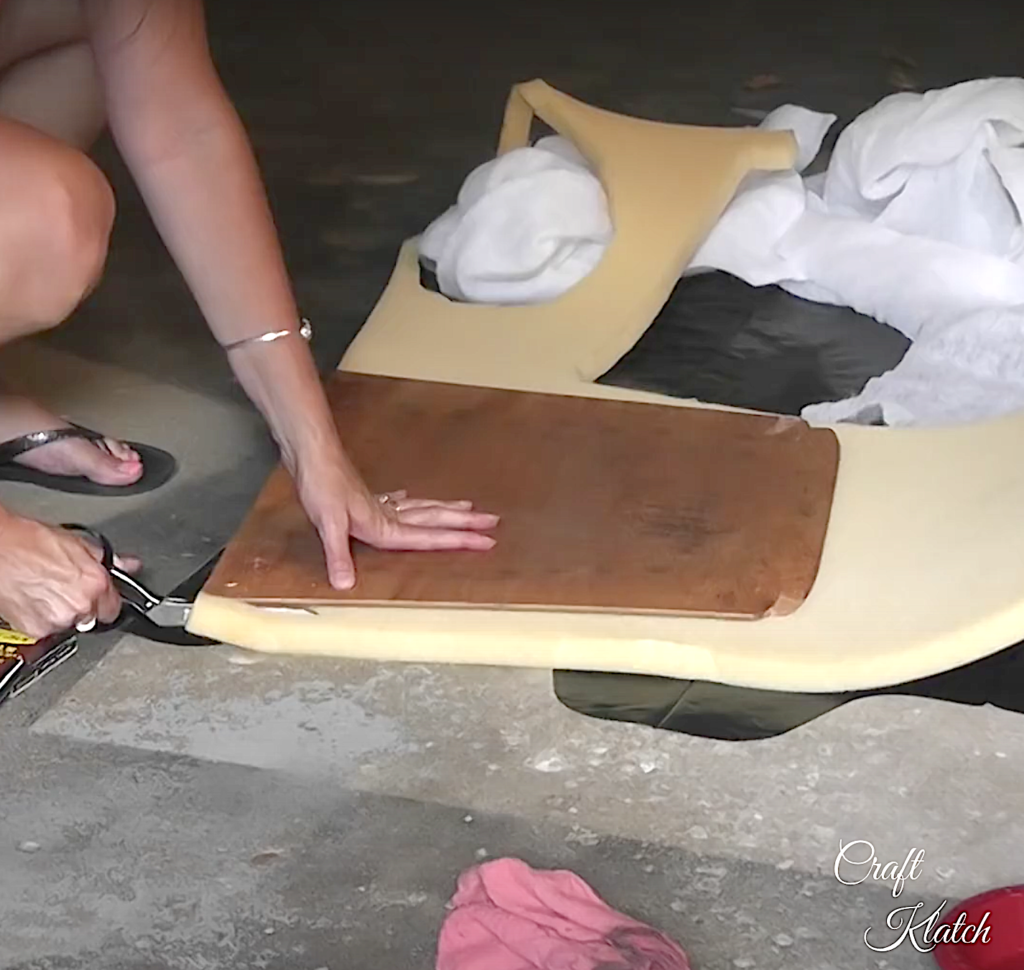
Step 5: Put down the layers of the cushion.
Facedown, on a clean surface, I placed my fabric, my quilt batting, my foam piece, and the seat base. I trimmed around, but not too close. You can always cut off the excess fabric later, but you can’t add more fabric once you cut it off.
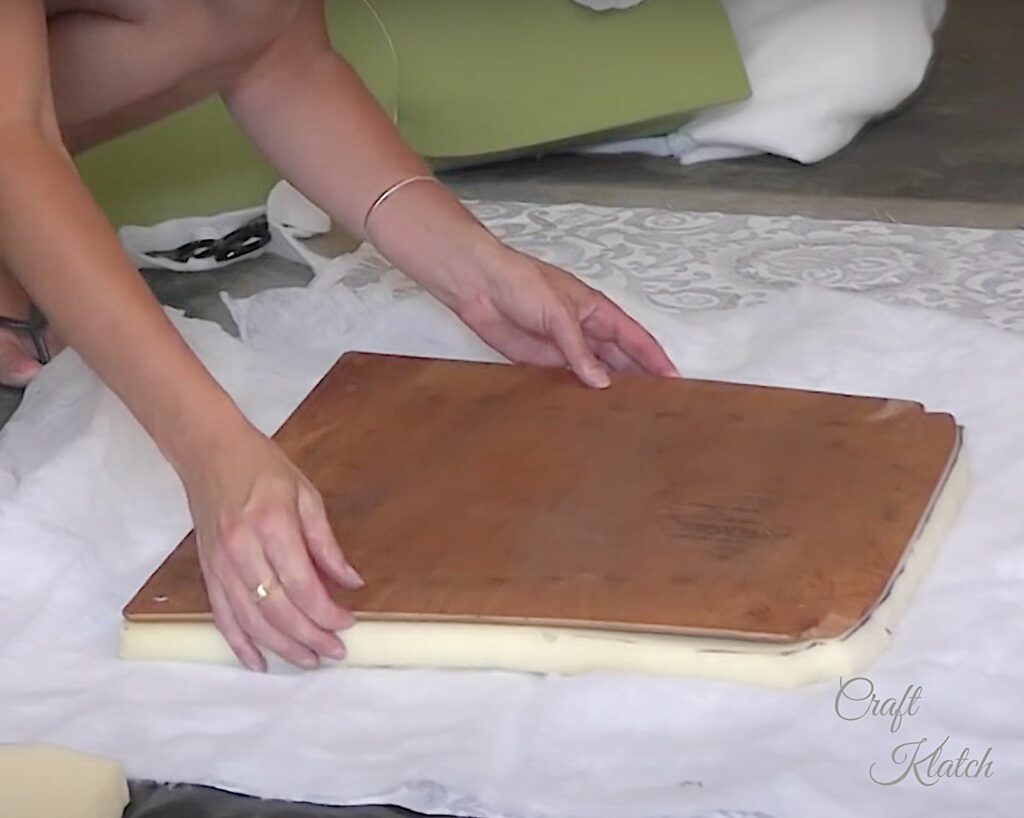
Step 6: Start to staple.
I started at the corners, going opposite to opposite and then the middle to the middle. Then I followed along all the edges.
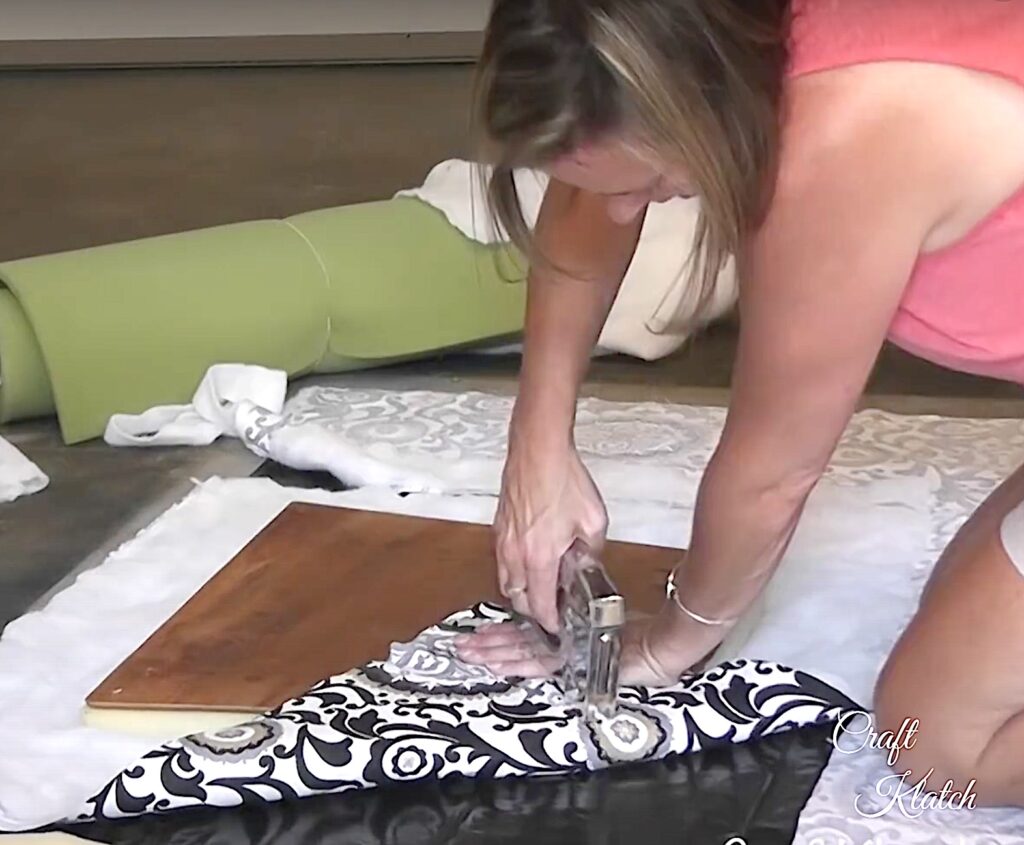
Step 7: Cut away the excess.
I cut away the excess because I didn’t want to have lumps of extra fabric that would look messy and/or prevent me from reattaching the seat.
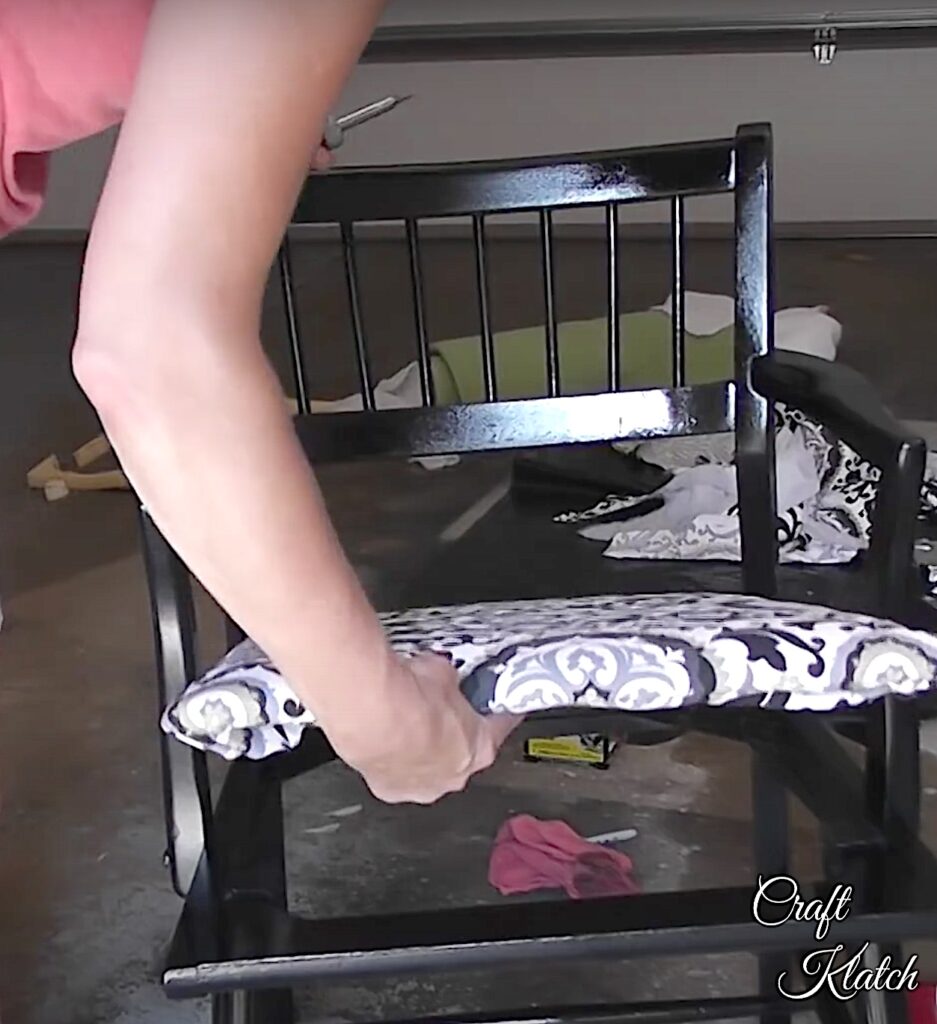
Step 8: Reattach seat to the chair.
Now, this chair makeover is starting to come together. I saved the screws from the chair and simply reattached the cushion from under.
That’s it! It doesn’t stink. It isn’t nasty and I think it makes a beautiful accent chair! I didn’t end up using this chair at home. I ended up using it in an office waiting room and it was a perfect addition.
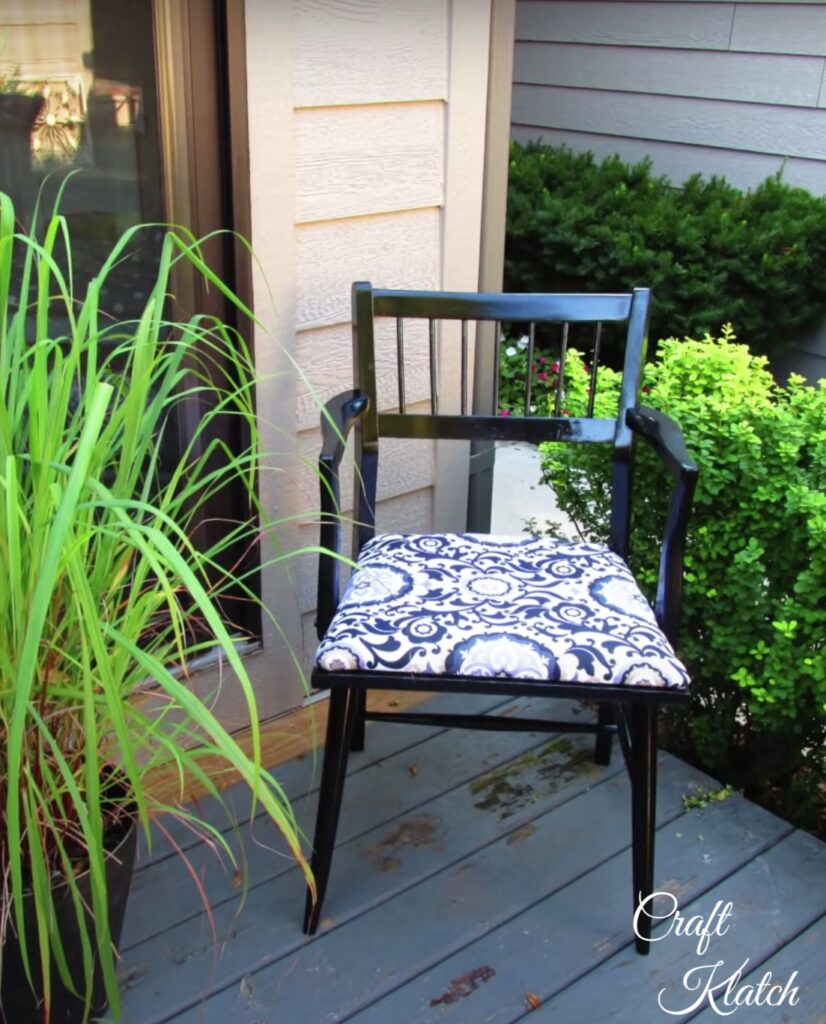
What a difference!!!
Let me answer some FAQs:
Where can I get the best deal on furniture?
That is a great question and there are so many options! I like free if I can get it! I spent 25 years as a real estate appraiser and I’d be driving around neighborhoods all the time. Garbage day was obviously my favorite day. That is how I came across the chair I just redid. I hate to see perfectly good things end up in a landfill when they can be repurposed, recycled, or upcycled and given a new life!
If you can’t find what you need in the garbage, here are a few other ideas:
If you can’t score something destined for the garbage, where can you go? My other source is Craigslist and the best category is Free Stuff and curb alerts get me pretty excited! With the dawn of Facebook Marketplace, there is a whole new world of opportunity to get stuff cheap! With both of those options, you just need to be careful and smart. Don’t take any chances when meeting up with people you don’t know. Take someone with you or meet them at a public location.
More great options are garage sales, estate sales, thrift stores, relatives, and the clearance section at your favorite store! One tip on garage sales: If you happen to know where there was a pretty good garage sale and you think some things were left unsold, you can check back. Often you see leftovers at the curb on Monday or on garbage day!
How do you makeover old furniture?
There are so many ways to makeover old furniture. Are you ready for the two MOST important things when making over old furniture? Here they are:
1. Clean it.
When things get older, they obviously get dirty and grimy and need a good cleaning. If you are going to paint the piece, you need to make sure it is clean first. You don’t always need to strip furniture, but if you don’t know what the finish is and if you don’t know if your paint will adhere, you might want to strip it. I have come across waxy finishes on furniture and the only way to redo it right is to start fresh and strip it. This is my go-to stripper. I have not tried the paste, but I love the idea of it because it sticks better to vertical surfaces. It’s on my wish list!
2. Fix it.
When furniture gets older, things start to fail. The most common things that fail are screws and glue. Screws may come out, get stripped, or simply come loose. The glue just wears out over time. If you can tighten up the joints with either glue or screws, or both, you can add many years to the life of your chair or table. If you need to add glue to a project that you are going to paint or stain, you can use wood glue, but they don’t always dry clear. I like to use clear drying glue. Even still with clear drying glue, if you are going to be staining a piece, be very neat with it. The stain won’t take the same on areas where you have glue, so wipe up any excess if it squishes out of a joint.
This is my go-to glue. I gave you two sources because sometimes they run out:
How can I make my furniture look better cheap?
You don’t have to go find other people’s discarded furniture to give a piece a makeover. Likely, there is a piece or two in your house right now that could use a little TLC or a facelift. Sometimes it is hard to see the potential in our own stuff because we are too close to it.
The easiest and cheapest way to makeover furniture is with paint or stain. You can take things that don’t match and make them into a set by painting them the same color. I did that in my Dining Room Makeover post. The table and chairs came from different people (all free) and now they are a chic set! If you come across a chair that is missing the seat, don’t let that discourage you! You can use plywood and cut a new seat and recover it. I did that in my Paris Chair Makeover!
What is your favorite piece of furniture to makeover?
As I mentioned before, I really enjoy doing chair makeovers, because they are functional and people need them. But just as much as I like doing chair makeovers, I also like doing accent tables. I found a mosaic metal table that had the mosaic tile half broken out. Yes, it was at the curb. Even though I didn’t know where I was going to use it, I knew what I wanted to do. I ended up using it as a side table off the chair in the family room. It’s my Glam Resin Table Makeover. You wouldn’t even recognize it! It has lots of cool natural elements in it. The pictures don’t do it justice!
I have another small table that my niece uses as a side table in her room. The neighbor across the street had it out at the curb. I snagged it, under the cover of darkness! It was an outdoor table with a glass top and a metal frame. The metal was hunter green and it was rusting. A little cleanup and paint made a big difference, but I turned it into an Emoji Table!
I have a whole Garbage to Gorgeous® series. It should be sure to give you some inspiration!
Be sure to let me know what you think in the comments below. Let me know what you are working on! Don’t forget to subscribe, so you don’t miss a thing!
Chair Alternatives
Maybe after all this, you just can’t find the right chair to makeover, or you would rather not take on the project. If that’s the case, here are six accent chairs that I would buy in a heartbeat!

Thanks for stopping by! Remember: Life’s too short not to shimmer, so grab your glue gun and your glitter!™ Stay safe!
Mona
Nice job
Very Nice and beautiful job done. Would have never have thought of such a great creation!
Trash to treasure, I like it a lot. Love the seat design on the material. Great job.
Thank you so much, Carol! Glad you like it!