To stay up on the latest, be sure to
SUBSCRIBE to my YouTube Channel!
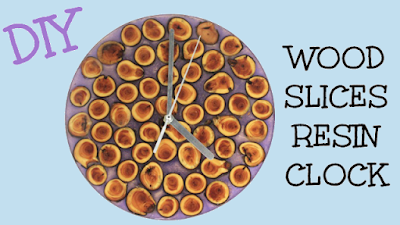
I had the opportunity to do a collaboration with Amy at CrafterZDelights and we decided that we would each make a clock. I made a wood and resin clock and Amy made an AWESOME Candy Explosion Clock! Be sure to check out Amy’s video and her channel! You won’t be disappointed!


For the wood and resin clock, you will need:
– Round silicone mold
– Clock kit
– Wood slices
– Sandpaper or a sander (rough and fine sandpaper or discs for a sander)
– Resin (Envirotex Lite or Easy Cast would work)
– Pigment powder
Here are some of the items I used, available through Amazon:
Here is the video tutorial for the Wood and Resin Clock:
Here is the video tutorial for the Candy Explosion Clock:
Directions
- The first thing I did was I went to our firewood pile and found sticks. I started cutting them with my scroll saw, but my dad stopped by and told me it would be much easier to do it on the radial arm saw. It turns out it was MUCH easier to have HIM do it on the radial arm saw! However, while he was doing it, a piece shot across the garage and hit me upside the head anyway. I heard bells. Serves me right. (reenactment
- Next I mixed four ounces of Envirotex Lite, feel free to use EasyCast, if you would rather. Both will work fine.
- I dropped every single piece of wood into the resin and dunked it, to make sure it was coated. That will cut down on bubbles later.
- With tweezers, I pulled out the wood pieces and put them in a separate cup. Don’t worry, the moment I am done, I will clean the tweezers with rubbing alcohol and they will be fine!!
- With the remaining resin, I mixed pigment powder. I used Violet Brass. I mixed it well and poured it into the mold.
- Using my tweezers, I put the wood pieces into the mold. Arranging and rearranging as necessary.
- I used my lighter to pop any bubbles. The wood is coated, so it should be fine, but be careful and remember you are taking a flame to wood. Extra caution is necessary. You will have a lot of bubbles. Wood is a porous material and will expel a lot of bubbles. You will need to go back and check periodically, until no more bubbles appear.
- Let it cure a minimum of 12 hours.
- It looks pretty good and I could just put another layer of resin on it and be done, but I want to even it all out a little. I know the edges will have a small ridge and I want it all to be flat. I took it of the mold and took it outside and did a rough sand and followed it with a fine sand.
- Wiped and washed it all off and let it dry.
- Prepared more resin and used a sponge brush to apply a thin layer. Remove bubbles as necessary.
- Let it cure a minimum of 12 hours.
- Find the center of the circle. I used a piece of paper, traced the clock, cut out, folded it in half and in half again and cut the point. That hole is the center.
- Use the template to mark a dot for the center. Drill a hole in the center and attach your clock assembly and add a battery.
Now you have a custom clock!
That’s it! Thanks for stopping by! Happy Crafting and stay safe!
Mona
Mona
See also more and compare for best prices deals for Decorative Clocks here!
Great video, thank you! Can you share some input about how to choose the clock movement? This is all new to me. If I'm using a mold that is .8" thick, what size hand shaft length should I choose? I'm on Klockit, and I see one that's 15/16" total hand shaft length, but with a max dial thickness of 1/2". I'm not sure if I'm supposed to deduct the dial thickness to determine what the thickness of the resin piece can be…or does this mean I could have up to 15/16" thick resin? Hope this question makes sense. Thank you!!
Hi Beth- Great question. I don't want to steer you wrong with bad math. They have a customer service phone number or you can click on it on their site. I think they would give you better advice! I usually have to consult my husband on that stuff! 🙂
Will one box of that enviro tex lite pour on high gloss finish make two clocks? Thank you
Hi.This is so awesome!thank you for sharing this.I made one(candy clock) but accidentally made it uneven!would you please tell me which sand paper should I use(which number)?thanks again
I’m going to read this. I’ll be sure to come back. thanks for sharing. and also This article gives the light in which we can observe the reality. this is very nice one and gives indepth information. thanks for this nice article… Best Digital Wall Clocks 2018