FX Poxy: http://amzn.to/2AF3Pkk ~ According to the manufacturer, this one is heat resistant to 500 degrees F and is UV resistant.
Here is the video tutorial:
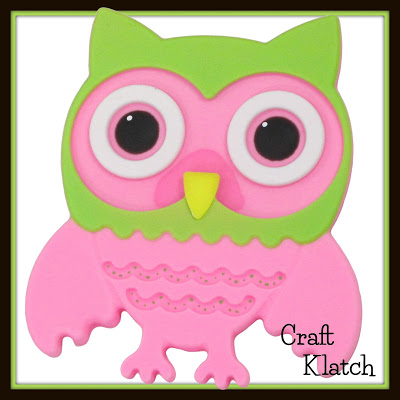
Directions:
1. Take a tiny bit of white acrylic paint and put a highlight dot on each eye. Let it dry. The reason I like to paint directly on the mold is because the acrylic paint actually becomes a part of the resin. It also allows for definition or fun designs that you would not normally be able to get with just the resin.
2. Mix an ounce or two of resin, according to the package directions.
3. Split it into three cups. Mix white into one, black into another and yellow into the third.
4. Pour the yellow into the beak, the black in the eye pupils and the white in the rings around the eyes.
5. Pop bubbles with your lighter and allow to cure for at least 12 hours.
Optional step: The yellow beak wasn’t perfectly opaque. I wanted to make sure the yellow wasn’t going to be affected by the next color, so I did a quick layer of white acrylic paint and let it dry.
6. Mix more resin and mix in some green. Pour it into the area around the eyes. Pop the bubbles.
7. With a paint brush or skewer stick, use green acrylic paint to put polka dots on the raised area. Allow to dry.
8. Mix 4-6 ounces of resin and mix in pink and white pigment. Pour into mold, pop bubbles and allow to cure.
9. Once cured at least 12 hours, take a piece of wire, bend it into a horse shoe and bend it so it sticks up.
10. Use a quick drying glue to tack it into place.
While the glue is drying, you can see the resin didn’t quite cover the mold. I tried to match the next layer, but it didn’t match perfectly. You will see, but I like they way it turned out anyway. Gives it a little character!
11. Once the glue has dried, mix another 2-3 ounces and add pink and white pigment and pour into mold. This should embed the wire hanger you just made. Pop bubbles and allow to cure at least 12 hours before unmolding.
That’s it! Pull it out and hang it up! You can customize the colors to fit any decor!
Thanks for stopping by! Remember: Life’s too short not to shimmer, so grab your glue gun and your glitter!™ Stay safe!