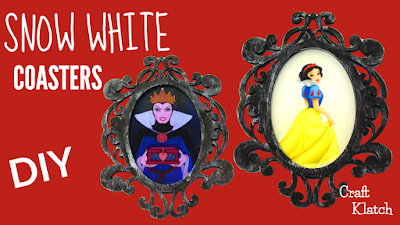

Continuing with the Disney Princess coasters, today we are tackling Snow White!!! I concentrated on Snow White and the evil stepmother, but you can also do the same thing with the seven dwarves.
Here is the video tutorial, so you can see exactly how I made them:
You will need:
Wood laster cut frames: I found them at Michaels
Resin: Stickers: http://amzn.to/2xSpF2t
Wood ovals: Also from Michaels
Black paint: http://amzn.to/2xTrW2n
Silver paint: http://amzn.to/2xSB4j0
White paint: http://amzn.to/2gUE3lk
Mod Podge: http://amzn.to/2xSIdQh
Glue: http://amzn.to/2xTsNLG
Resin (use whatever resin brand you like):
Easy Cast: http://amzn.to/2yjYmBC
Art Resin: http://amzn.to/2yk9X3z
Clear Cast: http://amzn.to/2z4rxGw
Directions:
1. First gather your parts. I have two wooded frames and two oval pieces.


2. I painted the frames black and the ovals white.


3. After the paint has dried, take a brush with a little bit of silver on it at run it over the frames, just to give it a little bit of a silver highlight


4. Take the sticker and place it on the white oval.

5. Trim off the excess.

6. I printed the evil stepmother onto paper. I used a laser printer, but you can use inkjet, you just need to give it a long time to dry, so it won’t run.

7. I trimmed it around the oval.

8. There was some white on the ends, so I took a black Sharpie and colored in the edges.

9. I then took the Super Gloss Mod Podge and put it on the front of the wood oval and on the back of the image.

10. Then I placed the image onto the oval…

…and then painted the Mod Podge across the top of the image.

TIP: I put some of the Mod Podge onto my finger and then rubbed it all down. If I have the Mod Podge on my finger, it prevents it from sticking to the image.

11. Put glue on the edge of the bottom of the frame and place it on the image and let it dry.


12. After it dried, I wanted to make sure I sealed the two pieces together, so when I added the resin, it would not leak out. To do that, I added additional glue at the seam.


13. Once everything dries, pour your resin over the images.

14. Pop the bubbles with your lighter.

Then you have these two amazing coasters!

Perfect to hold your apple cider, just be careful which apples you make it out of!


Hi Mona! I'm not a princess fan but as ALWAYS, your videos give me ideas for other projects. This is no exception, I love the frame idea! Thank you!!