To stay up on the latest, be sure to
SUBSCRIBE to my YouTube Channel!
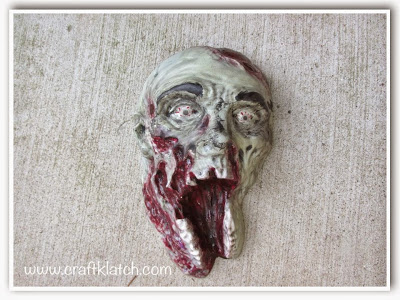
I saw this mold online and thought it would be cool to do a project with it, so I ordered it! Now, I thought it was going to be silicone, but it’s not. It is plastic. Instead of doing a resin project, I changed gears and went for a plaster project.

In the past, I have had trouble when trying to mix plaster. It hardens too fast and it clumps up on me. I knew I was doing something wrong, but I didn’t know what. I decided to research and I found this video, which I found to be very helpful:
With my new knowledge in hand, I was ready to start and the plaster of paris mixed up like a charm!!
You will need:
– Plaster of Paris
– Acrylic paint (suggested: greens, black, blues, grays, red, dark purple, white, off white)
– Zombie mold
– Triple Thick or a high gloss finish
– Paint brushes
– Paper towels
– Water
– Container to mix plaster
– Drop of dish soap
– Wire to insert in the back – I used 16 gauge
– Drop of dish soap
– Wire to insert in the back – I used 16 gauge
Here is the video tutorial:
Here is the mold from Amazon, as well as some Plaster of Paris:
Directions:
1. Mix your plaster, according to the package directions.
2. In a spray bottle, mix water with one drop of dish soap. Spray your mold, let excess run out.
3. Pour in plaster. Tap the mold on the table gently, to help bubbles rise and help it level off. I took and old towel and made a little stand for the mold, since it is not flat on the bottom. It allowed it to sit level, while hardening. Give it a minute or so to set just a little before inserting the wire. You want the looped part of the wire sticking out and being near the top of the head, so you can hang it.
4. Allow to harden and then carefully remove it from the mold. FYI: I let mine dry for a while after I removed it from the mold, because it still felt cold and wet.
5. Now it is time to paint. I mixed a light gray, a green and a blue together (By mix, I mean I had them all on the brush at the same time, but I didn’t actually mix them together to create a new color. All the colors existed separately, but also blended together.). Allow to dry.
6. I took red, dark purple and black and used them together to paint the mouth and any other sores I wanted to highlight. Allow to dry.
7. I used white and off white to paint the eyes and teeth.
8. I took black and dark gray to paint the eyebrows.
9. I took red and a toothpick and created blood vessels on the whites of the eyes.
10. I took a light gray, on the end of a paint brush to created the color of the eye.
11. Once everything dried, I gave it a wash. I took watered down gray and black paints and painted it all over the head – one section at a time. I immediately wiped it off with a paper towel. That leaves dark in the cracks and crevices and makes it look more realistic and weathered.
12. Once dry, I used red, black and purple on a brush and painted on the edged of the bloody sores. I immediately took a paper towel and smeared it, so the edges of the sores would not be so harsh.
13. I added Triple Thick to parts of the bloody areas, to give it a fresh, wet look. I also added the Triple Thick to the eyes.
Let it dry and that is it!! Thanks for stopping by and Happy Crafting!
Mona
