We are not in the kitchen trying out new cupcake recipes. Oh no, we are not! We are doing cupcake home decor.
You read that right! Cupcake home decor!
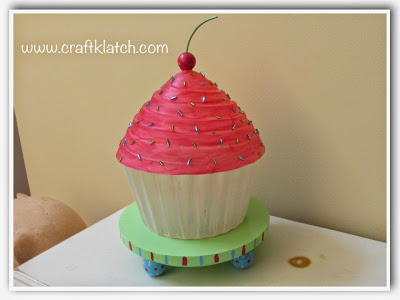
If you can believe it, we are making a cupcake lamp! I was so excited when I thought of this one and was worried it wouldn’t work out.
I don’t know how you feel about cupcakes, but I think they are so cute! My favorite part of a cupcake is the FROSTING (especially if it’s a cream cheese frosting)! What is your favorite part of a cupcake?
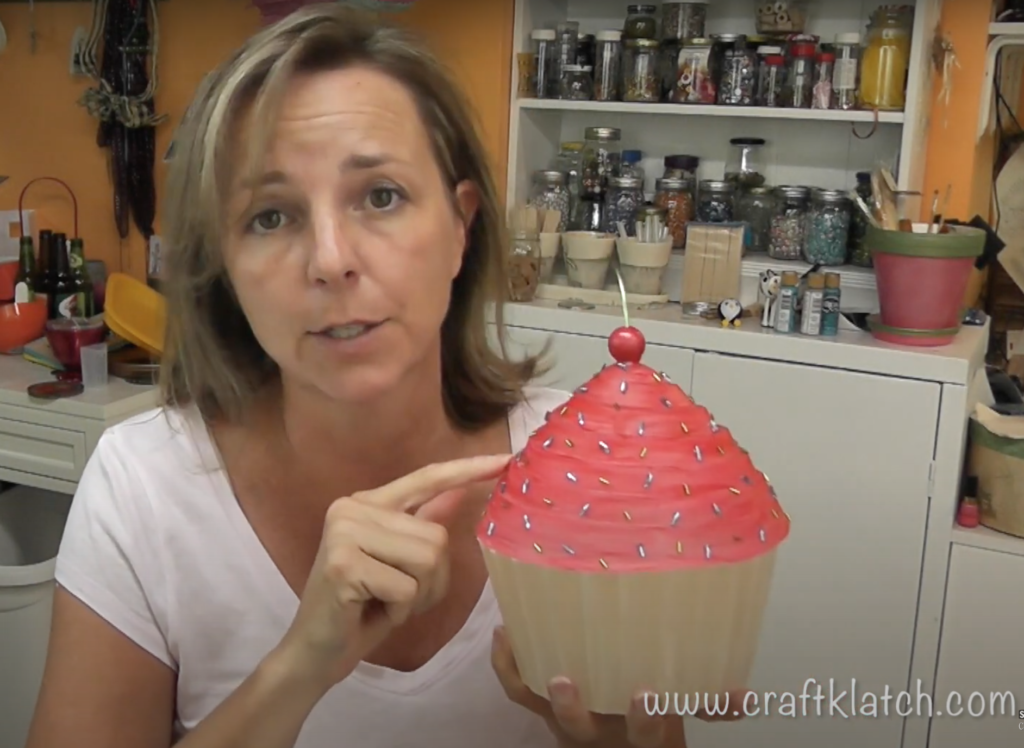
I LOVE everything about this no-calorie, jumbo-sized cupcake! The fact that it’s a lamp makes it over the top awesome!
This the the mother of all resin projects!
Think of all the perfect locations for this lamp. It’s a perfect addition to your kitchen! A bedroom! A playroom! A dining room! A bakery! Anywhere!
You can go whimsical or sophisticated. Customize it to go with your decor. You can add other cupcake accessories to compliment this one, like Resin Cupcake Coasters or a DIY NO SEW Cupcake Pillow.
Make it fun! You can do a whole cupcake room decor theme.
Just think, you can change up this cupcake by doing a neutral base and making interchangeable tops for each holiday!
We’ll talk more about different lighting options later.
I’m not sure if you can tell from the picture, but this cupcake is AS BIG AS MY HEAD!!
Supplies You Will Need To Make The Cupcake Lamp
*This blog uses affiliate links. As an Amazon Associate I earn from qualifying purchases, at no additional cost to you.
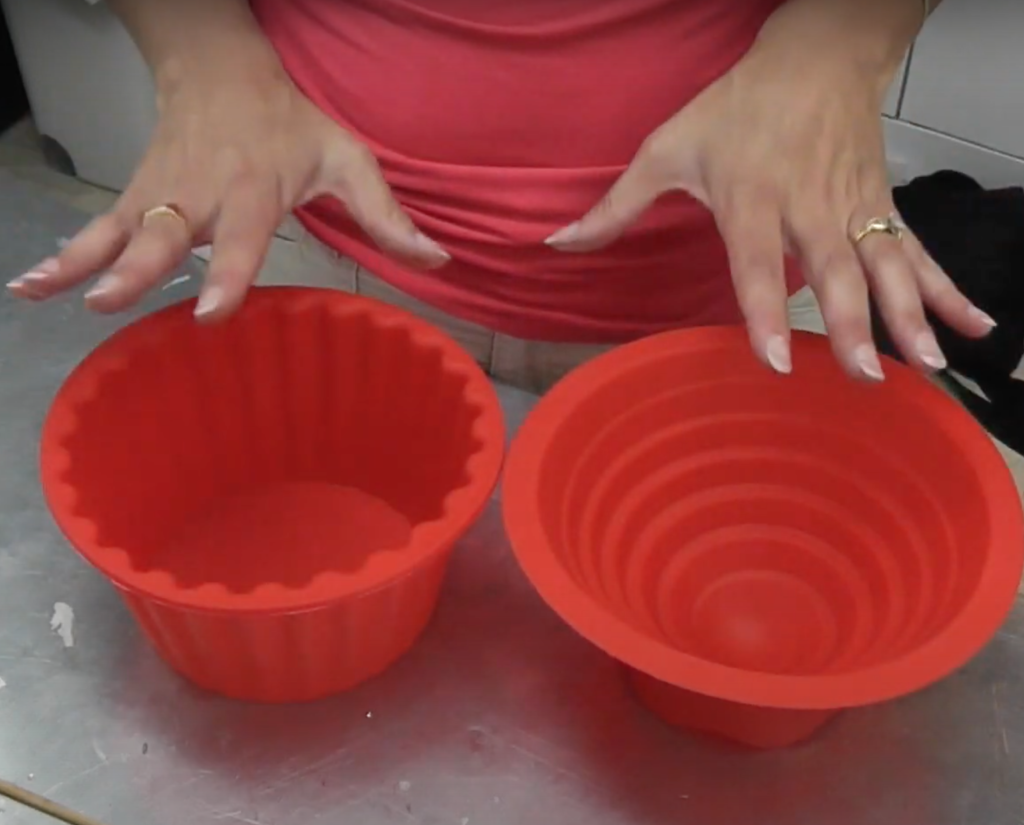
- Silicone giant cupcake mold: https://amzn.to/3jssi3G
- Stained glass paints: https://amzn.to/2Rs0aTO
- Wood plaque: https://amzn.to/2Vkotlp
- Acrylic paint (green, blue and red): https://amzn.to/2Rs9lTU
- Varnish or Triple Thick: https://amzn.to/2SrOtto
- Bugle beads (green and blue): https://amzn.to/2St8fVw
- Wood bead: https://amzn.to/2LFtQaG
- Wire: https://amzn.to/2VgAqZr
- Plastic bucket: I found mine at Home Depot
- Plastic bowl: Try the dollar store
- Vaseline: https://amzn.to/2QTchcV
- Light kit: https://amzn.to/2LD0J7R
- LED light kit: https://amzn.to/36wg32G
- Light bulb – stick to a lower wattage or LED
- Resin: There are lots of different resins to use. Use whichever you are more comfortable with.
- Regular resin:
- Easy Cast: https://amzn.to/2yjYmBC
- Art Resin: https://amzn.to/2yk9X3z
- Clear Cast: https://amzn.to/2z4rxGw
- Heat Resistant Resin:
- FX Poxy: https://amzn.to/2AF3Pkk ~ According to the manufacturer, this one is heat resistant to 500 degrees F.
- Stone Coat: https://amzn.to/2FZoWX8
- Regular resin:
Here is the video tutorial.
You can see it all lit up. I share tips on things I would do differently and things that went wrong.
I started with the very big cupcake mold to make this resin project!
Directions on How To Make The Cupcake Lamp:
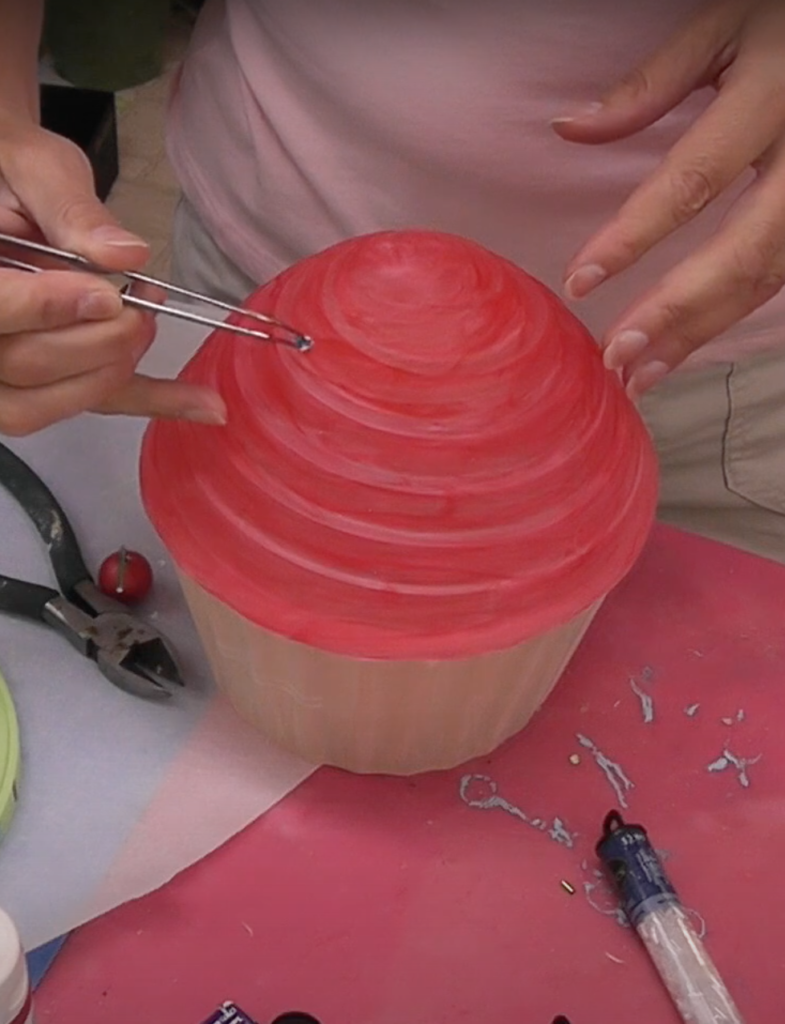
Step 1: Give it a little paint
I picked colors that I thought would make for a delicious looking cupcake.
I used glass paints and painted on the insides of the mold. The glass paints have a frosty look to them and are not opaque. I wanted to make sure the paint did not block the light from coming through.
The mold is silicone, so the paint didn’t want to stick to it and it took a few coats before I had even coverage.
Warning: the paint looks lighter in the container, but dries very dark! I bought a color that looked pink, but dried red. Keep that in mind when selecting your colors!
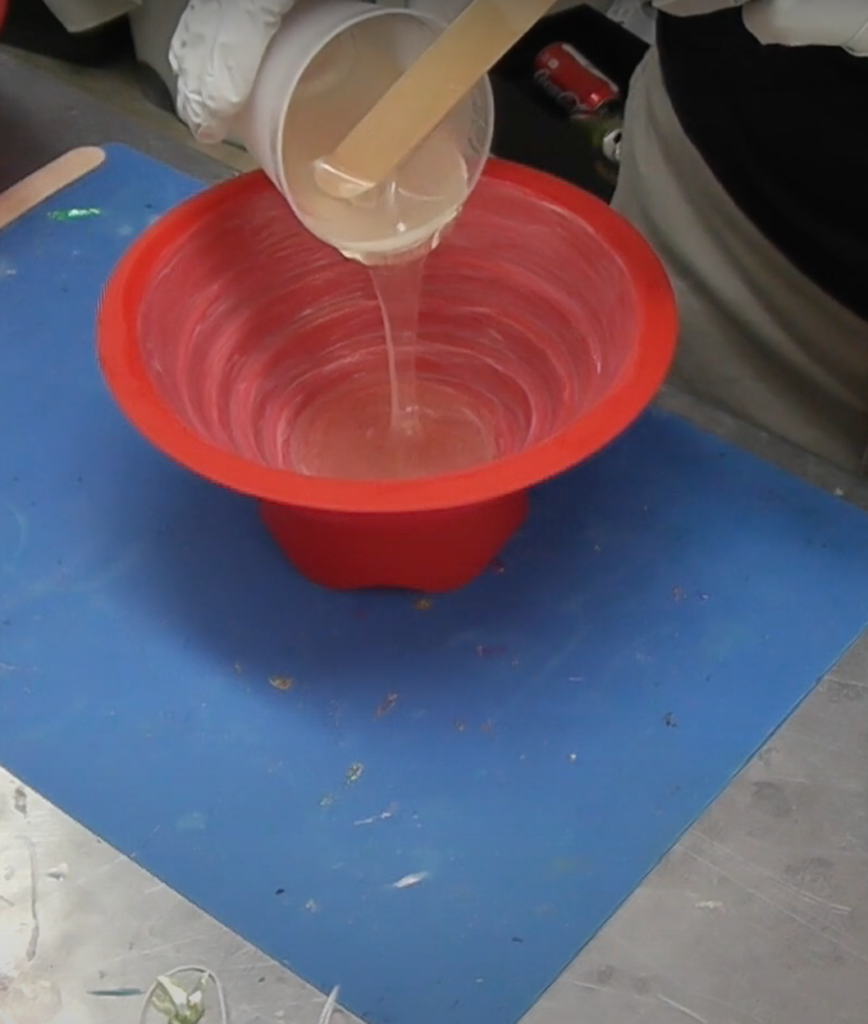
Step 2: Time for some resin – it’s our alternative cupcake batter
Once all my paint layers dried, I mixed my resin. I did 6 oz for my first pour.
For the base portion of the mold, you need to completely cover the bottom with a thin layer.
For the top portion of the mold, you need it filled enough to raise up the bowl you will be inserting.
See the video for a better explanation and demonstration.
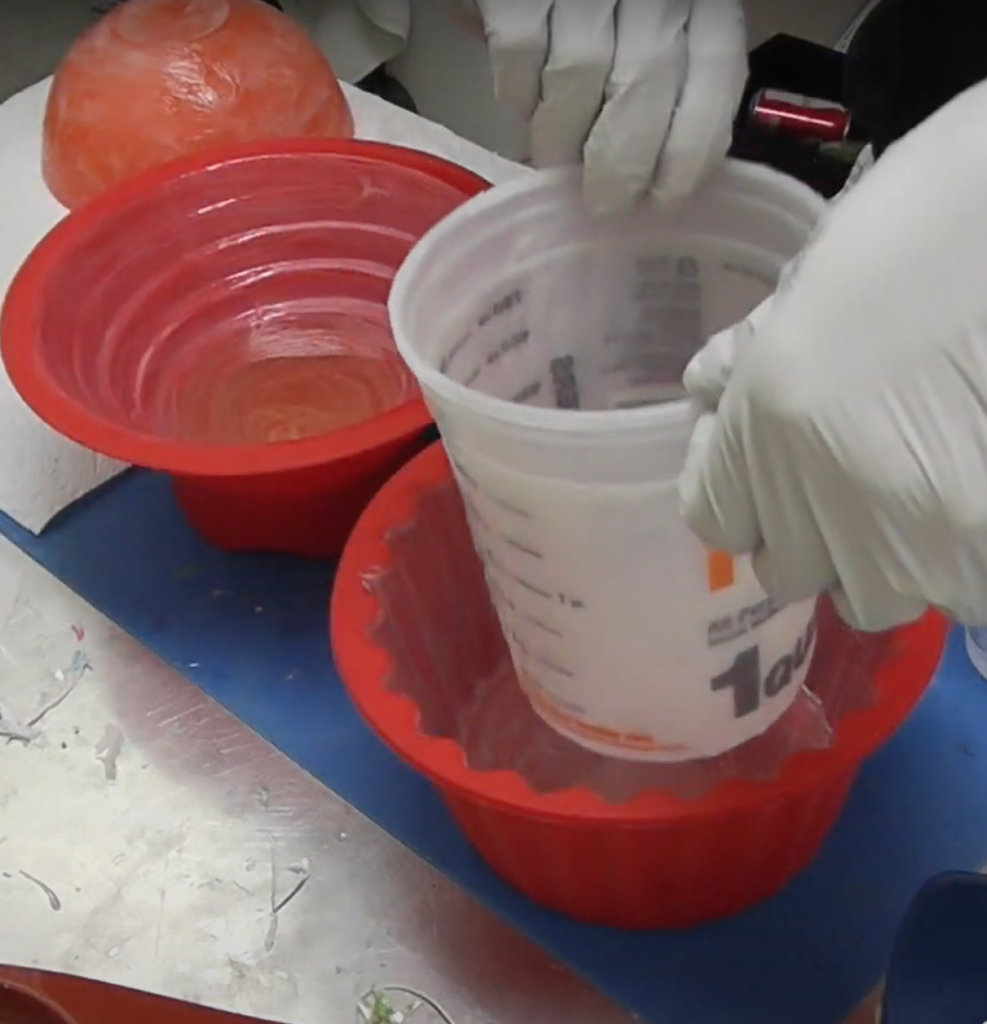
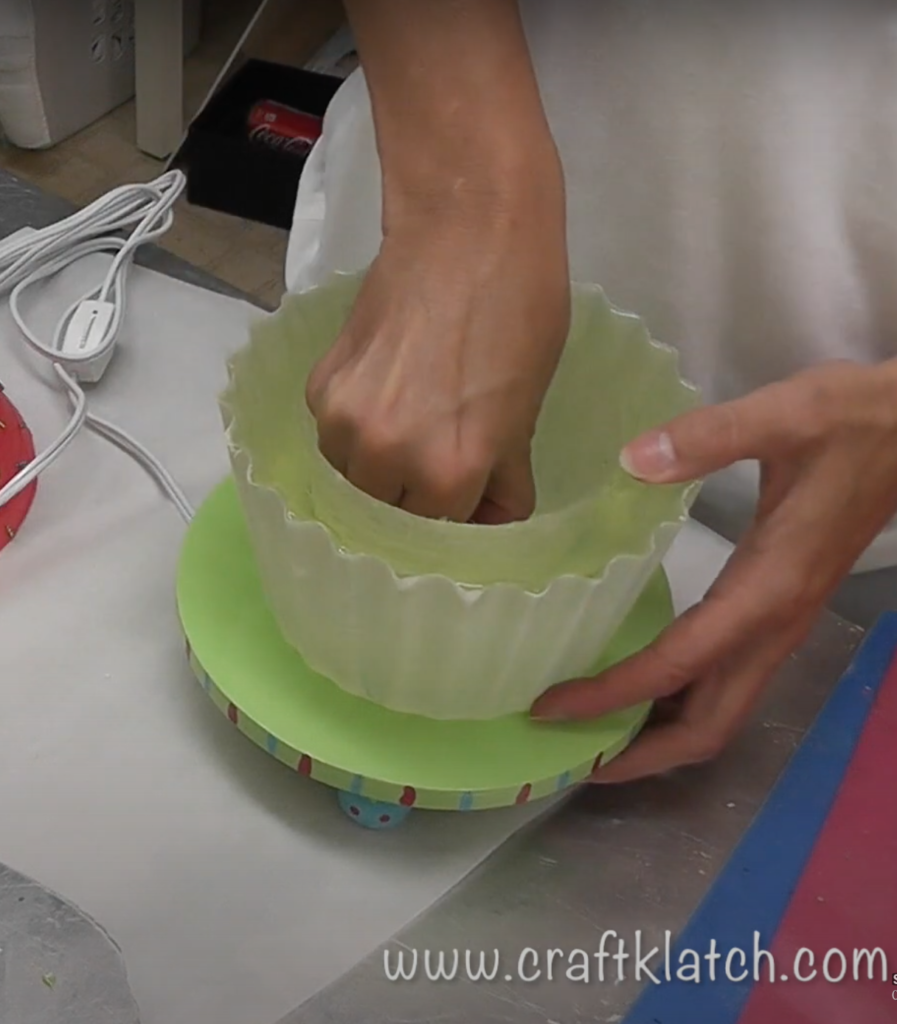
Step 3: A bucket and a bowl
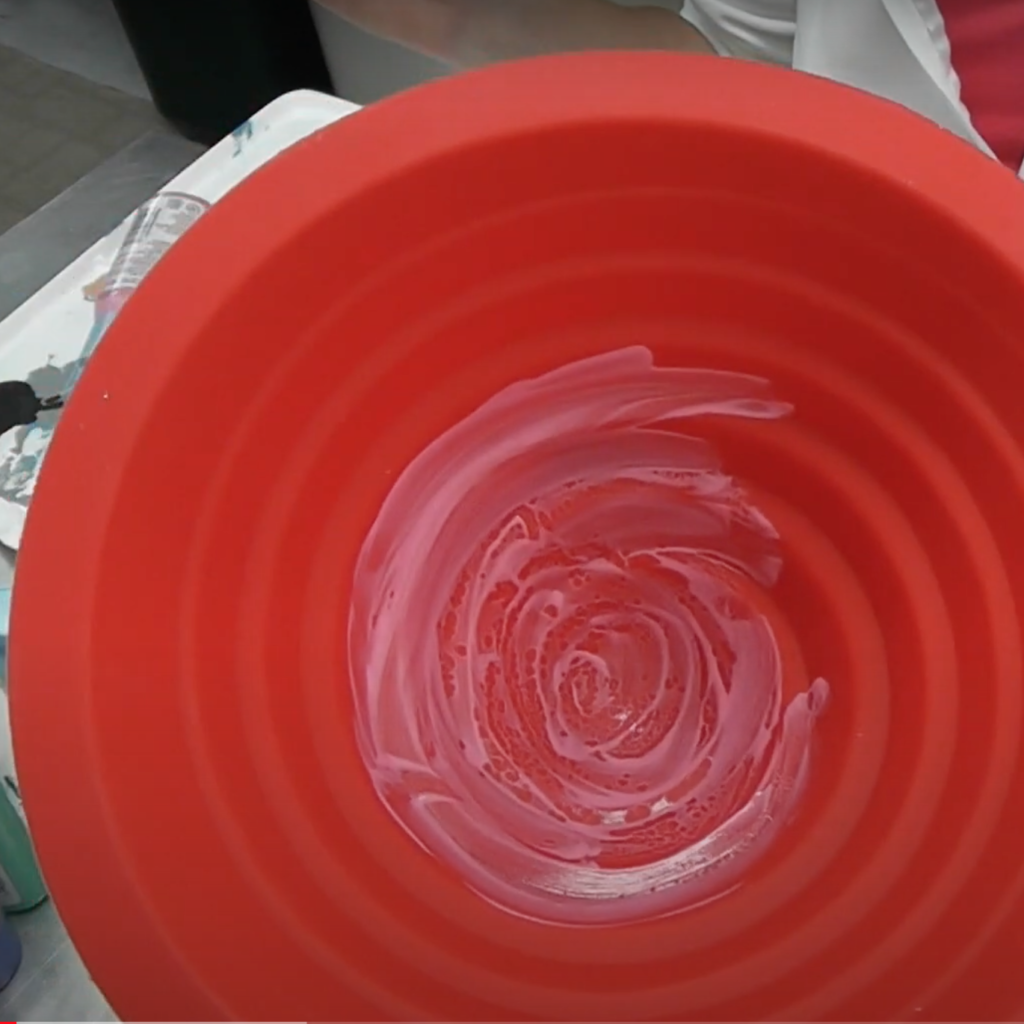
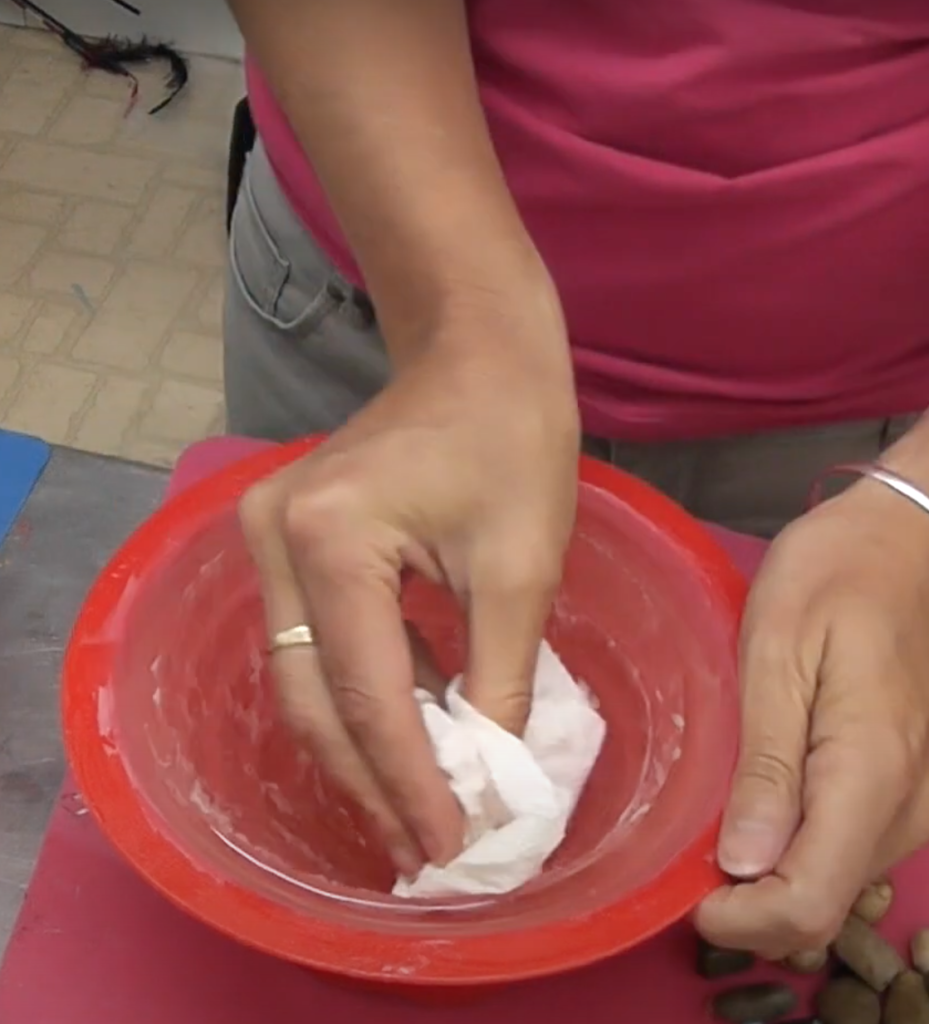
Once that layer hardened, I put a layer of Vaseline on the outside of the plastic bowl. The Vaseline is used as a release agent.
I did the same with the pail/bucket.
TIP: When choosing a bucket and a bowl, make sure they are thin plastic and make sure are the right size to fit into the cupcake mold.
See the video to see how they should fit in the molds.
Step 4: Give it a little weight
I placed the bowl and bucket into the mold halves and used rocks to weigh them down. We don’t want our bowl or bucket to float.
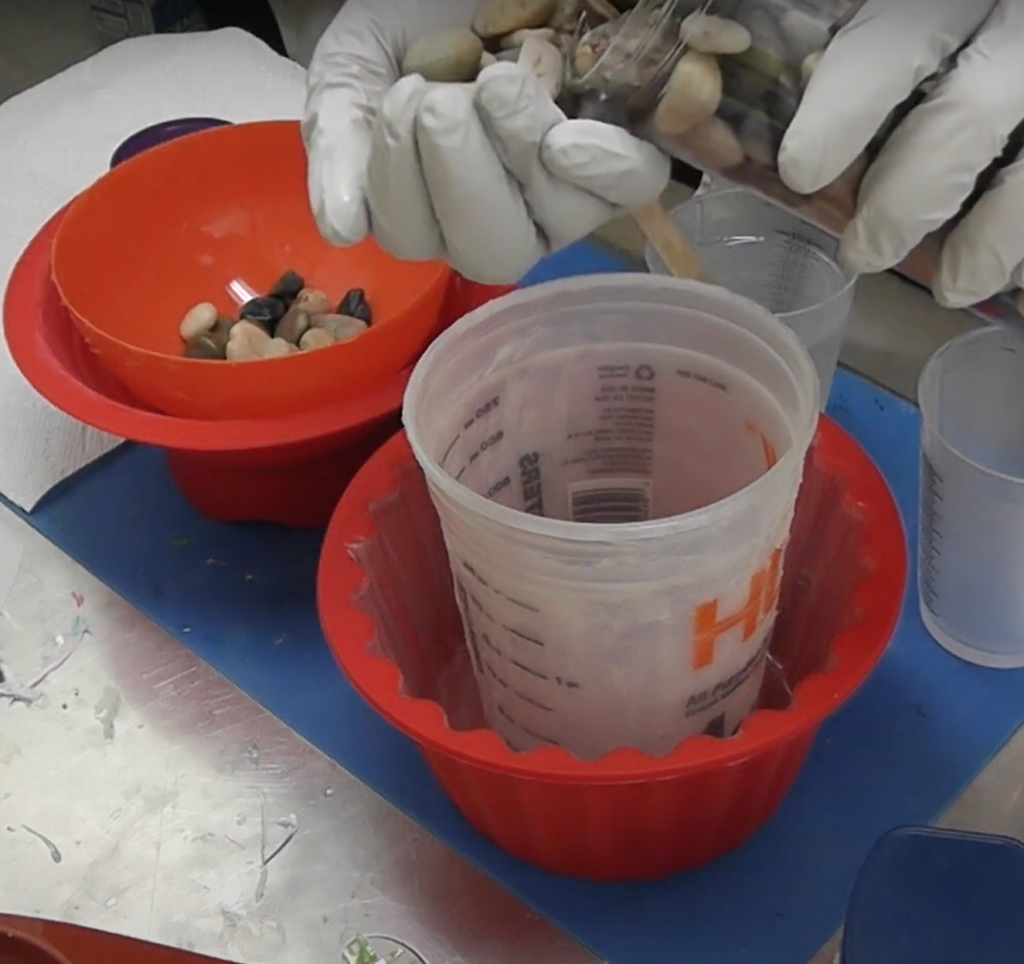
Step 5: And a little more resin
I prepared more resin and poured it into the molds. Carefully, I poured between the silicone mold and the bucket and between the silicone mold and the bowl.
Once poured, I allowed it all to harden.

Step 6: Keep adding
I continued adding resin to the molds until they were full. Once hardened, I removed the bowl and the bucket and I then I removed the resin from the molds.
FYI: The inside of the mold is a matte finish, not shiny. I usually prefer a shiny finish, but this actually worked out really well and gave it even more of a frosty feel.
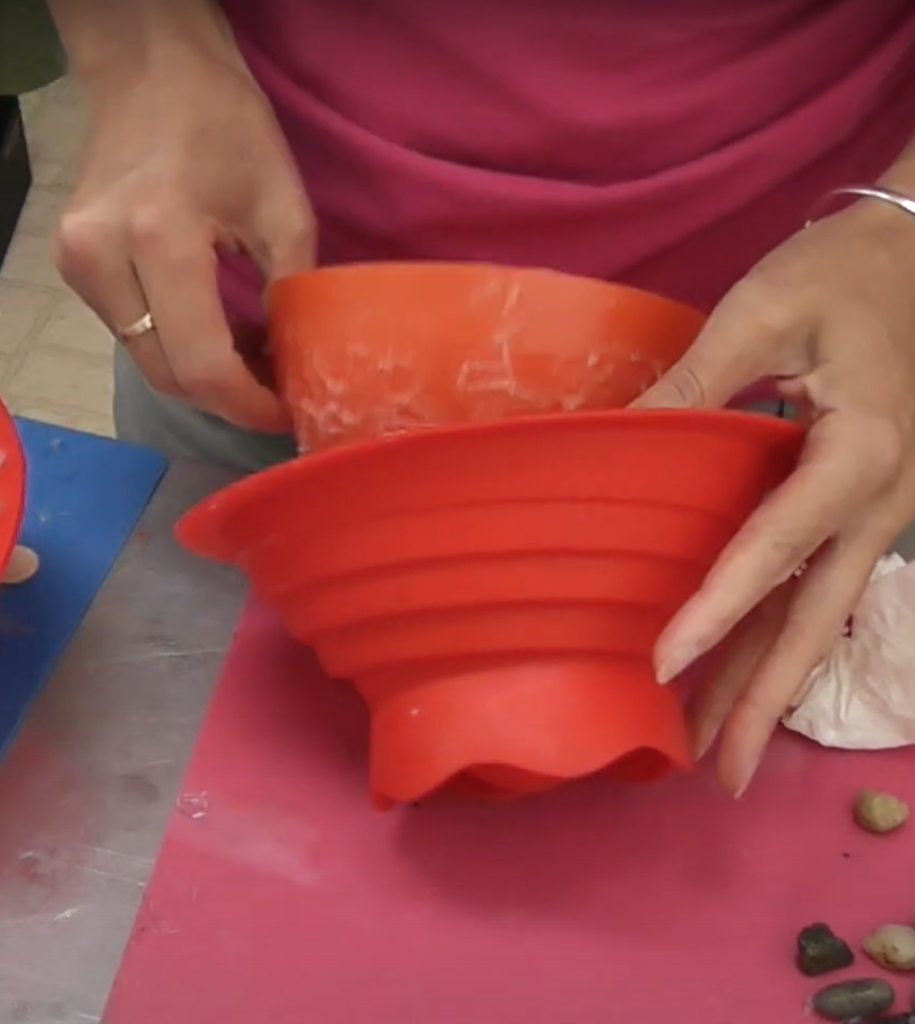
Step 7: Give it a wash
I had generously shmeared the Vaseline on the bucket and the bowl, so it was still pretty goopy when I pulled them out.
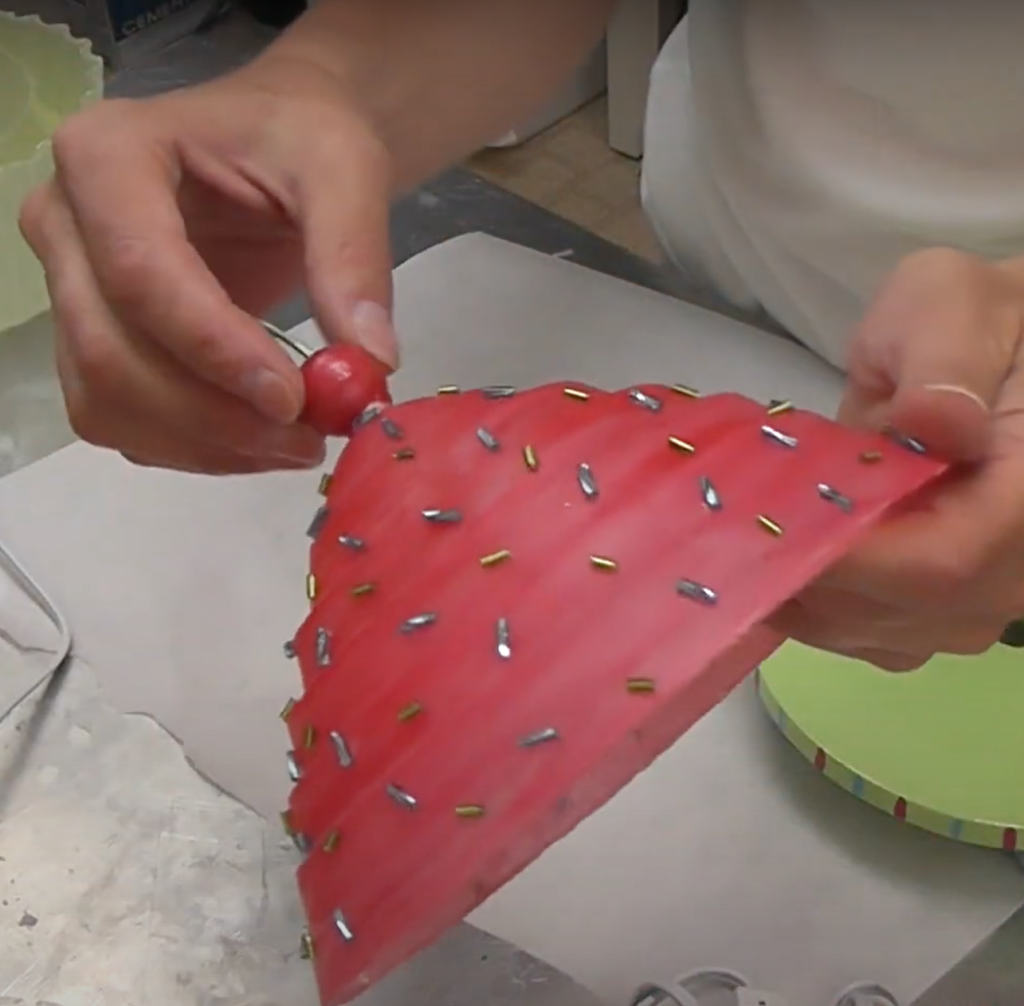
Step 8: A little sparkle and sprinkles to make this look like a cupcake
I used a clear drying glue to glue on bugle beads. The bugle beads are like little sparkly cupcake sprinkles!
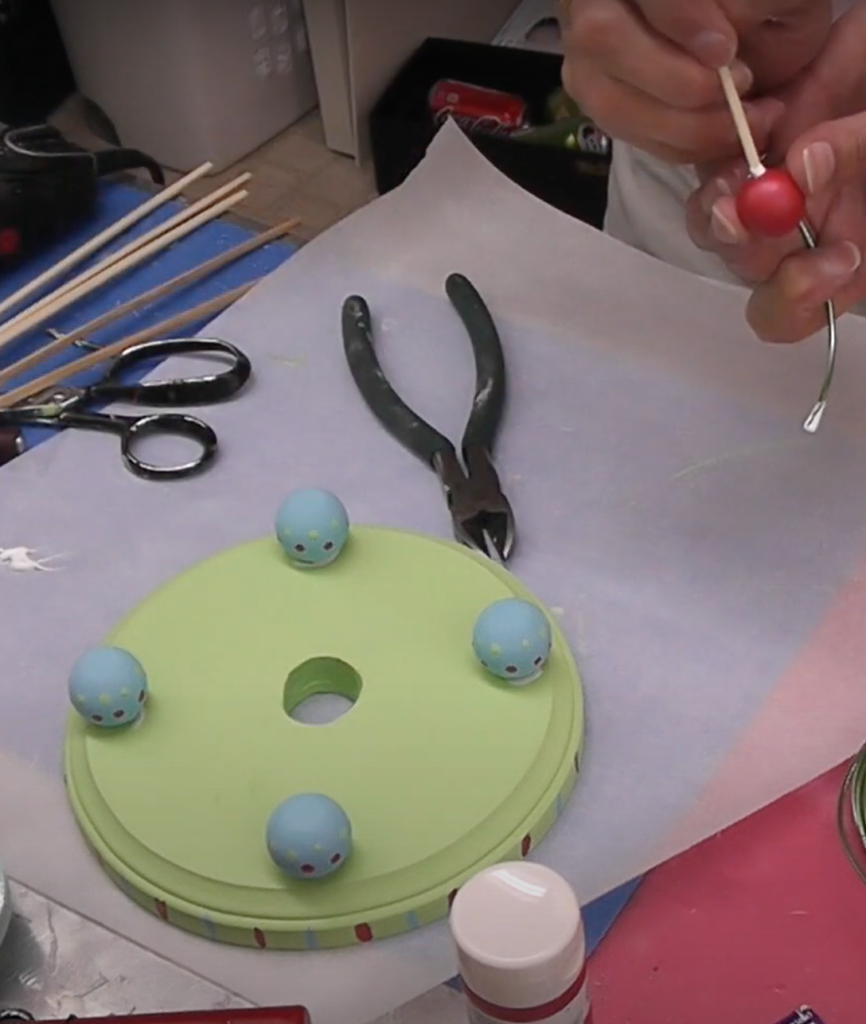
Step 9: With a cherry on top
I had a wood bead that I painted red. I turned it into a cherry by gluing green wire in it to look like a cherry stem. Then, I glued it onto the top of the cupcake.
TIP: You can run a screw through the inside of the cupcake top, to keep the cherry in place more permanently.
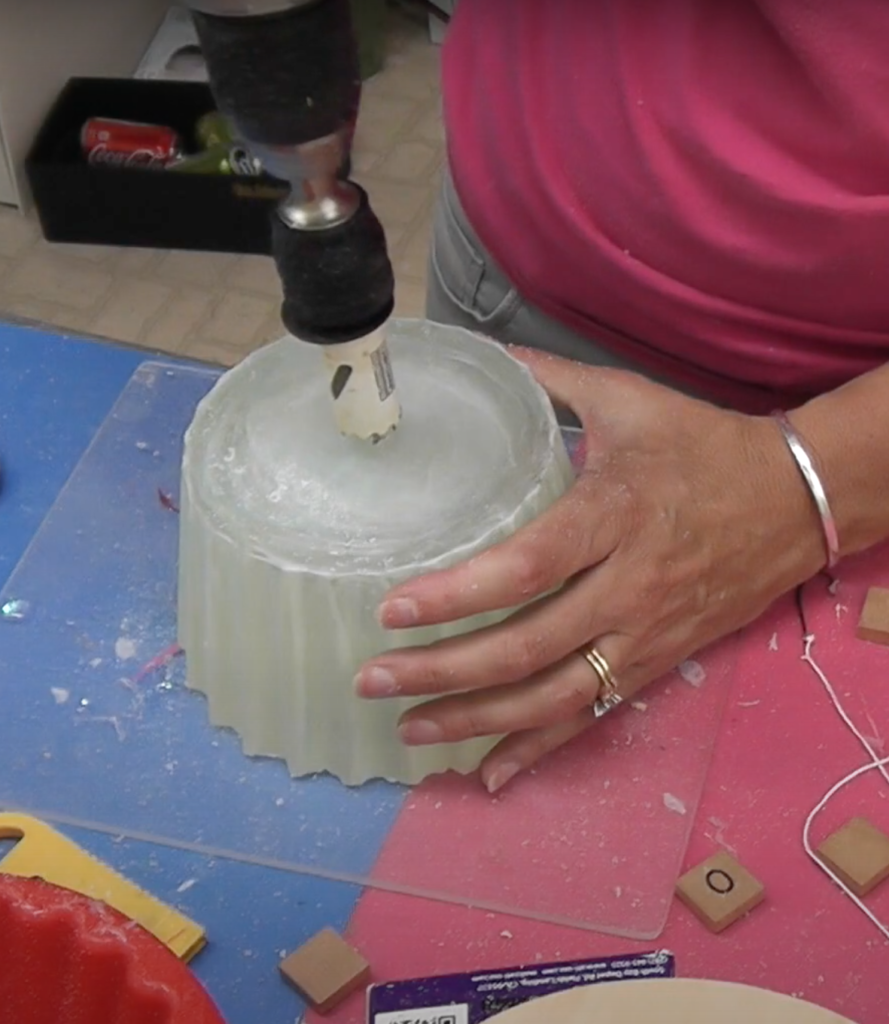
Step 10: Drill it
I drilled into a wood plaque. I made sure the hole was large enough to fit the light kit I bought.
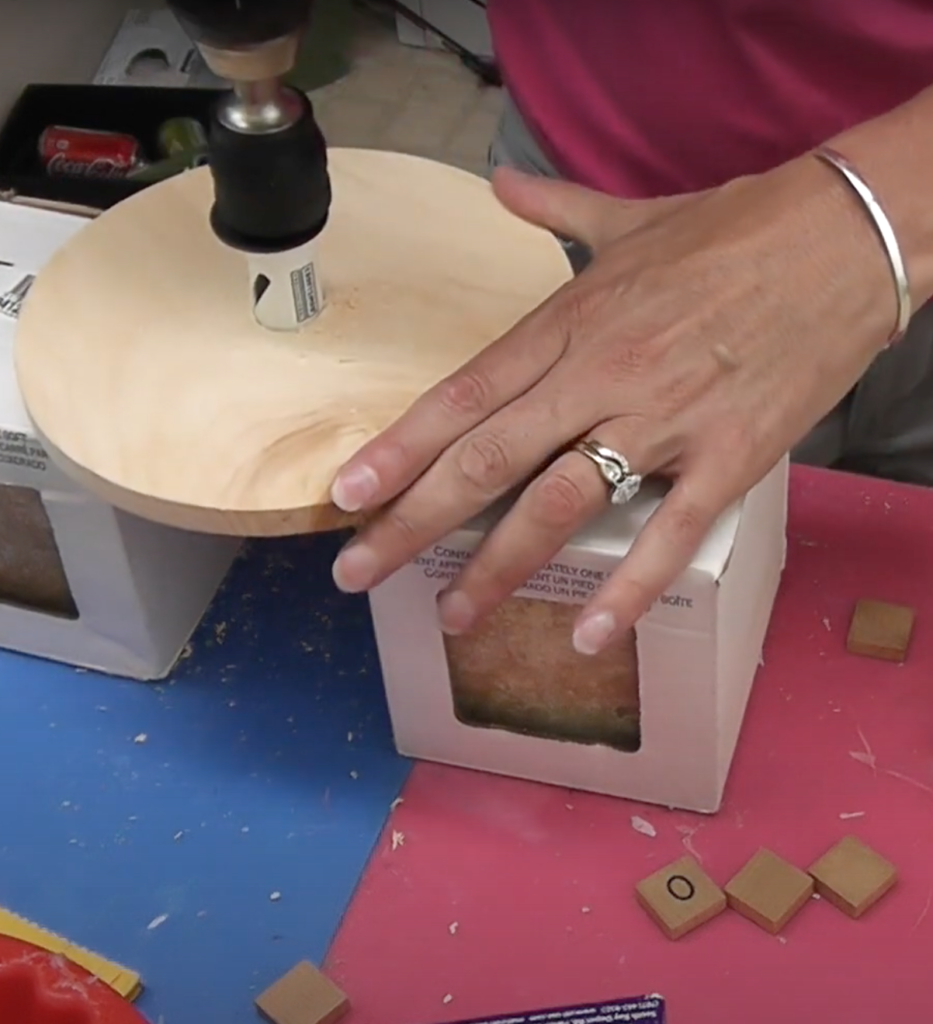
Step 11: And drill again
I also drilled a hole into the bottom of the cupcake – again, large enough to fit the light kit through.
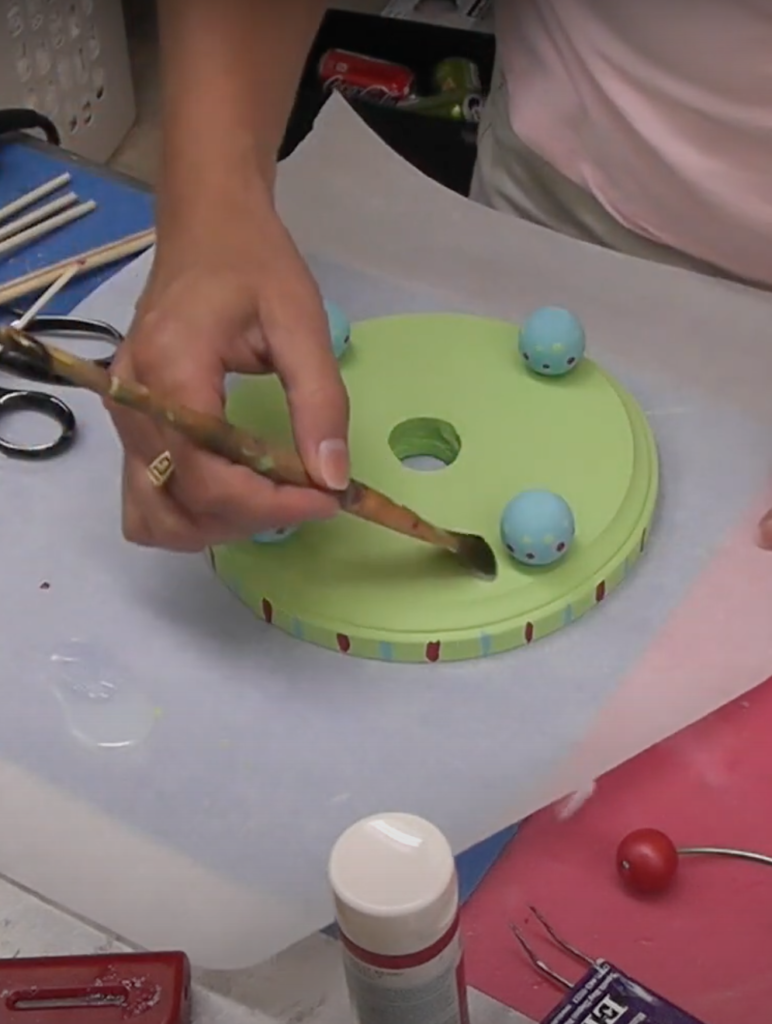
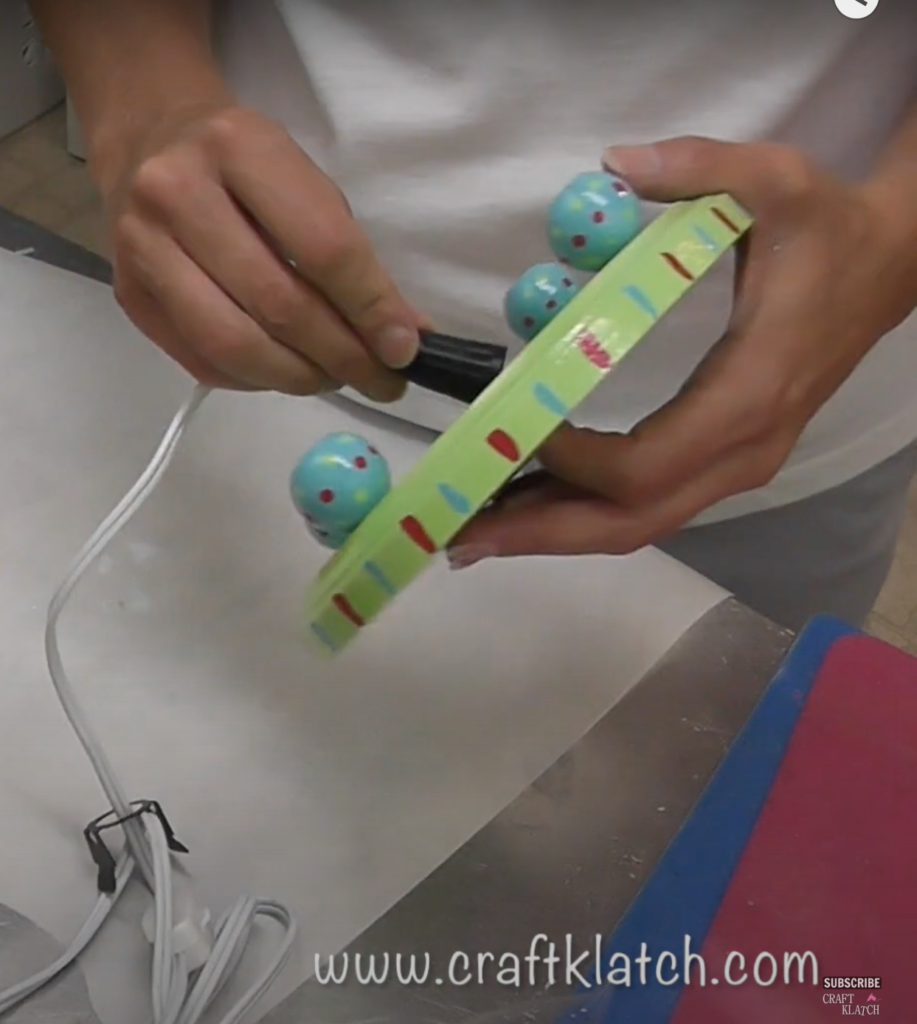
Step 12: Paint a plaque
You can paint the plaque any color(s) you want. I went with a light green, with blue feet (dowel caps) and used the cherry color as an accent.
Step 13: Give it a seal
I sealed all of the pieces with Triple Thick. That will give a shiny finish, but you can use a matte or satin varnish instead. When everything was dry, I glued the dowel caps onto the bottom of the plaque.
I used the dowel caps so it would raise up the plaque. With the plaque raised up, I can run the cord under the lamp.
Step 14: Feed it
I fed the light kit through the bottom of the plaque and through the bottom of the cupcake.
Step 15: Clip it
I then clipped it into place and added a lightbulb.
I put the top on and lit it up!
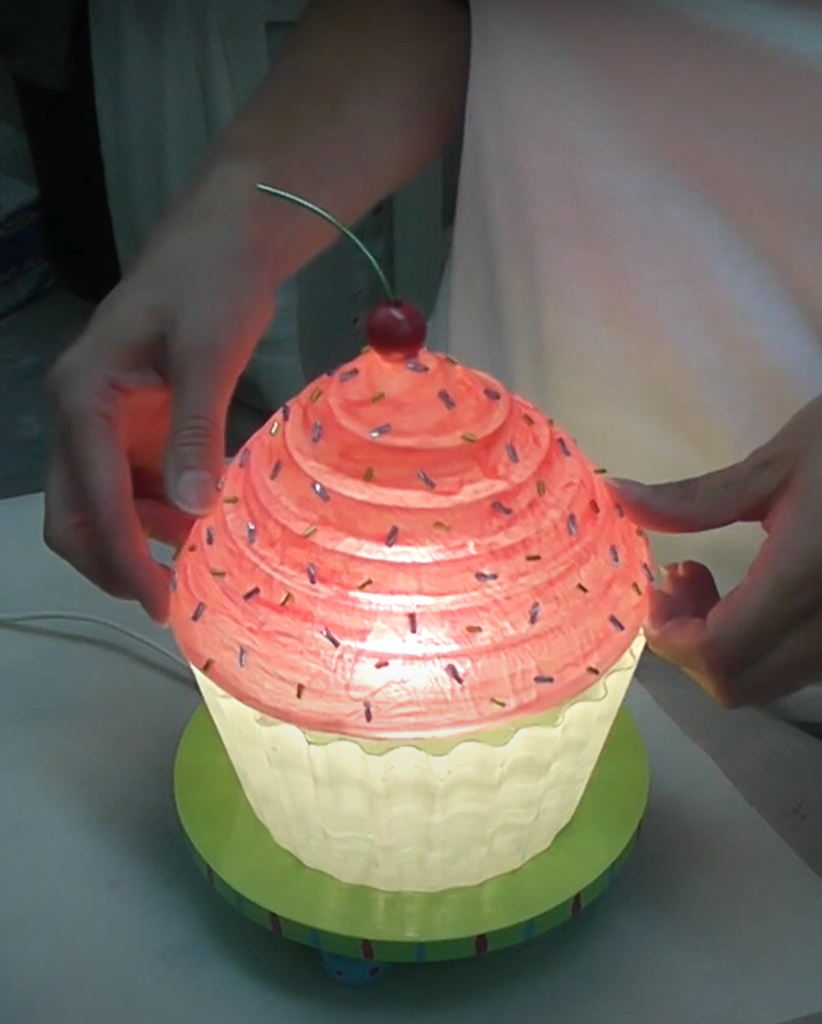
That’s it! I impressed myself on this one!!
If you don’t want to use a light kit, there are battery operated lights that can just be placed in the cupcake to light it up. That way, you can put it anywhere.
Like these:

If you are looking for another fun lamp, that is super easy and fun, try the Gum Ball Lamp DIY or another resin lamp is Golf Ball Resin Lamp DIY.
If you want to make fun and easy Christmas ornaments, try Cupcake Ornament Craft Tutorial.
Thanks for stopping by!
Remember: Life’s too short not to shimmer, so grab your glue gun and your glitter!™ Stay safe!
Mona
That is so cool!!!
Love the idea. However ETI resin products have issues at 130° and will soften at 180°. Lightbulbs do produce a lot of heat. You might want to consider deleting this to be used as an unattended child's night light.
This looks fantastic!! thanks for sharing this great tutorial
Unknown – obviously you would use LED lights and not traditional light bulbs.
Couldn’t you paint the resin after you unmolded (not a real word) it?
Hi Carla-
I know unmolded is not a real word but it’s a quirk for me. Demolding is correct but it doesn’t feel like a real word to me. 😉
Yes, you could paint it after. However, by painting it first, it actually becomes one with the resin and cannot scrape off.
Hope that helps!