Learn how to give a table makeover, with a tropical touch, in this episode of Garbage to Gorgeous! It’s a fun pet makeover for my cats, but the technique can be applied to other furniture projects!
Materials list:
Table: check out curbs and thrift stores
Stripper: https://amzn.to/2YVF2EP
Acetone (to clean): best to go to home improvement store
Scraper: https://amzn.to/31CXPqt
Green paint: https://amzn.to/31xG7o4
Blue paint: https://amzn.to/31znu30
Painter’s tape: https://amzn.to/2KsZtVF
Cricut on Amazon: https://amzn.to/2GV6zki
Cricut from Cricut: https://shrsl.com/1kzdi
Removable vinyl: https://amzn.to/2Tf4p1A
Transfer tape: https://amzn.to/2Y49FJ9
Here is a video tutorial, so you can see exactly how I did it:
Directions:
1. I stripped the old finish off of the table, so I could start fresh. I brushed on the stripper and let it sit for a while.

2. Once it started working, I used a scraper and scraped off the stripper and old finish.

3. I took acetone and cleaned it all up.

4. Only after I had stripped and cleaned the table, did I realize I could take it apart. That made life easier! I sprayed it (top and bottom) with two coats of the green paint.

5. I created a design in Cricut Design Space. I knew I wanted to go with a tropical cat theme, so I thought a Hemingway quote would be appropriate!

6. I cut out the images with my Cricut and I cut the images from vinyl.

7. Once cut, I removed the excess vinyl, which is called weeding.

8. I trimmed around each image, so I could get a better idea of placement.


9. Then I put transfer tape onto each image.

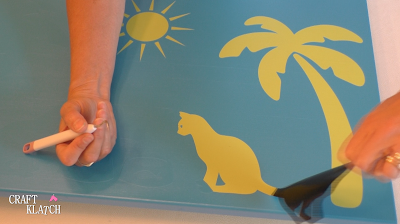
10. I placed all of the images on the table top and used painter’s tape to keep them in place. This way, I know they won’t move when I’m working on a different piece. Oh! I also recruited Greg to help!

11. We carefully went one by one and removed the transfer tape and smoothed the vinyl onto the table top. Greg also used the scraper to burnish the vinyl onto the table.


12. Then we removed the transfer tape.

13. It’s good to burnish the vinyl onto the table one more time. Then, I took it to the garage and sprayed the green all over the whole table. This sealed the vinyl and ensured that we would get sharp edges.

14. Once dry, I followed up with the blue paint. This will likely take at least three coats.

15. Once dry, I carefully removed the vinyl.


16. I put the table back together.

That’s it! I used indoor/outdoor paint to seal the table and now it can be used indoors or out!!!

I used fun contrasting colors.

Grayson seems to like it too!

Thanks for stopping by! Remember: Life’s too short not to shimmer, so grab your glue gun and your glitter!™ Stay safe!
Mona


