Learn how to make a Cheeseburger Resin Coaster! It’s an easy resin craft and whimsical home decor idea! These would be fun for summer, foodies, 4th of July, or anytime!

You will need:
Plywood: https://amzn.to/2YpI0RH
Saw: https://amzn.to/30W9jVv
Unicorn Spit: https://amzn.to/2ZSZcnD
Acrylic paint: https://amzn.to/2ZW6mbq
Paint pens: https://amzn.to/2JWAw4E
Torch or lighter: https://amzn.to/2ybHdtc
Cork shelf liner: https://amzn.to/2YjiIVD
Glue (optional): https://amzn.to/314htLL
Resin (use whatever resin brand you like):
Easy Cast: https://amzn.to/2yjYmBC
Art Resin: https://amzn.to/2yk9X3z
Clear Cast: https://amzn.to/2z4rxGw
This is the resin I used for this project:
FX Poxy: https://amzn.to/2AF3Pkk ~ According to the manufacturer, this one is heat resistant to 500 degrees F.
Here is the video tutorial, so you can see exactly how I made them:

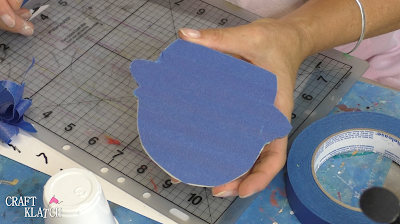
2. I cut it out and traced it onto the plywood.

3. I cut it out.

4. I sanded the edges.

5. I drew the lines on the wood cut outs, so I could use them as a guide for painting.


6. The first one I did was with the Unicorn Spit. See video to find out how I mixed the colors and painted the burger. I did the second one with acrylic paint.


7. I used a skewer stick paint little sesame seeds on the bun. For the seeds, I used acrylic paint.

8. I used my paint pen to outline the burger.

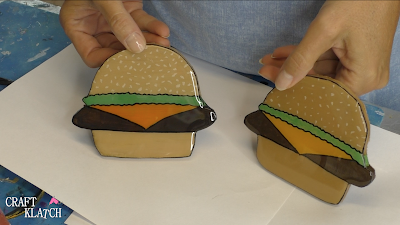
Here is how they look so far.

9. Once dry, I applied painters tape to the back.

10. I burnished it down, to make sure the tape is well stuck.

11. I used my craft knife to trim off the excess tape.

12. I mixed resin and poured it onto the coasters.

13. I used my stir stick to move the resin around.

14. I made sure to get the edges too.

15. I repeated with the other coaster.

16. I used my lighter to pop the bubbles.

Here they are with the resin, but we’re not done!

17. I used my craft knife to cut along the edge, so I could remove the tape.


18. I used acrylic paint to paint the back of the coasters. This is simply to make sure the raw wood never gets wet.

19. I used glue, just on the edge to prevent future peeling.

20. I put the coaster on a piece of cork shelf liner.

21. I trimmed around to remove the excess cork.

Here they are all finished!