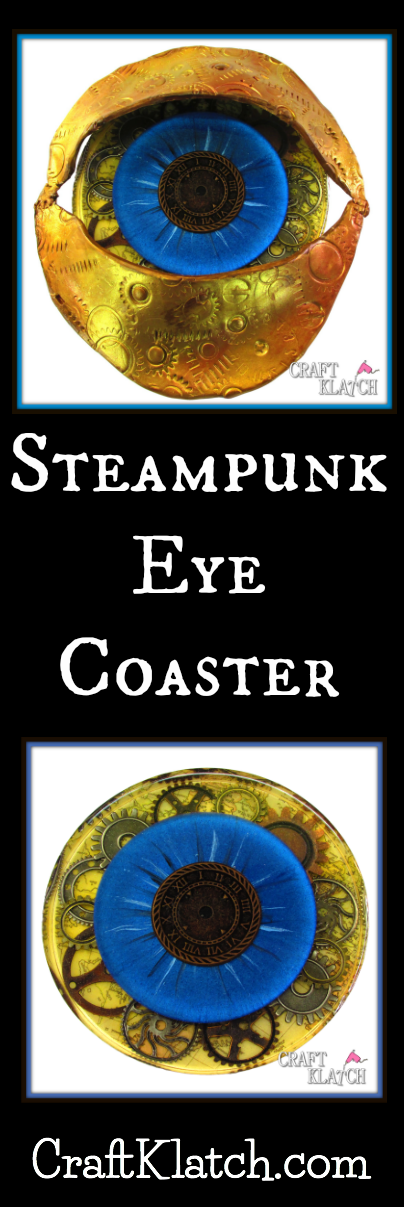
I finally tackled a steampunk coaster and I think I did okay! I really struggled with it. I understand steampunk and at the same time, I kind of don’t. After much thought, I decided on a steampunk eyeball.
The links below help support this channel, as I may earn a small commission at no extra cost to you.
FX Poxy: https://amzn.to/2AF3Pkk ~ According to the manufacturer, this one is heat resistant to 500 degrees F and is UV resistant.
Here is the video tutorial:
Directions:
1. Cut out map scrap book into a circle that will fit into the coaster mold.
2. Mix one ounce of resin and split into two 1/2 ounces. In the one add a drop of the amber pigment. In the other, add some blue pigment powder. You can also add a darker aged gold, to give it a little aged look.
3. Once mixed, take the amber resin and pour some of it in the coaster mold. Pop bubbles with lighter. Slide in the map circle. Add the rest of the resin and let the paper soak up the resin. Press down with your stir stick, to make sure all the bubbles are out from underneath. Pop bubbles.
4. Take the blue resin and pour it into the mold with the smaller circles. Pop the bubbles with the lighter and let it cure for 12 hours.
5. Take the metal cogs and gears and put them in the resin with the map. You only need to do the perimeter of it and if some overlap, that’s okay too. Pop bubbles and allow to cure for at least 12 hours.
6. Remove the blue resin from the mold. Take the metallic blue and metallic acrylic paints and paint lines out from the middle, like you would see on an eye. Paint the center black. Allow to dry.
7. Glue the metal clock face onto the middle of the blue resin and allow to dry.
8. Mix two more ounces of resin and pour part of it into the mold with the map and gear resin. Place the blue resin piece into the map resin, be sure to center it. Pour remaining resin over it.
9. Pop bubbles with lighter and allow to cure at least 12 hours. Once cured you can unmold it.
10. If you want to make the eyelids, mix brown and tan polymer clay and condition it. Run it through the pasta machine to make it flat, or use a rolling pin.
11. Wrap the coaster in cling wrap, so you don’t get polymer clay fingerprints on it.
12. Take the sheets of polymer clay and lay them over the eye coaster.
13. Cut into the shape of an upper lid and a lower lit and place onto the coaster, to see if it fits.
14. Remove and stamp gears and clock faces onto the eyelids.
15. Using the pigment powders, I used a combination of copper, gold and an aged gold. I brushed it on with a soft brush.
16. I flipped over the lids and brushed pigment powder on the back.
17. I crunched up some aluminum foil to simulate the shape and size of the coaster and placed it under the eyelids. Then I baked it, according to the package directions.
18. Once baked, allow to cool.
That’s it! Now you can use it as a sculpture, or a drink coaster!
Thanks for stopping by! Remember: Life’s too short not to shimmer, so grab your glue gun and your glitter!™