I was thinking my coffee table needed a little something to brighten it up. I’ve had a stick lying around for ages and it was dried out perfectly and now seemed like the perfect time to do something with it. That’s how I came up with Birds On A Stick!

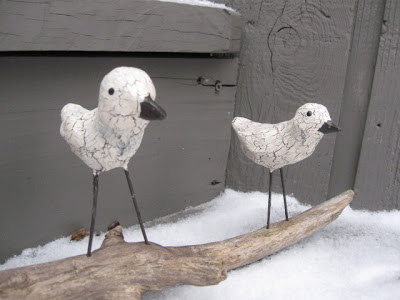
I wanted them to have a kind of folksy-craftsy-distressed look to them.
You will need:
– A stick with some character
– Paper clay (or any other clay you like to work with)
– Aluminum foil
– Wire hanger
– Hot glue
– Crackle medium
– Parchment paint
– Dark brown paint
– Stick with character
– Matte varnish
– Small piece of wire
Here is the video tutorial:
Directions:
1. Clean and dry your stick. Apply a matte varnish onto the stick and allow it to dry.
2. Take aluminum foil and mold it into the shape of a bird.
3. Cut two pieces of a wire hanger for the legs. Stick the legs into the foil bird. Remove – put a small amount of hot glue into the hole and reinsert the legs.
4. Take a small piece of thin wire – if you have a scrap lying around, use that. Bend in half and insert into the head for the beak. Remove – put hot glue into holes and reinsert the wire.
5. Cover the bird with Paperclay. Use your fingers to smooth it and you can always dip your fingers into water to better smooth the clay.
6. Add two pieces on either side for the wings and smooth into the body.
7. Allow to dry overnight.
8. Paint bird with a dark brown and allow to dry.
**Tip: Normally I would have spray painted the legs, but since it’s cold here and I don’t spray paint inside, I used a metal primer and then painted them the same dark brown. You can find metal primer at the craft store in small bottles.
9. Apply the crackle medium – according to package directions. Allow to dry – mine said 15 to 40 minutes or until tacky, but not completely dry.
10. Apply your topcoat of paint – be careful not to over-brush, or you will lose the crackle.
11. As it dries, it will begin to crackle. Allow to dry.
12. Apply a matte varnish and allow to dry.
13. Drill holes into your stick to insert the birds legs into.
14. Take a dab of glue and put it in the hole and insert the birds – the dab of glue will give them additional support.
That’s it!
I was going for a very specific look, but you can apply the techniques I used here and create a very colorful and whimsical display! Match your decor!
Thanks for stopping by! Happy Crafting!
Mona
This is the clay I used (it is one of my favorites!):
Very creative and cute!
Susan
SunflowerHugs.blogspot.com
Thank you Susan!
Very cute. I'd love to have you link up to What to Do Weekends Party also. I'd love to make these, too. Linda
craftsalamode.com/2013/01/sweet-and-wonderful-friends-its-time.html
Thanks Linda! I'm writing myself a note. What days are the link up?
Mona
These are pretty incredible!!!
Beautiful project and what a perfect gift for a bird lover!!!
Hugs,
Thank you so much Suzan! I really appreciate it!
Hugs right back!
Mona
Lovely! I love the crackled look to the paint.
Thanks so much Ana!
Mona
Love the crackle finish on the birds. Great job!
Thank you so much!
Mona
Saw this on Diana Rambles Pin Me Linky Party #19. Pinning! My posts are #186 and #188.
Looks just like those birds on the beach! Cute!
Aw, cute. I pinned onto my beachy board. They remind me of shore birds:) I'm going to make a sail boat with a stick like this using some striped shirt fabric for the sail:) Stop by sewsweetvintage.com/2013/02/lombard-gable.html