Today I am going to transform an old school desk into a side table with a beach vibe using Unicorn Spit and Glaze Coat! It’s a coastal home decor desk makeover!
Their website: https://tryglazecoat.com #UnicornSpit #GlazeCoat
*This post is sponsored by Eclectic Products, the makers of Unicorn Spit and Glaze Coat. The ideas and opinions are all my own.
I don’t know about you, but I am a fan of free. Have you ever checked out the Craigslist free stuff section?
Ummm…
I have stuff from there…more than Greg would ever want to know about.
It’s one of my favorite places.
That is where I found this little gem a few years ago.
It’s a small desk and I knew I wanted to give it a makeover…I just didn’t know how I was going to do it.
Since I love coastal decor, when Unicorn Spit reached out to me, it came to me! I knew EXACTLY what I wanted to do!

Here is a quick desk makeover video tutorial, so you can see exactly how I did it!
Products I used:
*This blog uses affiliate links. As an Amazon Associate I earn from qualifying purchases.
- Ning White Unicorn Spit: https://amzn.to/2DNspnO
- Weathered Daydream Unicorn Spit: https://amzn.to/2DNWS4Z
- Zia Teal Unicorn Spit: https://amzn.to/2ZWCGHO
- Glaze Coat (top): https://amzn.to/2DQa1dN
- Stripper: https://amzn.to/2vBm0az
- Acetone: best to get it at the hardware store
- Sealer (legs and inside): https://amzn.to/2LkGUp5
- Torch: https://amzn.to/35Ew31T
Directions:
Step 1: Let’s get this desk makeover started!
I started by taking off the top. Whenever you can take a piece apart to paint or stain it, do it. It allows you to get in between to clean and remove any old finish much better than if you left it together.

Step 2: Start stripping!
I applied the stripper. Use any stripper you like, but be sure to read the directions. The directions will tell you how to apply it correctly, how long it takes to work, and how to clean it up. It will also let you know if you need any safety equipment while using it.

Step 3: Take your time!
I made sure to get the stripper everywhere and then I let it sit.
I read the directions to see how long it would take. If you are impatient (like me), you will go back every five minutes and just check on it. Do a little scrape here and there to check on the progress.
If you read the directions, it will ease your mind and you might be able to stop yourself from constantly checking because you will know what to expect.
So, don’t rush it.
You want to make sure your stripper has time to soak through that finish and get the job done. If you don’t give it enough time, you will end up taking more time and you will end up using more product.

Step 4: Scrape it and make it start to look like a desk makeover!
I scraped off the old finish. I don’t know what kind of finish it was.
It almost had a waxy quality to it.
Some parts of it almost became hard and flaked off and others became liquified. You just never know what kind of finish you are taking off of old furniture.


Step 5: Clean it up!
After you strip it, you need to clean it. This is another reason to read the directions on the product you use.
My directions said to clean it off with acetone.
It takes the excess stripper off, which is important because you don’t want it to get in the way of your final finish. You want the final finish to look as nice as possible.
Go into it realizing stripping furniture is a messy business.
I put a garbage bag under my piece to collect the mess that inevitably happens. The clean-up is my least favorite part of this type of project.

Step 6: Prime – if needed – don’t skimp on the desk makeover!
In the case of the desk, the inside had ink stains that did not go away with the stripper. They did get lighter, but they were there to stay.
I didn’t want them to show in my finished piece, so I primed the inside. Since I wanted to give it a pop of color anyway, priming the inside and covering the stains did not bother me.


Step 7: Start the Unicorn Spit Transformation!
It was time to break out the Unicorn Spit. For the desktop, I used the Weathered Daydream Unicorn Spit. I did water it down, which is totally okay to do with the Unicorn Spit.
I simply brushed it on and then wiped it off. Such a great color!


Step 8: Break out some more of that Unicorn Spit!
Once the primer on the inside of the deck dried, I used the Zia Teal on the inside of the desk. That is a pretty color! That beach vibe is starting to take over the desk makeover!

Step 9: Now for the exterior!
I used Ning White on the exterior of the desk. I put it on, wiped it off, and let it dry. The look I was going for was a whitewash or driftwood kind of feel. I did not want it to be a solid white.

Once it dried, I found the yellow or gold tone of the wood showed through more than I would have liked.
I’ll have to fix that!

Step 10: Tone down that gold!
To cut the gold/yellow tones, I used a lot of the Ning white and a little bit of the Weathered Daydream. I applied it to the desk and lightly wiped it off.
I made sure I was blending both colors because I did not want streaks.
Blend. Blend. And blend some more!


Step 11: Time for the glaze portion of the desk makeover!
Once everything dried, I taped off the top of the desk to ensure the legs and inside were protected.
Then, I mixed the Glaze Coat for the top.
I wanted the top to have a shiny and durable finish, while the legs kept more of a weathered wood look.
FYI: I sprayed the legs and the inside with a sealer. The Unicorn Spit should be sealed because if left, it could smear if it were to get wet.

Step 12: Time to break out the Glaze Coat!
I poured the Glaze Coat onto the top of the desk and spread it around. I used my stir stick to get it moving.
Depending on the size of the piece you are glazing, you might want to use something larger like a paint stick.


Step 13: Torch it!
I used my torch to pop the bubbles.
If you watch me regularly, I use a lighter for many of my resin crafts.
However, for large items, I prefer my torch because it covers more area more quickly. It’s a much more efficient way to do it.
Then, I just let it cure.

Step 14: Dress it up!
I found a small bud vase that fits into the inkwell and then I added a silk flower.
You can add a fresh flower instead and change it up for the seasons.

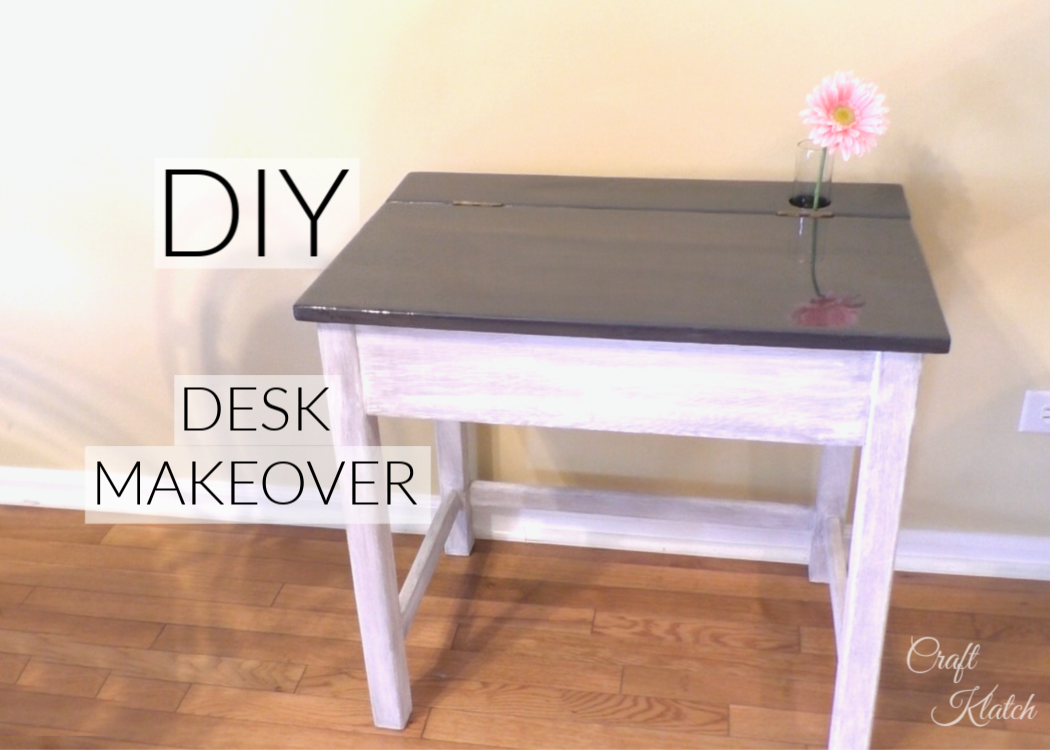
This is how it looks all done! It has a fun weathered, beachy feel to it!

The inside has an unexpected fun pop of color!


This happened to be a small desk, but you can apply what I did in the desk makeover to any furniture you want to refinish.
Use it for inspiration when you design your Home Office Guest Bedroom Combo.
Be sure to check out my other Coastal Decor Projects!
I hope you like it! Thanks for stopping by and remember: Life’s too short not to shimmer, so grab your glue gun and your glitter!™ Stay safe!
Mona
