Repurpose a gingerbread house mold to craft a spooky zombie house for Halloween using resin, paint, and creepy decorations. Perfect for long-lasting decor!
Halloween is the perfect time to get creative with your decorations. I’m excited to show how you can use a mold for things other than their original intended use.
I have the silicone gingerbread house mold which was originally made for baking traditional gingerbread houses. But I don’t bake gingerbread houses.
I bought it to create a resin Christmas gingerbread house.
But my brain didn’t stop there…I also used it to make an Easter Bunny house and now…
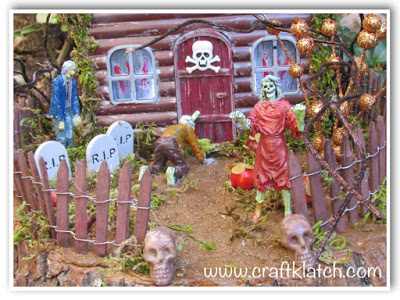
I used it to create one of the best haunted house decorations…
…EVER!
You are going to pull this out year after year and it is going to become a Halloween tradition!

Materials You’ll Need
Before we dive into the step-by-step instructions, gather the following materials:
*Disclosure: This blog uses affiliate links from Amazon and other retailers. I earn a small amount from qualifying purchases at no additional cost to you.
- Silicone gingerbread house mold
- Pigment dyes for resin – You can customize your colors, but I opted for various shades.
- Acrylic paint – I used gray, brown, red, and black for a weathered look.
- Sheet moss and Spanish moss
- Zombie figurines – I found mine at Michaels.
- Base – I used a basswood base.
- Brown sand
- Glue – I used E6000, Elmer’s, Ultimate, and hot glue.
- Various decorations – I included skull beads, resin tombstones, a fence, fall picks, plastic spiders, and a skull sticker.
- Resin:
- When deciding on which resin to use, there are a lot of qualities that might be appealing, UV resistant, price, heat resistance, etc. Just make sure to select a resin that fits your needs.
- Use whatever brand you like:
- Easy Cast
- Art Resin
- Let’s Resin
- Promise Epoxy
- These are heat resistant resins:
- FX Poxy
- Stone Coat
Pro Tip: I made the resin tombstones from a mold I found. I’ll link similar items on Amazon at the end of this post, in case you want to try it yourself!
Step-by-Step Instructions
This project involves several steps, so I’ll do my best to guide you through the process. For additional clarity, be sure to watch the video tutorial linked above.
Step 1: Paint the House Parts
Begin by painting the walls, roof, and door of your zombie house:
- Walls: Use streaky brown and gray paint to give the walls a weathered, run-down appearance.
- Roof: Paint the roof with a mix of brown, gray, and black for a dark, eerie vibe.
- Front Door: Apply a combination of brown, gray, and black. Ensure that the paint looks uneven and peeling for that abandoned look.
- Allow the paint to dry completely.
Step 2: Prepare and Pour the Resin
Now, it’s time to prepare your resin and start pouring:
- Prepare Resin: Follow the package instructions to mix your resin. I started with four ounces at a time.
- Coloring: For the first batch, mix white opaque dye with black, a hint of brown, and a touch of green to achieve a washed-out wood look.
- Pouring: Carefully pour the resin into the walls of the mold, avoiding the windows. Use a stir stick to guide the resin into the window frames. Pour any excess into the door mold, and a small amount on the roof.
- Curing: Run a lighter over the resin to pop any bubbles and let it cure.
Repeat this process with a second batch of resin, adding black, brown, and green pigments for a darker layer. Pour into the mold, ensuring careful coverage around the windows and roof. Let it cure.
For the third batch, leave the resin clear and pour it into the windows and roof mold. Allow it to cure.
Step 3: Assemble the Zombie House
Once all the resin pieces have cured, it’s time to assemble your zombie house:
- Glue the Walls: Use E6000 glue on the ends of the walls and attach them together. Since E6000 takes time to cure, reinforce the joints with hot glue on the inside corners.
- Attach the Roof: Use the same method to attach the roof panels.
Tip: The house is not attached to the basswood base so you can place a battery-operated tea light or small strobe light inside for an eerie glow.
Step 4: Create the Haunted Landscape
Bring your zombie house to life by creating a haunted yard:
- Prepare the Base: Place your house on the basswood base and mark the outline with a pencil. Drill holes where you want to add landscaping picks.
- Sand and Glue: Mix glue and brown sand into a chunky mixture and spread it onto the base. Let it dry before adding layers.
- Decorate: Start placing and gluing your zombie figurines, tombstones, and any other decorations.
To hide the bases of your zombie figurines, apply the sand and glue mixture around them using a stir stick or toothpick. This also helps create an uneven, realistic yard.
- Fence: If you’re using a fence, now is the time to glue it in place. I used hot glue for this step.
Step 5: Final Touches
Now for the fun part—adding those eerie finishing touches:
- Blood Smears: Use red paint to create blood smears and sprays inside the windows. Once dry, add a wash of light gray paint to make the windows look dirty.
- Moss and Decorations: Add moss around the roof, corners, and base of the house. Incorporate small pumpkins, spiders, skull stickers, and beads to enhance the spooky vibe.
- Lighting: To illuminate your zombie house, place a battery-operated strobe light underneath. This adds a perfect spooky effect with lights and sounds!
With these steps complete, your DIY zombie house is ready to haunt your Halloween decor. This unique piece will surely become a Halloween favorite!
Ok that was really good! and got me thinking because that is what you do, stir my imagination! It made me think of fairy gardens which my sister is totally into! I think I could use this idea for something along those lines to make for her!