Learn how to make a Cricut baby shower gift tag! It’s adorable and budget friendly!
Whether you use a Cricut maker or a Cricut explore air 2, you can make beautiful things! There are so many amazing Cricut project ideas that you can find, but this is a great Cricut project for a beginner and a papercraft that will make your baby shower gift extra cute!
*This blog uses affiliate links. As an Amazon Associate I earn from qualifying purchases, at no additional cost to you.
Materials you will need:
- Cardstock: https://amzn.to/2UishSK
- Cricut machine: https://amzn.to/2Fb1n9P
- Glue stick: https://amzn.to/2GdNJD9
Here is a quick video tutorial, so you can see exactly how I made it:
Baby Shower Ideas
Before we make the baby shower gift tag, I have a couple of other baby shower ideas that you may love!
- Golf Ball Babies would make a PERFECT baby shower favors or place card holders!
- I have Baby Shower Coasters made out of clay that can be personalized and used as decorations.
- I also have some Baby Shower Footprint Coasters that are adorable!
Directions on How to Make a Cricut Baby Shower Gift Tag
1. I went into Cricut design space and started a new project.

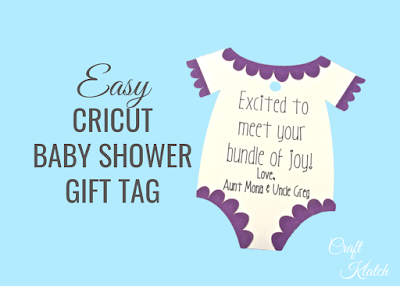
2. I clicked on Images and typed in “cutie patootie” and scrolled down until I found the onesie, with the trim.

3. I hit insert image and it put it into my project. This is such a cute Cricut baby shower gift tag template!


5. I changed the color of the trim to purple and the onesie to white.


5. Then, I sized it to be 6″ tall by 5.511″ wide.

6. I added a text box and typed my text and changed the font to Awesome.

7. I spaced and sized the text to fit. I also attached the text and the onesie.

8. I hit make it and it separated the colors onto different mats.

9. I put the paper on the mats and cut out the pieces – don’t forget to add your marker/pen!


10. I removed the pieces from the mat.

11. I added glue and put it all together.


There it is! Add a ribbon and tie it to your gift!

That’s it! Now you have the most adorable Cricut Baby Shower Gift Tag!
Thanks so much for stopping by! Remember: Life’s too short not to shimmer, so grab your glue gun and your glitter!™ Stay safe!
Mona


