Learn how to repair glasses at home using UV resin. This easy fix saved my husband’s pair – and it might just save yours too!
I hesitate to call it a miracle fix…but it kinda is.
*This post is sponsored by Let’s Resin. They provided me with their bonding UV resin kit to try on my YouTube channel, but as always, the ideas and opinions are all my own.
*Disclosure: This blog uses affiliate links from Amazon and other retailers. I earn a small amount from qualifying purchases at no additional cost to you.
If you know my husband Greg, you know he has a special talent…for breaking things. His glasses are frequent victims, and this time he managed to break a chunk out of the actual lens.
One day, I was looking at him, wondering why his glasses were crooked on his face. Upon closer inspection, I saw the missing chunk.
One tumble off the nightstand, onto the tile floor, and there they were…broken glasses.

Instead of letting him do his normal go-to to repair glasses (duct tape or super glue), and before getting them replaced…because glasses are SOOO expensive, I decided to take a crack at it.
I decided to repair his glasses myself using UV resin. Spoiler Alert: I really didn’t think it would work…but...IT DID!
I’m going to walk you through how to repair broken glasses using UV resin from Let’s Resin.
Check Out the How to Repair Glasses Video Here
How to Repair Glasses Directions
Step 1: Get Set Up for the Repair

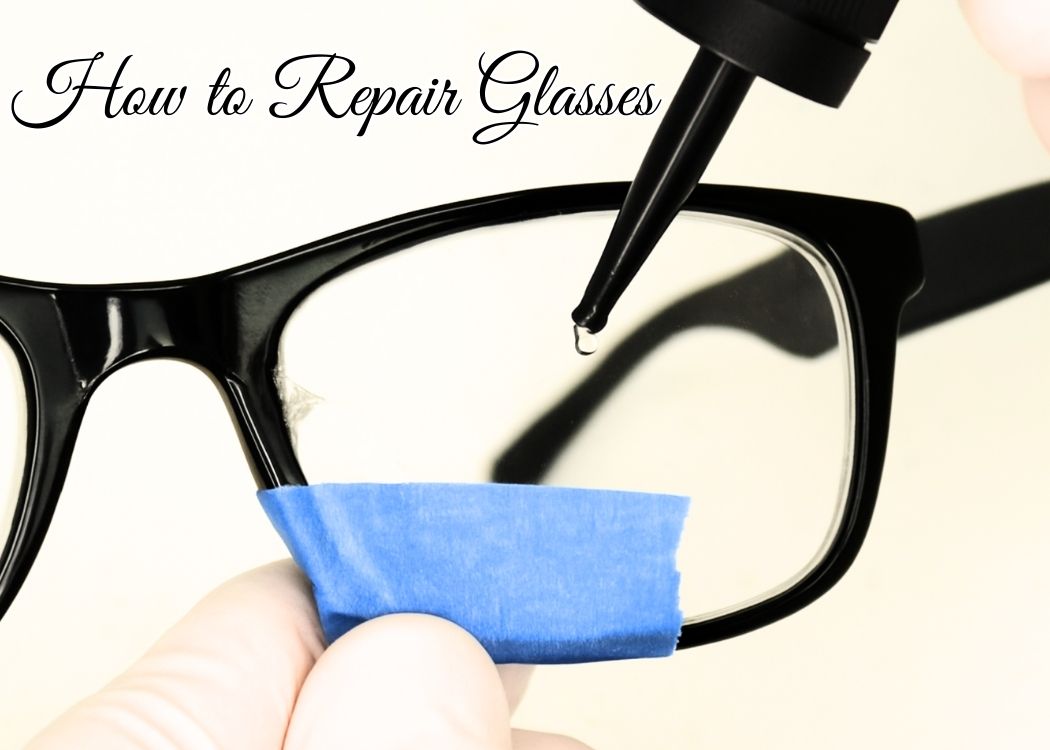
Before anything else, I grabbed my gloves. Even though I wasn’t planning to directly touch the UV resin, I like to be cautious when working with it.
I also used painter’s tape to protect the lens around the broken area — I didn’t want any resin accidentally getting on the good parts of the lens.
Step 2: Position and Prep

The one lens was super wiggly and out of alignment, so I made sure to tape everything in the correct position. I also rubbed the tape down to make sure the resin would not seep under it.
I didn’t want Greg walking around with lopsided glasses!
Step 3: Apply UV Resin to Repair Glasses

Now the fun part: I carefully dripped a little of the UV resin onto the broken section of the lens. I did this slowly, building up a layer a little at a time and using the UV flashlight to cure each layer as I went. The resin started to hold firm pretty quickly – definitely a good sign.
The bonding UV resin I used comes in a kit from Let’s Resin. It comes with the resin, as well as the flashlight, and bonds within 5-10 seconds of putting the light on it.

I continued to build it up until the break was fully filled. So far, so good!
Step 4: Clean and Shape the No Longer Broken Glasses!

Once the resin cured completely, I removed the tape and checked my work. It did run a tiny bit one one area, but it was barely noticeable. I grabbed an emery board and gently filed down any sharp or uneven edges. The resin was solid, I couldn’t even cut it at first!

It might not be a perfect cosmetic fix, but it blended well enough that most people don’t notice anything was ever wrong. You have to point it out to notice it!
Final Result: A Total Glasses Win
Greg used to try gluing his glasses back together, but it never ended well. This fix? It’s holding strong weeks later. I actually wanted three weeks to post this to make sure the repair would last, and I’m happy to report it’s rock solid.

If you’re wondering how to fix broken glasses without a trip to the optician, this bonding UV resin is a game-changer. Whether you want to repair broken glasses, fix a loose arm, or fill a chip like I did, this method is definitely worth trying.
Would I Recommend this DIY for Glasses Repair?
Absolutely!
I now have a little miracle fix in my craft kit for those unexpected breaks – and knowing Greg, I’ll be using it again soon…unless he loses them in the ocean again…I can’t fix that!
I can’t tell you how excited I am that we saved the money on a whole new pair of glasses!
Other Resin Projects You Will Love
- Your Resin Coasters Are Not Curing: Top 5 Reasons Why
- Candy Resin Charm
- Rock Candy Vase
- Donut Earrings
Thanks again to Let’s Resin for sending me their product to try. I’ve already used it on a couple of crafts, so stay tuned!
Let me know in the comments if you’ve ever had a glasses emergency, and don’t forget to check out the full video over on my YouTube channel!
Remember: Life’s too short not to shimmer, so grab your glue gun and your glitter!
Mona