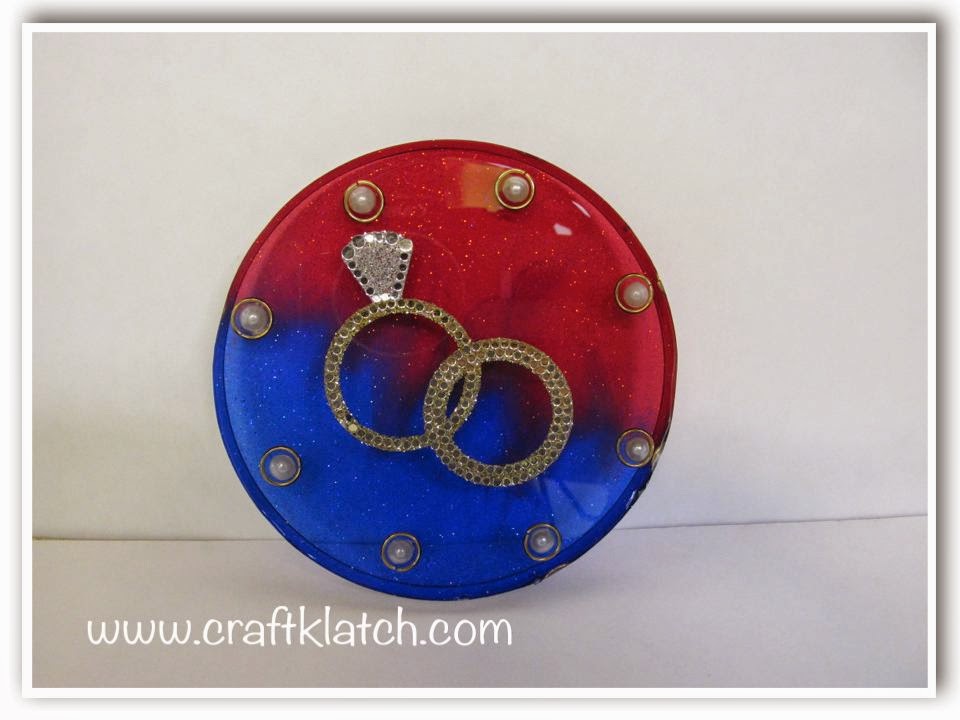
I was asked several times to make a wedding coaster…so I did! I’m going to be straight with you, I don’t love the colors I chose but you can personalize them to go with any wedding colors…so look past the colors and just imagine your wedding colors instead!
Other Wedding Coasters I have Made
I have since made several more wedding coasters, in case this one isn’t your jam! But you have to start somewhere!
While at a bridal shower for my nephew and his fiance, some other nieces and nephews thought it would be funny to put the confetti from the tables into my purse…I didn’t find it for about a month.
That shows you how often I go into the depths of my purse! You can find the story and you can find those wedding coasters HERE!
I did turn them into part of the happy couple’s wedding present!
My next one involved a cute wedding cake and champagne glasses in this wedding coaster.
Then, to take it to the next level, I turned one into a set of wedding band coasters!
And finally, my favorite wedding coaster is probably the classic black and white Mr and Mrs coasters.
WAIT!!!
I almost forgot about the classic and super easy confetti resin coaster!
Materials you will need for the wedding coaster
*This blog uses affiliate links. As an Amazon Associate I earn from qualifying purchases, at no additional cost to you.
- Coaster mold
- Transparent blue pigment
- Transparent red pigment
- Glamour dust
- Half pearls
- Gold jump rings
- Ring stickers: I couldn’t find the exact stickers to link them, but if you go to the craft store, you might find some alternatives and if you have a Cricut or Silhouette, you could easily cut some out of vinyl.
- Resin
- When deciding on which resin to use for your coasters, you need to keep in mind whether you want it just for cold cups or for hot ones as well.
- If only for cold drinks, you can be flexible and use whatever brand you like:
- If you want it to work for both hot and cold drinks, you need to look for a heat-resistant resin, like these:
- Stone Coat (Quick coat)
- Stone Coat (Heat resistant)
- FX Poxy ~ According to the manufacturer, this one is heat resistant to 500° F.
Wedding Coaster Directions
Step 1
Prepare your resin according to the package directions. Split them into two small cups and add blue pigment into one and red into the other and make sure each cup is mixed well. Add a little glamour dust to both and mix again.
Step 2
At the same time, pour both colors into the coaster mold and let them meet in the middle. Mine did not mix as I had hoped, so I used a toothpick to swirl them together a little. I was hoping to have a bunch of purple in the middle…guess I’ll have to keep experimenting with that! I let it cure for 12 hours.
Step 3
Once it has cured enough, you can add your stickers to the resin, as well as the jump rings and the pears inside of the jump rings.
TIP: Make sure the pearls have sticky backs, otherwise you will need to glue them before the next step.
Step 4
Prepare more resin to pour over the coaster. One ounce should be enough, unless your pearls are bigger or thicker. Then, just let it sit for a minimum of 12 hours.
That’s it! Once it has cured, you can remove it from the mold!
If you would rather not make a wedding coaster and you would rather have something that’s a little more classic, that’s okay!
Wouldn’t this set make a fabulous wedding or bridal shower gift?

Be sure to check out those other wedding coasters I made! I’m sure you’ll find one you love!
Also, click for the wedding ring coaster video tutorial! So you can see exactly how I made it!
Remember: Life’s too short not to shimmer, so grab your glue gun and your glitter!™ Stay safe!
Mona
Mona, that came out great! You answered my question about a 2 color resin pour. Now I know if I want a stark line with little color blending I should use the dyes, where as alcohol ink trends to blend by itself a bit better (especially with a toothpick helping).
I LOVE, LOVE, LOVE the jump rings around the pearls. I never in a million years would have thought of that. It gives the appearance they are in a mounted like they'd be if on a ring. Thank you so much for that idea.
Wow, I really like your post because the information which you given in this blog is really extra ordinary.
wedding coasters