To stay up on the latest, be sure to
SUBSCRIBE to my YouTube Channel!
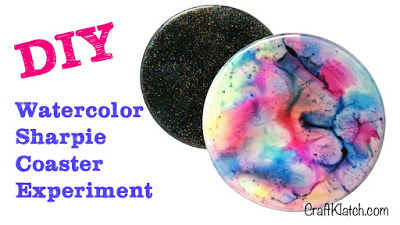
After doing my original Sharpie watercolor coaster video, I had people wanting me to do an experiment with a white background and a black background, to see how they would turn out. So I created this easy DIY video and you can see how the craft experiment turned out!

You will need:
– Sharpies
Here is the video tutorial:
Directions:
1. Mix resin, according to the package directions. You only need an ounce or an ounce an a half for each coaster, for the first pour.
2. In separate cups, mix black pigment dye and white pigment dye. Mix and pour into mold cavities.
3. Allow to cure, a minimum of 12 hours.
4. Once cured, take any combination of Sharpie marker and draw all over the coasters. FYI – I did not have any luck with having anything show up on the black, so you can skip that step on the black.
5. Drip rubbing alcohol on the coasters, which will make the markers bleed and will create a watercolor effect.
6. Allow to completely dry.
7. Mix two and a half ounces and split it into two small cups.
8. Pour first half onto the white coaster.
9. I salvaged the black coaster by mixing some fine glitter into the remaining resin and then pouring it over.
Once cured, you can unmold them!!
That’s it! Thanks for stopping by! Happy Crafting and stay safe!
Mona
hi please let me know what colours can be used to mix in the resin can we use normal food colouring? thanks .
I have not used regular food coloring, but other people have told me they have and it worked. You can also use powdered eyeshadow. Hope that helps!
thanks u so much. love ur blog . it has such fun stuff and im gonna be trying out a few of them today 🙂
Hi Mona! Thank you for sharing. I will definitely try this with my Sharpie Products Philippines.