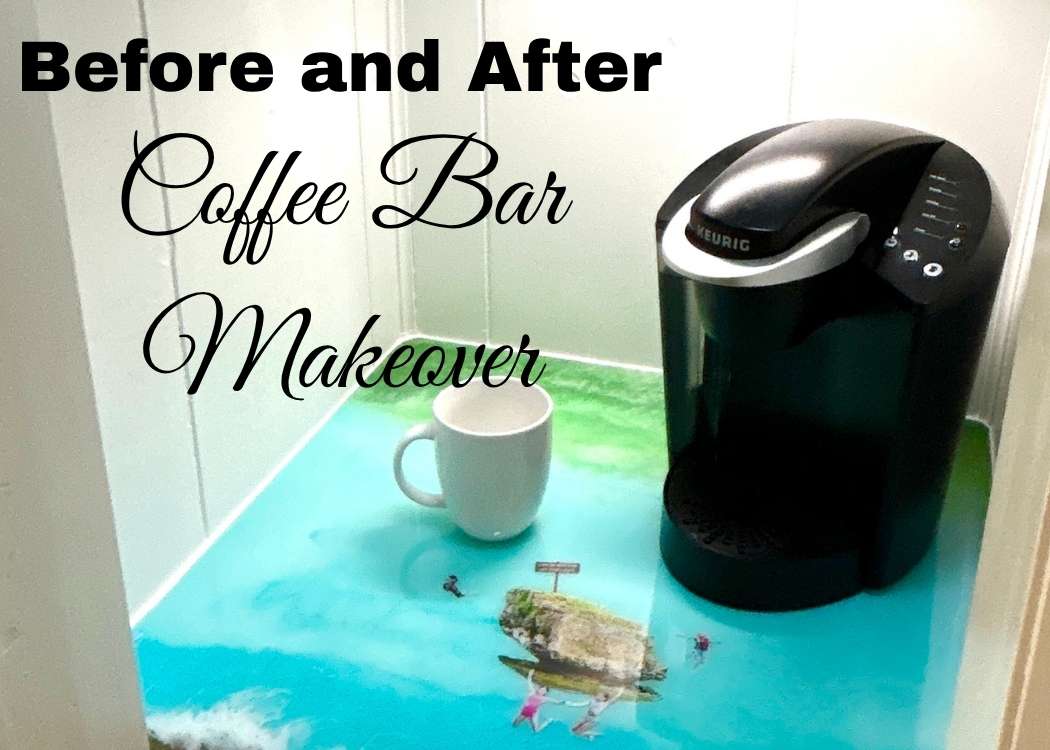
Before and after transformation! See how I turned a closet into a functional coffee bar with coffee bar cabinet ideas that are simple and personal.
It Started With a Broom Closet…
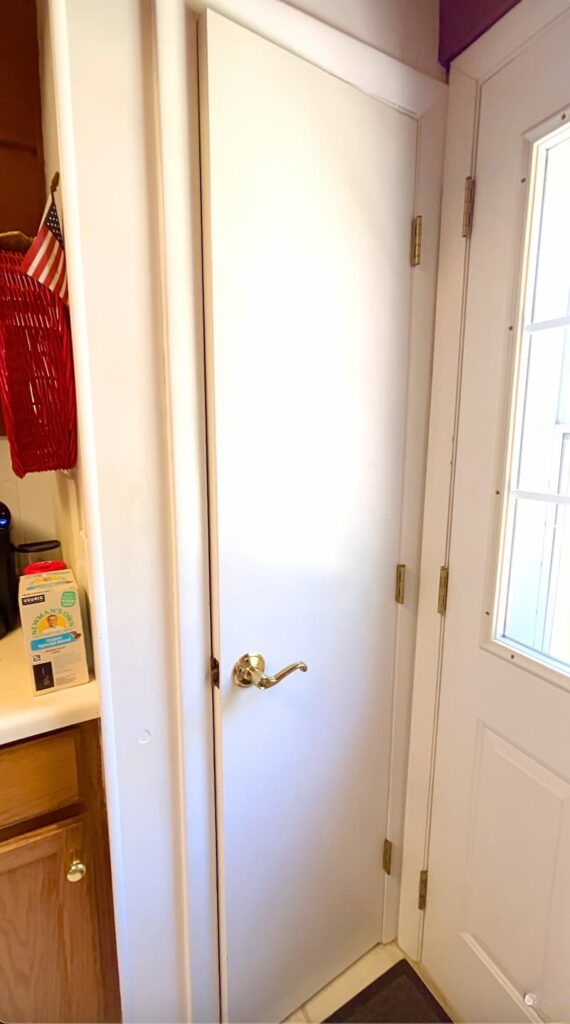
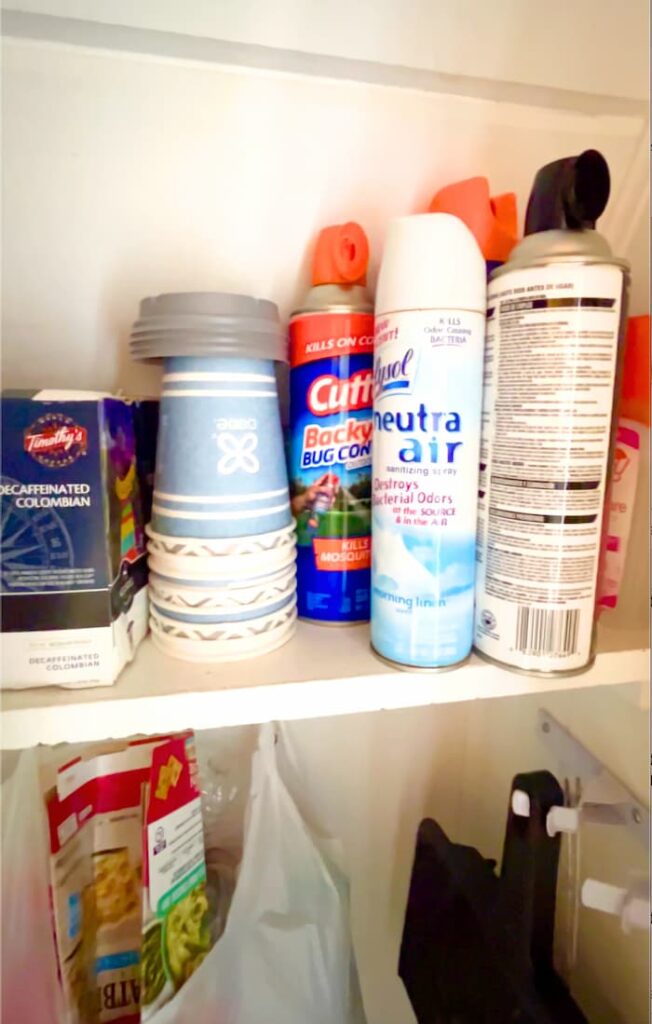
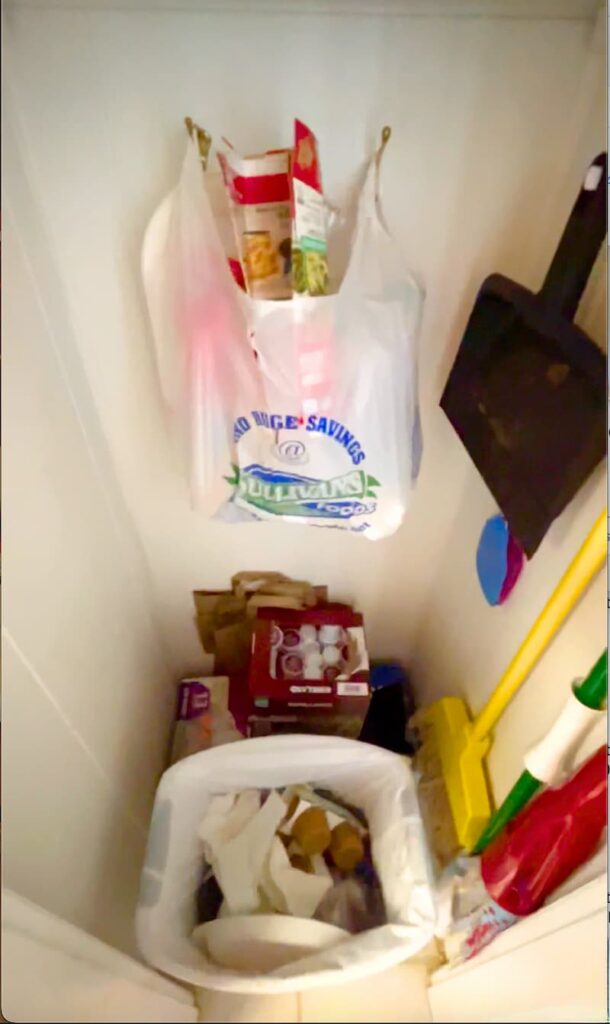
At the lakehouse, we had this tiny, awkward broom closet by the front, too. It was packed with a random mix of stuff…
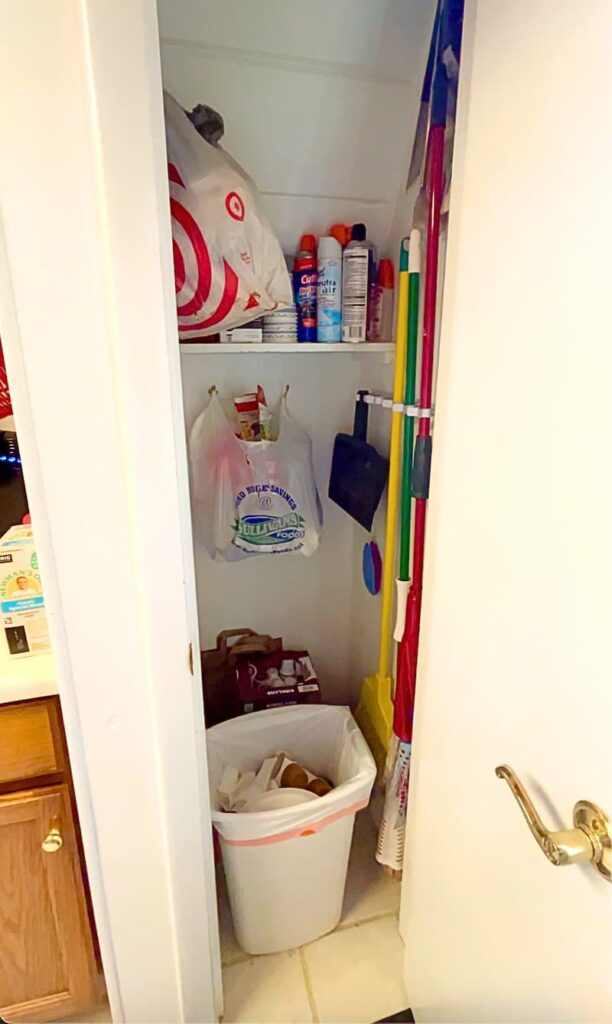
the coffee was next to the bug spray…was next to a mouse trap (yikes)…was next to bags of recycling…and don’t forget about the trash, the brooms, the grilling utensils, and fly swatters.
To top it off, we had dueling doors. You couldn’t come into the house if someone was throwing something away, and you couldn’t throw something away if someone was trying to leave. The doors were always crashing together.
It was one of those spaces that wasn’t doing us any favors.
So, I decided it was time to do something about it. I wasn’t going to just reorganize; this called for a full-on makeover!
I wanted to create something functional and special – a coffee bar, where we could start our mornings at the lake without the fear of getting a finger caught in a long forgotten mousetrap.
The before and after project turned out better than I imagined, and I wanted to share exactly how we made it happen.
CLICK to follow Craft Klatch on Instagram!
Supplies We Needed For the Coffee Bar Makeover
Here are the supplies you will need if you want to tackle a similar project.
*Disclosure: This blog uses affiliate links from Amazon and other retailers. I earn a small amount from qualifying purchases at no additional cost to you.
Fixes and Cabinet
- Putty knife
- Wood filler
- Sander
- Paint & primer
- Caulk
- Motion sensor lights
- Wall basket for coffee pods
- Trash cabinet
- Garbage cans
- Cabinet hardware
Resin Countertop
- Quick coat resin
- Alcohol inks (blue and green)
- White resin pigment
- Sand
- White glitter
- Heat gun
- Gloves
- Cups
- Stir sticks
- Super Gloss Mod Podge
- Photos
Here’s a Quickie Video of the Before and After Coffee Bar Makeover
Watch the quick video so you can see how it all went down!
Before and After: Day by Day Coffee Bar Cabinet Directions
Aside from the doors bashing together and the weird things that lived together in the broom closet, the trash and recycling situation really spurred me on.
Day 1: Clearing Out the Chaos
The broom closet had been neglected for too long! First, I emptied everything out. I took down hooks, removed the door, and Greg removed the door stop.
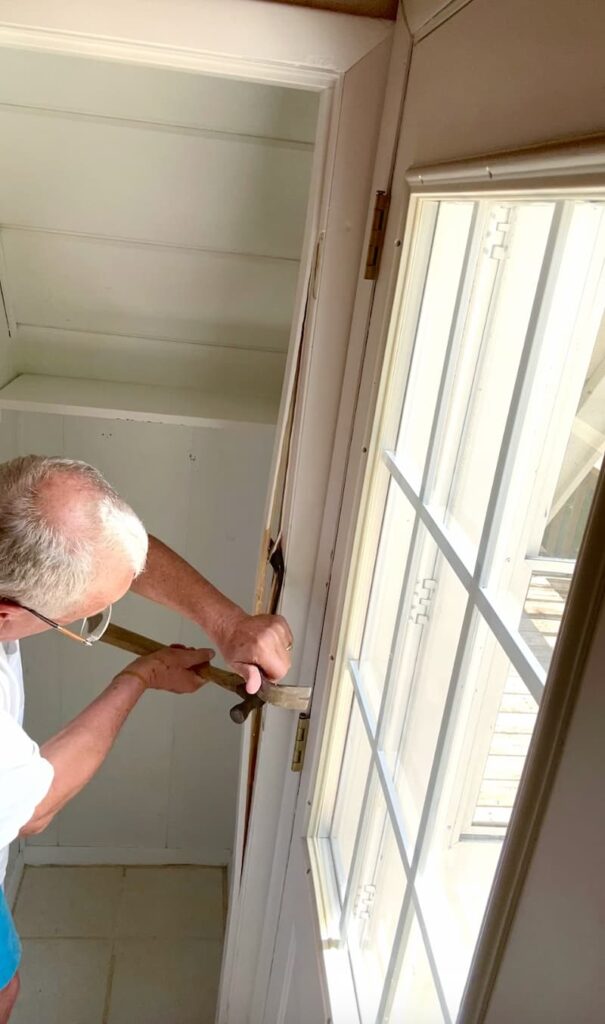
Then, we patched all of the damaged areas and where the hinges were.
It already felt better just having a clean slate to work with.
Quick video on how it all started!
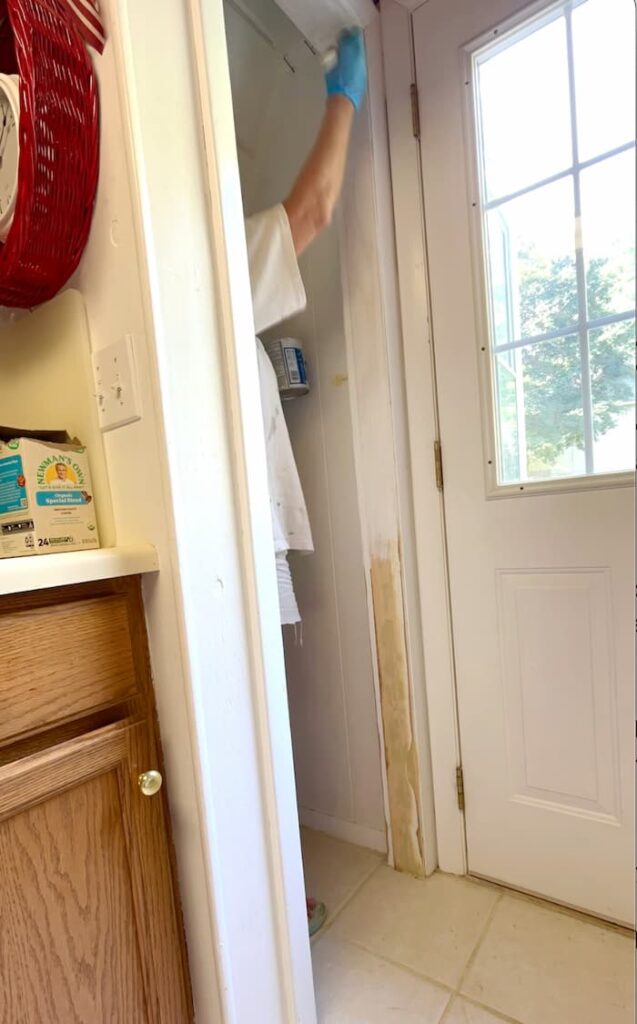
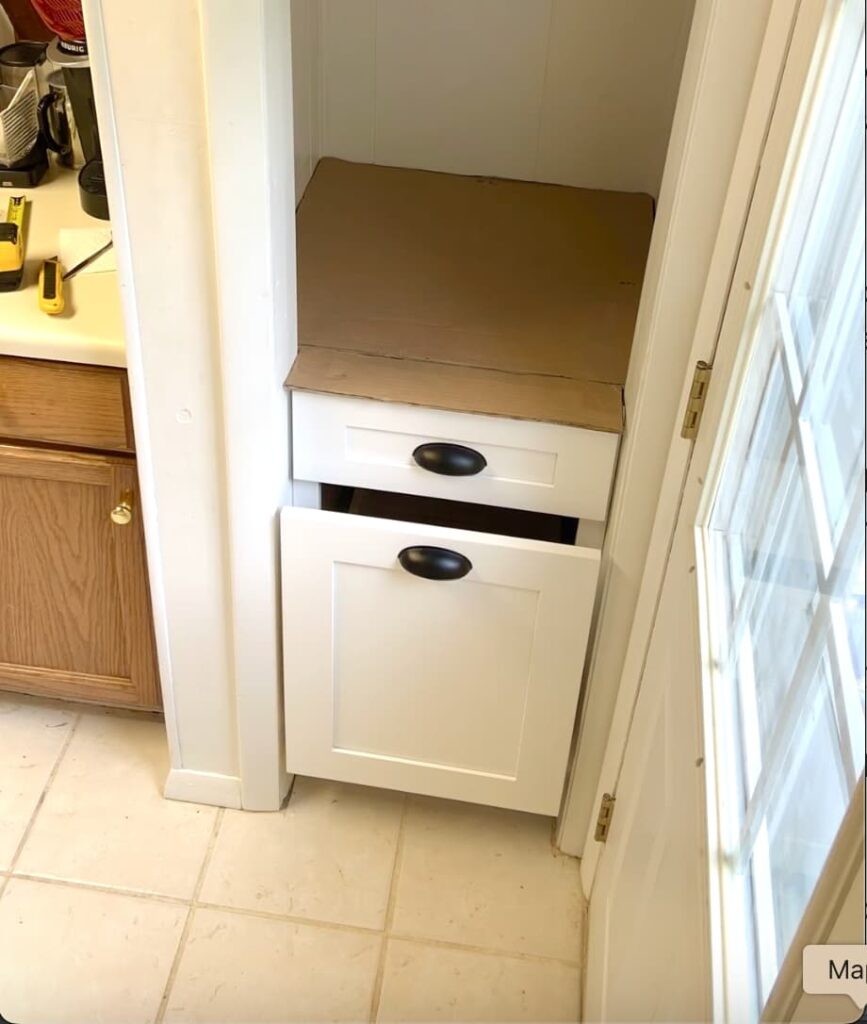
Day 2: Building the Coffee Bar Cabinet
After sanding everything smooth, I painted the frame where the old door was. Then Greg and I got to work putting together the coffee bar cabinet with space for trash and recycling, plus a working drawer.
Those were the must-haves on my list when I was looking for a cabinet!
When I slid it into the nook…it fit perfectly…like it was meant to be there.
If you are looking for coffee bar cabinet ideas, I suggest measuring and finding a cabinet that will fit your needs.
We knew we were not going to build a custom cabinet, but I knew we were going to add touches that make it all feel very custom and personal.
Quick Video of Day 2 of the Coffee Bar Makeover
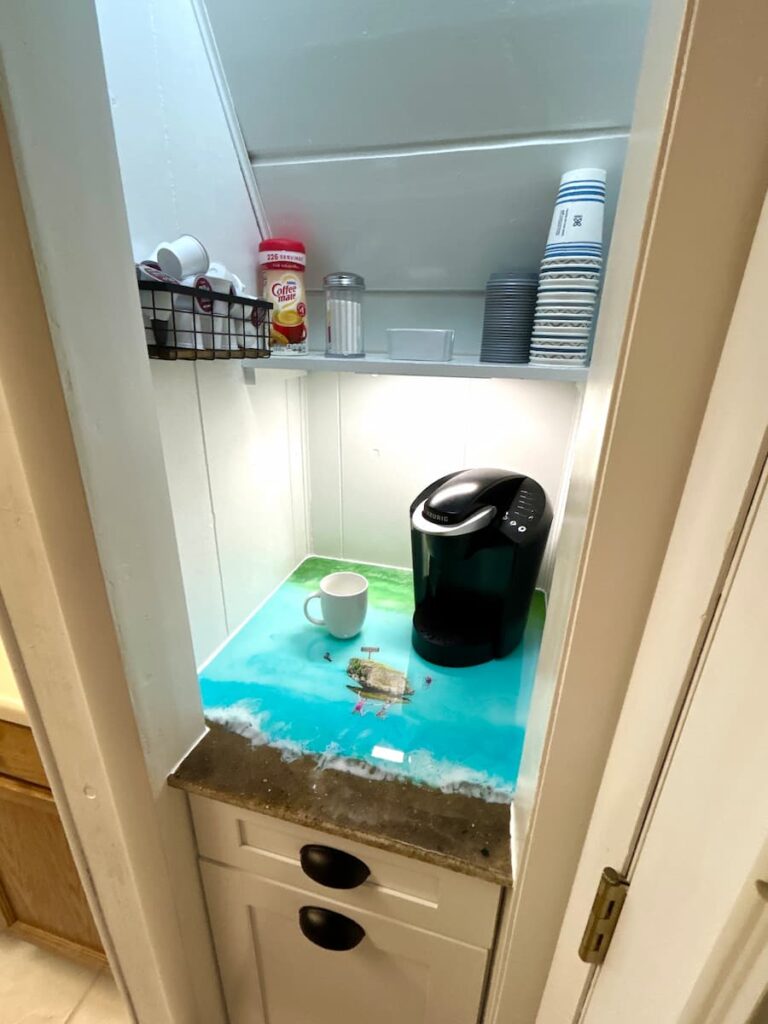
Day 3: Creating the Countertop for the Coffee Bar
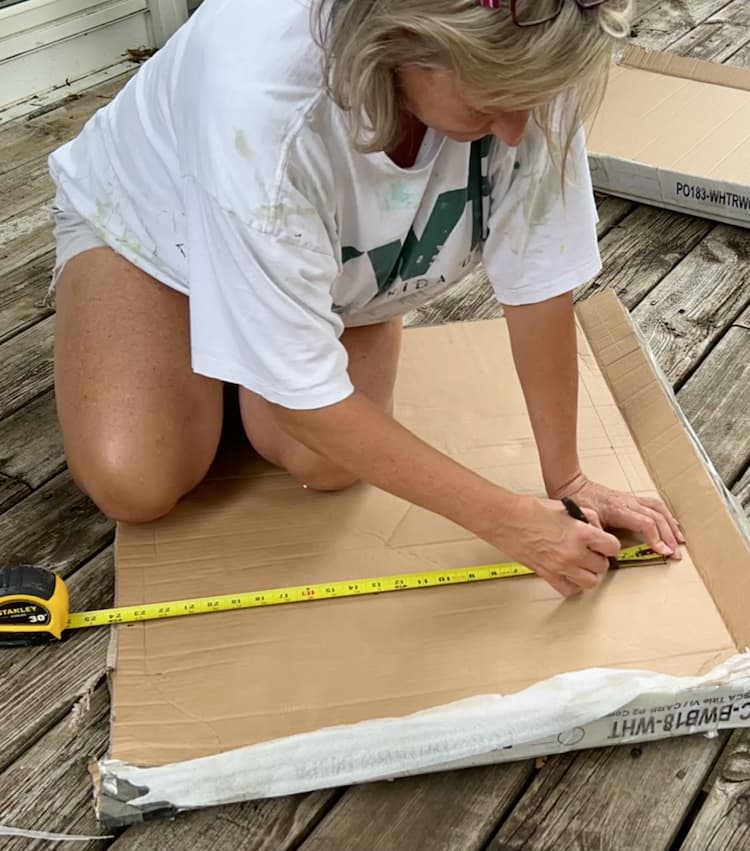
I used the cardboard from the cabinet packaging to make a template for the countertop, and Greg cut it out from 1/2″ plywood. I primed it and then the fun started…resin!
I began with 4 ounces of resin mixed with sand from the beach and some white glitter. Sand darkens when you add resin, so I always add some white glitter to brighten it a bit.
I spread the sand along the front and the front edge to create the shoreline and left it to cure.
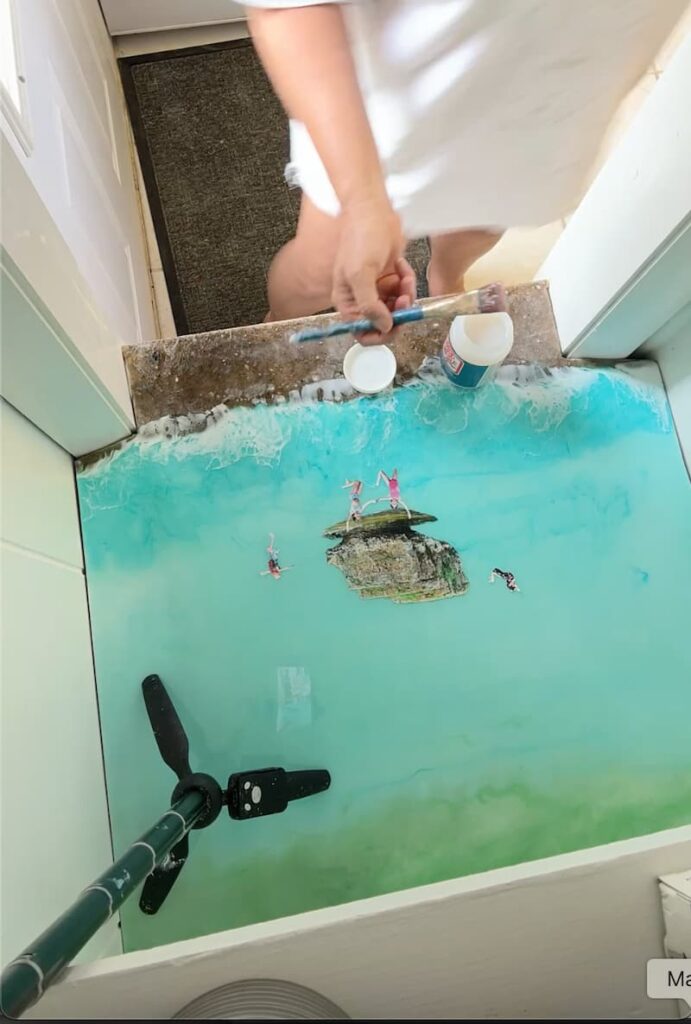
Then, I mixed 16 ounces of resin with blues and greens using alcohol inks. I also saved an extra bit of resin and added white pigment.

Because it was a quicker curing resin, I had Greg help me. We poured the green and blues on the countertops and blended them a bit. At the shoreline, where the blue met the sand, I ran a line of white and used my heat gun to create the wave effect.
Then, we had to walk away and let it cure. I didn’t blend the colors as much as I would have liked…to be honest, I was a bit worried.
Check Out the Quick Video of Day 3
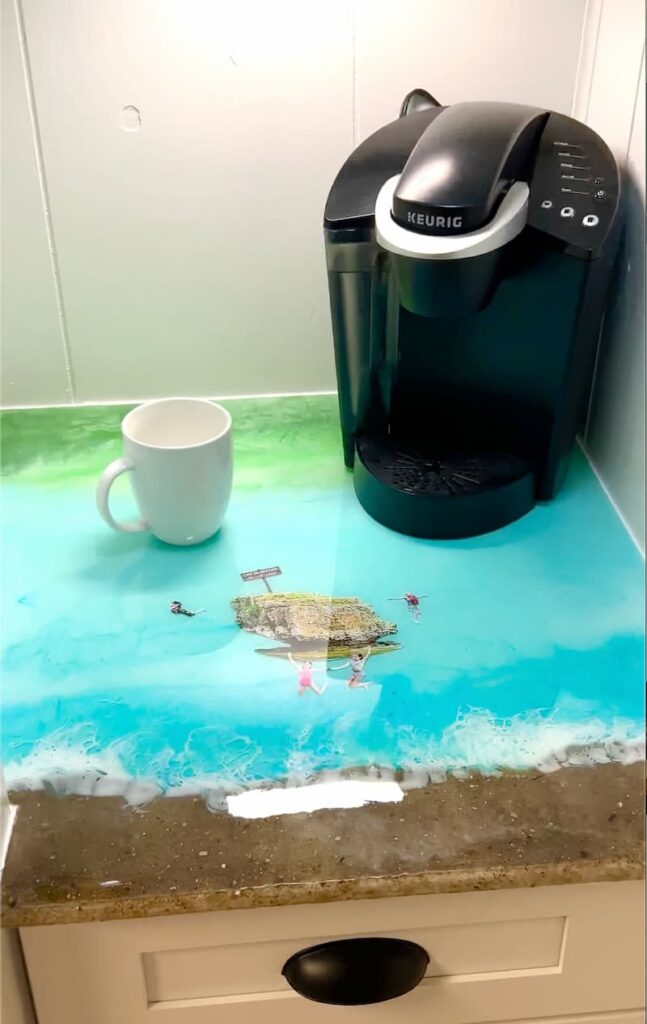
Day 4: Adding a Personal Touch
Now this part was my favorite. Our grandkids love jumping off a rock and into the lake – it’s one of their favorite things to do.
It’s just a rock in the lake, and everyone jumps off it.
So, I printed out a photo of the rock and cut it out. I also printed out pictures of the kids mid-jump and cut them out. Using my Mod Podge, I decoupaged them right onto the countertop.
When I use Mod Podge for a resin project, I always use the Super Gloss Mod Podge. You don’t get the shadows that you can sometimes get with regular Mod Podge and resin.
Another tip is to brush the Super Gloss Mod Podge all over the project – in this case, the countertop. That ensures that there won’t be a visible line where the Mod Podge began and ended.
You’ll never see it at all!
It looked like blue was the water, and the green was a looming cloud in the background. Totally unplanned, but it worked out!
I’m really happy with it, but in reality, the water is a bit more tropical than the actual lake, which is more on the green side.
Just remember, realism isn’t always necessary…this is art!
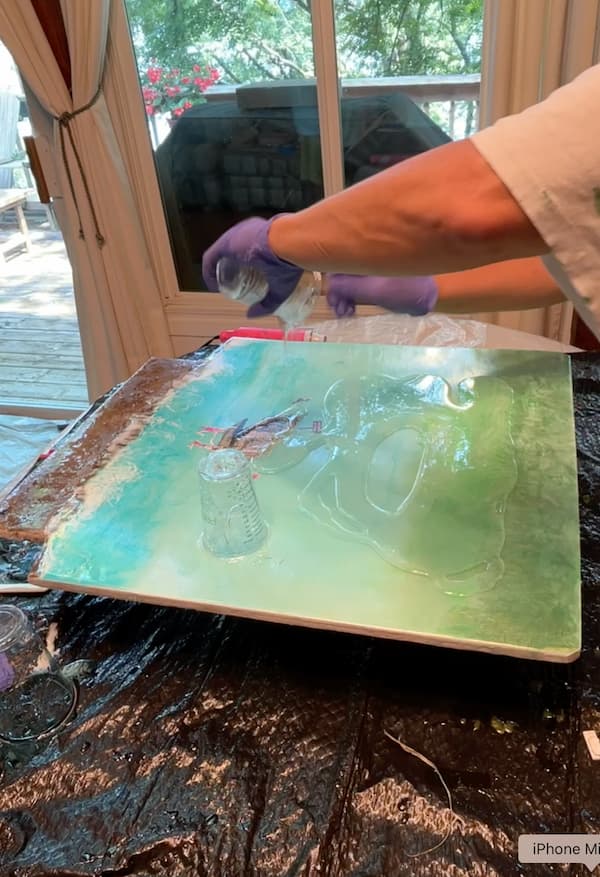
Once the Mod Podge dried, we poured a clear coat of resin over everything to seal it.
This is one of my favorite coffee bar cabinet ideas ever! It made it very personal and very meaningful!
Watch the Quick Video and see how I make it personal!
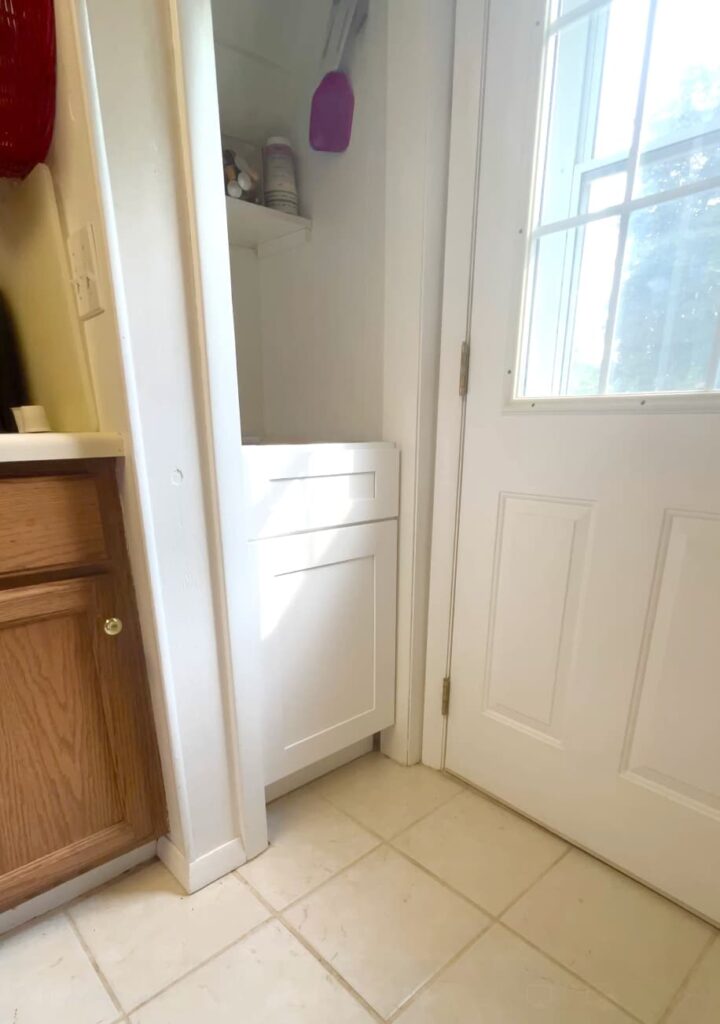
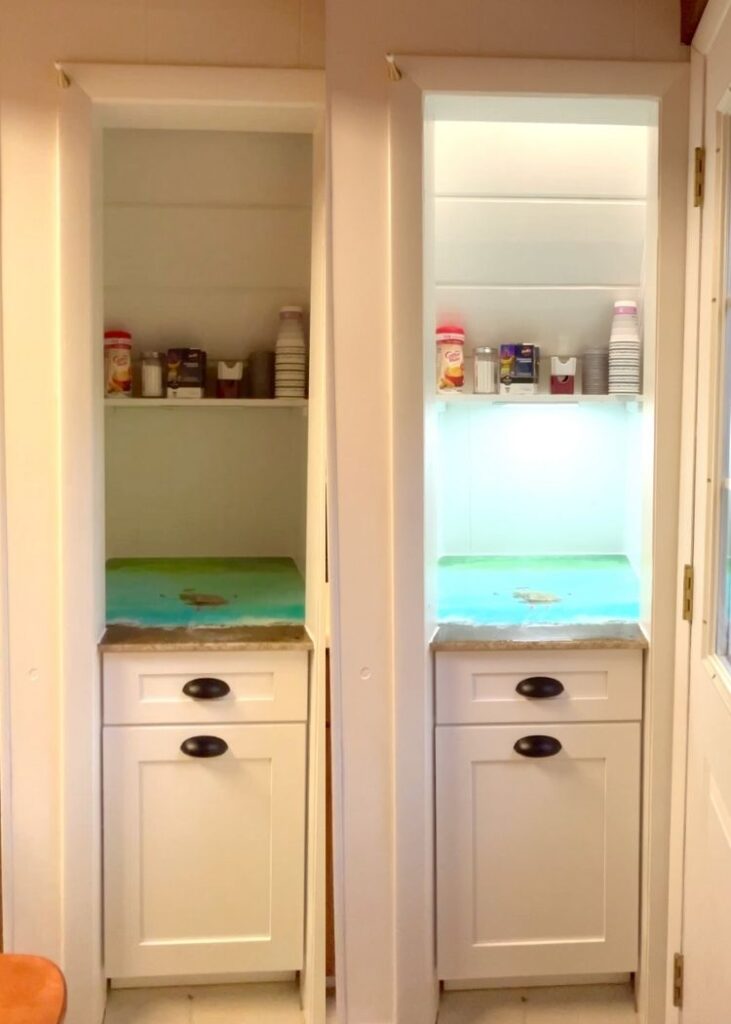
Day 5: Lights, Basket, and Details
Next, I installed the countertops and caulked around the edges for a finished look. I added motion sensor lights (highly recommend!) so it lights up as soon as you step near it.
Then, I mounted a wire basket to the wall for Greg’s coffee pods. I knew I should’ve purchased two – don’t you hate when you do that?

One will do for now.
All the random stuff – brooms, sprays, traps – have been relocated. The space now holds only what we need: coffee, tea, and essentials.
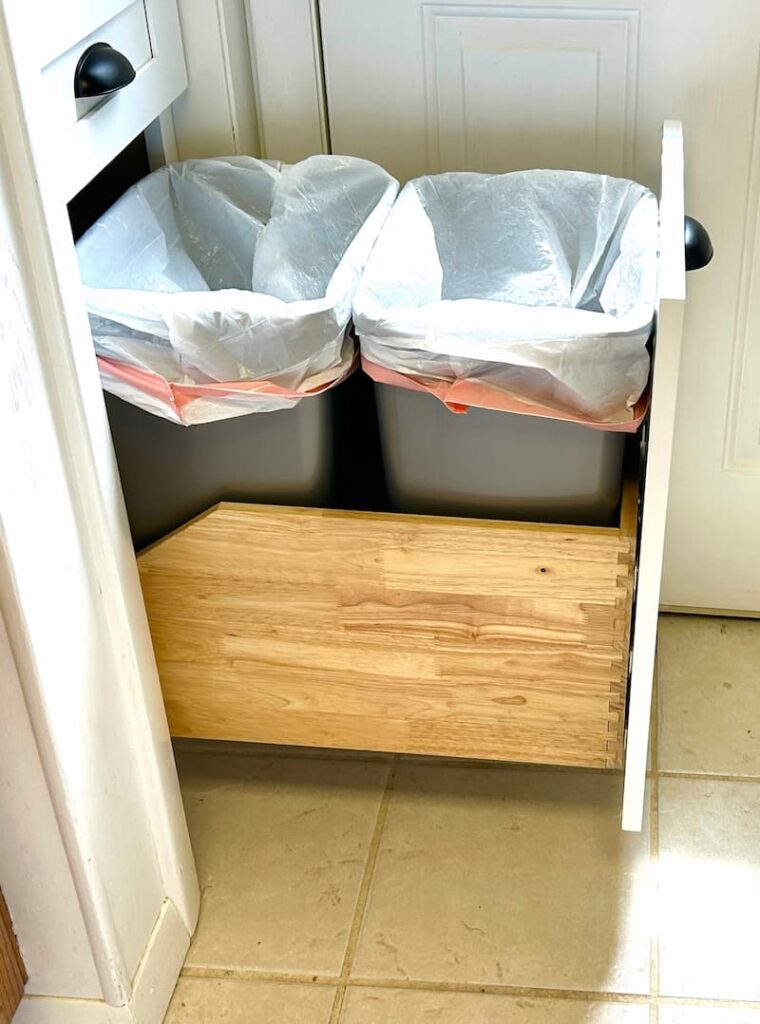
I also solved our trash and recycling dilemma, and it’s hidden out of sight in the cabinet.
The Before and After Coffee Bar Makeover Final Reveal
And just like that…before and after…done! What used to be a cluttered closet is now a cozy, personalized coffee bar. It’s functional, it’s organized, and most of all…it reflects our family and lakehouse memories.
Coffee Bar Ideas to Try
If you are thinking of creating your own coffee bar cabinet, here are a few ideas to get you started:
- If you have a closet, nook, or corner space that’s not being used effectively, that’s the spot to tackle.
- Customize your cabinet for trash/recycling to keep things tidy. It beats a trash can that’s always in your way.
- Add lighting…don’t let it be a dark corner. Motion sensor lights are a game changer!
- Use resin for a creative and durable countertop. The sky is the limit!
- Make it meaningful. If it works in the space, incorporate photos or memories.
- Keep it functional with baskets or wall-mounted storage.
There are so many creative coffee bar cabinet ideas out there, but adding a personal touch makes it truly special.
Watch the Final Reveal!
Just When You Thought It Was Over!
I was super pleased with the before and after… but I thought I was missing something.
I decided to make a sign, and I LOVE the way it turned out! You can find it HERE!
I’d love to know what you think.
More Before and After Makeover Projects
This project is one of my favorites before and after makeovers. It turned a cluttered, awkward space that just didn’t work into a warm and functional coffee bar that we will enjoy every day we are at the lake.
Here are more makeovers you are sure to enjoy!
- Cedar Chest Makeover | From Victorian to Coastal DIY
- Tropical Cat Table Makeover | Cricut Crafts
- Outdoor Table Makeover DIY
- Table Makeover | Stenciling On Wood
- Chair Makeover
If you have been thinking of creating a coffee bar cabinet, I hope this gives you a little inspiration!
Sometimes the smallest spaces bring the biggest joy.
Remember: Life’s too short not to shimmer, so grab your glue gun and your glitter!
Mona
This project turned out so wonderful! I have been thinking of converting a bifold pantry closet in my kitchen to a coffee bar/appliance garage area. Haven’t gotten to it yet because of other projects but this one inspires me to move it up on the renovation list. Thanks for sharing and this post will be a feature this week. #HomeMattersParty
Thank you so much, Donna! ❤️ I’m glad you enjoyed it and that sounds like the perfect spot! I really appreciate the feature! ❤️ I’ll be sure to share!
I would have put the picture of the kids jumping in the water. on the back wall. but since you have already placed it, a false window the back of the shelf would look creative.
Such a great idea!
I really like what you’ve created. The sign completes the space. The photos aren’t accurate the highlight for me. Nice touch and very creative!
Just curious, did that closet have an electrical plug for the coffee pot?
It did not have a plug. There was one just on the other side of the wall, so a drilled a hole between it and fed and extension between the two, so the plugs were available for the coffee machine. The chords are hidden behind the machine and there was a small recess behind the counter top backsplash where I could hide the cord.
To apply this idea to our home, I would have to create another closet for brooms, etc which was in the original closet. How did you manage that in your home?
It’s a lakehouse built in the late 60’s early 70’s. The floorplan and storage is a little wonky. The first floor bathroom has a large closet and I was able to mount things on the wall in there, as needed.