Remember the wine coaster mold I made last week? Well, I used it and here is what I made:
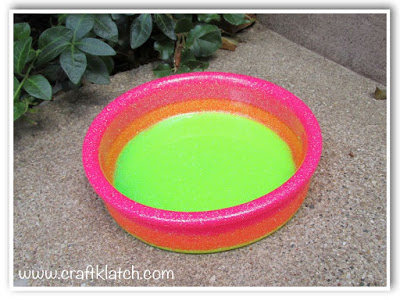
It has a very sherbet quality to it, which is P-E-R-F-E-C-T for summer!
You will need:
– Wine coaster mold – CLICK HERE for the video on how I made it.
– Glitter – I used rainbow colors from a package I bought at Hobby Lobby
– Easy Cast Resin (for more info on where to find it internationally go to www.eti-usa.com)
Here is the video tutorial:
Here is the video tutorial on how to make the mold:
Here are some items, which are available through Amazon, which you might find helpful, if you want to give this project a try:
Directions:
1. Prepare your resin according to the package directions.
TIP: I used three capfuls of the resin mixed with the three capfuls of the hardener for the first pour. On all subsequent pours, I used two capfuls of each. If I were to do it again, I would use two capfuls of each for all of the pours.
2. Once you have your first batch of resin mixed, mix in your pink glitter. You want a lot of glitter and you want it to be fairly thick. Mix it well.
3. I let it sit for a few minutes to let the bubbles rise to the top.
4. Peel back the edge and pour it into the mold. Let it sit for a minimum of 1-2 hours before moving onto the next step.
5. Repeat with orange glitter (2 capfuls of resin and 2 capfuls of hardener).
6. Allow to sit for a minimum of 1-2 hours and repeat with yellow glitter.
7. Allow to sit for a minimum of 1-2 hours and repeat with the green glitter.
8. Allow to sit a minimum of 12 hours before unmolding.
9. When unmolding, carefully go around and pull the top flap back, to break the seal. Then pull it out!
10. Sand the bottom as needed.
Remember it takes a full 72 hours to fully cure.

That’s it! Thanks for stopping by and Happy Crafting!
Mona