I love Easter crafts and pastel colors and wanted to make a sign for the holiday. This was a perfect opportunity for a Cricut project and a great Cricut projects
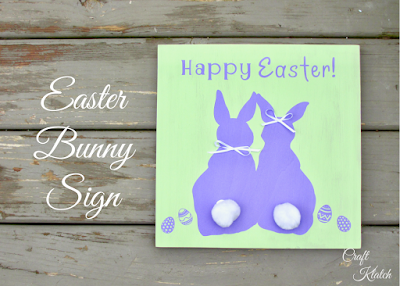
Learn how to make an Easter Bunny sign, using the Cricut cutting machine! It’s an easy holiday project!
Here is a quick video tutorial, so you can see exactly how I made it:
*This blog uses affiliate links. As an Amazon Associate I earn from qualifying purchases, at no additional cost to you.
Supplies You Will Need
- Wood panel: https://amzn.to/2CrGuXa
- Purple paint: https://amzn.to/2Y60Luz
- Green paint: https://amzn.to/2FiFqGZ
- Cricut machine: https://amzn.to/2Fb1n9P
- Removable vinyl: https://amzn.to/2Tf4p1A
- Transfer tape: https://amzn.to/2Y49FJ9
- Hot glue: https://amzn.to/2CpimV0
- Glue: https://amzn.to/2TFdbem
- Pom poms: https://amzn.to/2TGGuxf
- White ribbon: https://amzn.to/2F8shit
Directions
1. I created a new project in Cricut Design Space.

2. Watch the video above, to see exactly how I did it.

3. I cut it out with my Cricut.

4. In the meantime, I painted my wood panel with a light purple paint and let it dry.


5. In the meantime, weed the vinyl.


6. Apply transfer tape to the vinyl.

7. Burnish it down.

8. Remove the transfer tape from the backing. You want to pickup the vinyl with it.


9. Put the vinyl and transfer tape onto the dry board.

10. Burnish the vinyl, to make sure it adheres well.

11. Then, carefully pull off the transfer tape.


12. Burnish down the edges again.

13. I used the same purple paint to paint over all of the vinyl. I made sure to go in all directions. This prevents any seepage of the next color. Allow it to dry.

14. Paint green over everything and let it dry.

15. Once dry, start pulling off the vinyl.


16. I glued pom poms on as bunny tails.

17. Add bows.

That’s it!


Alternative Bunny Signs
If you don’t have time to make the Bunny Sign, there are great alternatives available. Here are a few:

I hope you like it! Remember: Life’s too short not to shimmer, so grab your glue gun and your glitter!™
Mona

Loved it but don’t think bunny’s tails would be on same side as ribbons