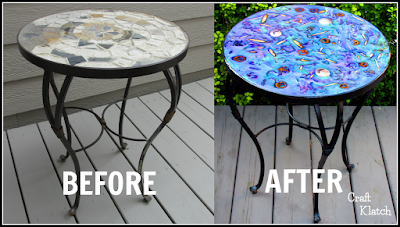
Garbage to Gorgeous® is back with a table makeover!!! I’ve had this table in my garage FOR-EVER! Don’t you just love furniture makeover before and after projects? I do!
I love to see the transformations and I don’t mind getting dirty to get it done! This piece was found at the side of the road, so keep an eye out…especially on garbage day!
You can find something similar at a thrift store, online, or maybe you even have something sitting around your backyard!
In this case, the top had broken slate tiles and it was a little rusty. I decided to go for a glam resin look while adding natural elements. The last time I did something like this, it was the Beauty of Nature Coaster. This time, I wanted to try it on a larger scale.
Supplies I Used For This Table Makeover
*This blog uses affiliate links. As an Amazon Associate I earn from qualifying purchases, at no additional cost to you.
- Old table: I found mine in the garbage at the side of the road
- Tools to clean it up: I used a hammer, chisel, and wire brush
- Wire brush: https://amzn.to/2shdiv5
- Resin: https://amzn.to/2tg9VFZ
- Pigment powders: https://amzn.to/2tC0HGi
- Rust converter: https://amzn.to/2tGHcNp
- Spray paint: https://amzn.to/2tAhlX5
- Dremel tool: https://amzn.to/2shpFXW
- Sander: https://amzn.to/2uzYhoX
- Resin:
- When deciding on which resin to use, you need to keep in mind if you want it to be more decorative, or more durable.
- If it will have light use:
- Easy Cast: https://amzn.to/2yjYmBC
- Art Resin: https://amzn.to/2yk9X3z
- Clear Cast: https://amzn.to/2z4rxGw
- If you want it to be more durable and be able to put hot drinks down on it, you need to look for a heat resistant resin, like these:
- FX Poxy: https://amzn.to/2AF3Pkk ~ According to the manufacturer, this one is heat resistant to 500 degrees F.
- Stone Coat: https://amzn.to/2FZoWX8
- If it will have light use:
- When deciding on which resin to use, you need to keep in mind if you want it to be more decorative, or more durable.
Items I Found In Nature
- sticks
- dried leaves
- seashells
- pine cones
- nutshells
Here is the video tutorial:
Quick Question
Before we get started, I wanted to ask a quick question: Do you work with resin or does it intimidate you? I’d love to know your thoughts, down in the comments below!
Directions
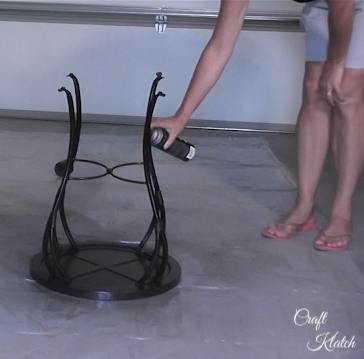
Step 1: Get to work!
When I found the table, the slate was already broken, which is no doubt why it ended up in the trash. In order for me to give it a makeover, I had to break out the slate and all the other material.
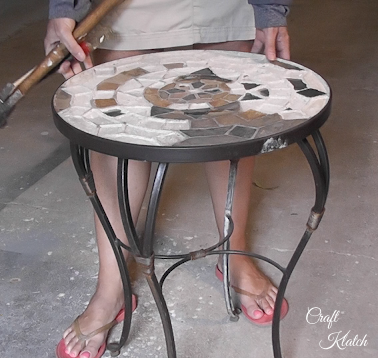
I broke out my chisel and hammer and got to work! Things definitely got messy, but it’s a great project if you have some pent up frustrations!
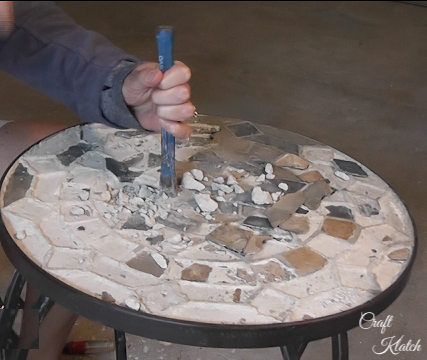
Step 2: Get the rust out…or off
Using a wire brush, I cleaned off the rust. I didn’t want to leave a rusty build up on the table. When doing a project like this, you aren’t going to get every bit of rust off, but get as much as you can.
I then gave the table a thorough general cleaning. I needed to get rid of any dust and dirt, so the paint could actually adhere.
Step 3: Did somebody mention paint?
Me! I did!
I first sprayed the table with a rust inhibitor/remover. This is the stuff you need to do before you move onto the pretty part of the table makeover.
That should take care of any of the remaining rust I was unable to scrape off. I then followed up with black spray paint. I went with a satin, but glossy and matte work just as well!
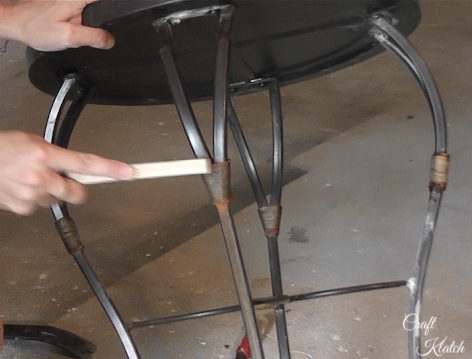
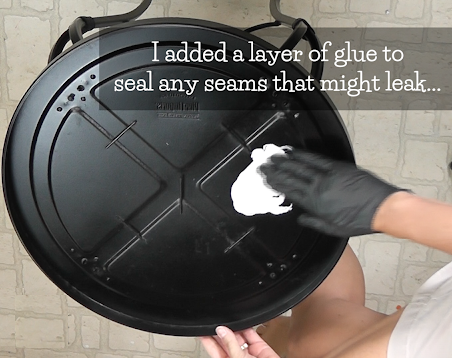
Step 4: Seal it up!
I added a layer of glue. This might seem like a weird step, but it is a necessary step. I have found that what might look to be a pretty solid or airtight piece, sometimes is not. There are seams and even if they are teeny tiny, your resin will find the seam and leak right through it.
My solution was to add a layer of glue. I used my hands and fingers to move it around and get it into the seams and corners. I happened to use clear-drying glue. That was just what I had on hand. You will never see the glue, so any glue that will stick is fine.
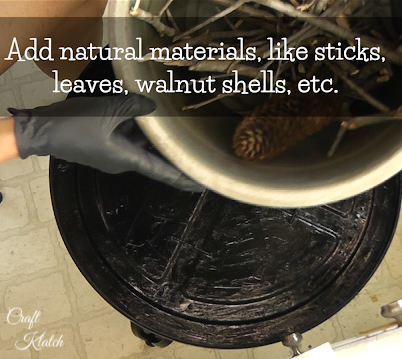
Step 5: Take a nature walk. Wait…aren’t we were working on a table makeover?
I went for a walk and collected stuff. Some of it I had on hand, like the snail shells, but I went out and collected dried leaves, sticks, walnuts, etc.
The items you find might differ based on where you live, but that just makes it all the more interesting and unique!
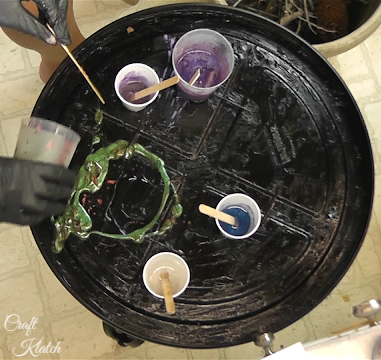
Step 6: Resin time!
This is where you decide on your color scheme. After mixing my resin, I added pigment powders. I went with green, purple, and blue pigment. Go with whatever goes with your home, or is flexible enough to change with your decor.
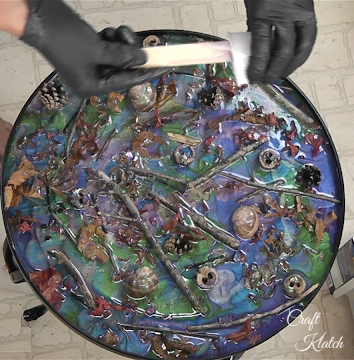
It’s time to break out those goodies you found outside. I added leaves into the resin and poured it all onto the table. It spread around and created a thin layer.
I added layers and layers of resin, added sticks, shells, leaves, etc., with each layer. There was no real plan and I did not know how much resin it would take. I slowly built up each layer, adding natural materials as I went along.
I lost count of the layers and just kept plugging along on it.
Step 7: Layer, after layer, after layer…
I kept adding layers, which seems like a big pain, but it wasn’t. I just added a layer or two every day.
I’m not going to tell you how much resin is needed for a project like this because it will vary greatly depending on the size of your table, the depth of the table, and what and how much stuff you plan on adding.
Here is the most important tip I can give you: Be EXTRA careful when you pop your bubbles. I do suggest popping them, especially as you get to your final layers. You are working with natural materials that will create extra bubbles. Don’t get too nuts about the bubbles, but if there is a big one, try to pop it.
So why be extra careful? You are working with natural materials and the twigs and leaves in particular are items that can easily catch on fire! Don’t set your table on fire!
I you are working on a spot where you are worried about setting it on fire, you a straw and blow on the bubbles, or use a heat gun. I have not worked with a heat gun on resin, but other people do. Just be careful.
Step 8: This looks like a disaster of a table makeover!
I know, it looks bad. But have some faith!
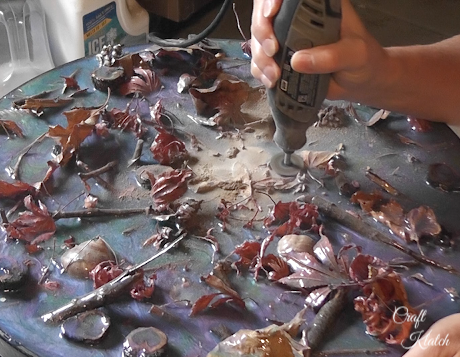
I did not mention that you don’t have to worry about the natural materials being taller than the edge of your table. I had sticks, shells, leaves and pine cones sticking up all over the place. In fact, I wanted that to happen.
When the last layer cured, I took my rotary tool and cut it down. Doing this would give me the cross section of walnuts and shells and sticks and pine cones. It would make for a much more interesting finished piece rather than have full pieces that would sometimes show up and sometimes be covered.
Hang on. You’ll see what I mean…
Trust me.
Step 9: Give it a good sanding.
I sanded it nice and smooth. The pieces that were sticking up were now flat and flush with the top edge of the table. The resin was all scraped up and had a matte finish from the sander.
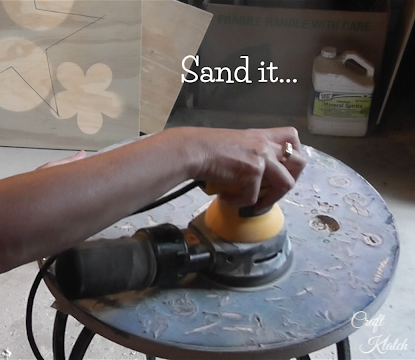
Not to worry! It’s all part of the plan!
Step 10: This is where the magic happens!
I cleaned all the dust off with a damp cloth. Then, I added a final layer of clear resin.
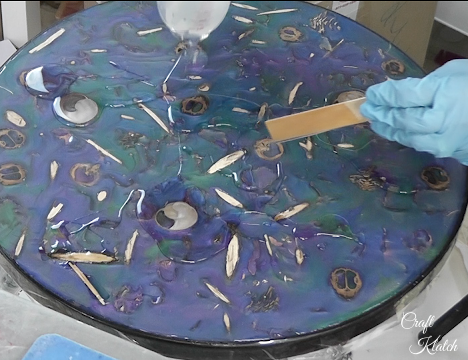
Here’s a close up of the table, but be sure to check out the video above and see all the beautiful sections on the table! It’s smooth, but doesn’t look smooth. It has movement, interest and if you use a heat resistant resin, you can put your hot coffee cup right on it!
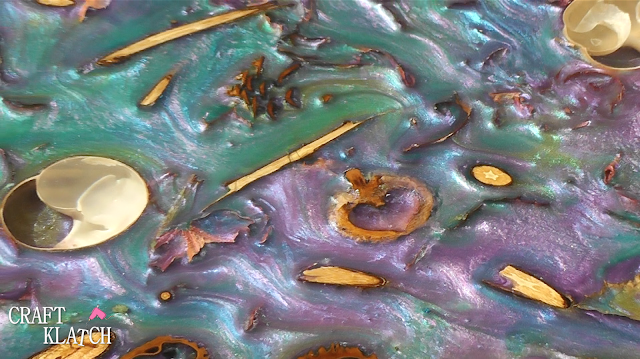
It’s hard to get a good picture, it’s so reflective.

It’s crazy what a difference lighting can make. The photo below was outside and it’s like the table lit up with the sun.

TIP: If you want to redo a table in a similar way, you want to look for a table that has an edge or a lip. That will make it much easier.
If you like this table makeover, I have a couple of others that you may like as well and only one of them uses resin incase that’s not your thing.
I did an easy refinish of my parent’s kitchen table. With regular use, things get a little worn and need a refresh.
I pulled my neighbor’s rusty outdoor table out of the trash (under the cover of darkness) and gave it a fun emoji makeover.
My dad helped me turn a beat up kids table into a coastal side table. You would never recognize it!
I used my Cricut to give a table a fun tropical cat themed makeover!
Finally, I found a small incidental table that was transformed with a little paint and stenciling!
Thank you for stopping by! Poke around at some of my other projects.
Remember: Life’s too short not to shimmer, so grab your glue gun and your glitter!™ Stay safe!
Mona
I think your table is gorgeous as I live near the sea, I'm thinking more shells & seaweed, which comes in more colours than green 😀
Your table is beautiful and just what I was looking for. I have a similar patio table that did not hold up to the weather but I insisted on keeping it even though my husband wanted to toss it. Could you tell me, please, your pigment powder to resin ratio — approximately. I've never attempted anything like this and I don't want to mess things up. Thank you!
@Debby Hood
Hi Debby – I'm not sure why I could not comment directly to your comment. Don't get hung up on the ratio of pigment powder to resin. I never measure. Add it until you like it. It should not react with the resin and it should cure fine. When you start adding the liquid pigments, you have to be careful and not add too much.
Hope the helps!!!
Mona
I really like your work!
I love this stuff. I have been following Craft Klatch for probably more than a year now, yet I have made nothing. While I do have resin somewhere, I also had four rooms and hallway destroyed by water in 2019. Much was destroyed, and nothing was completed until more than a year later. I must admit that working with the resin is somewhat intimidating for me. I am truly afraid that I will screw it up, yet it fascinates me. I have an old tile top table that I would like to re-do, and two tray tables, and, and and. Yet I have trouble getting started. It could be the chemo, it could be something else, but getting started is what is holding me hostage. Thank you so very much for the hours of enjoyment I get from following your posts, and blogs…. Dyan.
Thank you so much, Dyan! What a plate full you have had! Hopefully, this next year will be so much better for you! Hang in there! I was intimidated to try resin too (way back when). Start with a coaster and some confetti. Easiest coaster to make. It turns out great. And it’s a perfect way to dip your toe into starting to work with it! Wishing you all the best! Thank you for following and watching! I appreciate it more than you know!
Hey Mona,
That little table is just singing it is alive now with a whole new purpose, it’s just stunning to see how all the pigment colors look and the natural elements are beautiful too❣❣
Thank you so much, Patricia! I’m so glad you like it! I have it in my family room and use it to hold my tea every day and still love it!
Hi Mona, I love how you refurbished the table. It came out beautiful. I’m now on the hunt for a similar table to give it a try. It’s been awhile since I’ve been here, I’ve had a horrible last 4 years. My son Evan suddenly passed away at the age of 26 and things seemed to just expand from there. I’ve moved out of California and now live in Missouri. What a huge change that has been. My Mom and I are having a house built and I’ve been forbidden to bring any of my craft stuff to the new house. So I bought the cottage next door as my hobby/craft place. When I read Greg has banned you from bringing any glitter to the new house my Mom laughed and said see I’m not the only one that feels that way. LOL well I’m really happy for you and Greg’s next adventure in Florida.
Hi Rhonda!
I’m so sorry to hear about your son. I can’t even begin to imagine your loss. My heart is broken for you. It sounds like you have had enough sadness over the last four years and I hope things get better for you in Missouri.
I love that you bought the cottage next door as your craft and hobby place. It’ll be a nice escape for you and I hope it brings you much joy! No glitter restrictions or craft restrictions!
I would love to see a picture of it sometime!
You are in my thoughts and I’m glad you are back!
Mona