– Disposable brush
Here is the video tutorial:
Directions:
1. Put parchment paper down on your work surface.
2. Blow up balloon
3. In a bowl, mix plaster according to directions on package – I did 2 parts plaster to 1 part water
4. Take some plaster and put it on the parchment paper – that will serve as your base
5. Take your balloon and gently roll it around in the plaster – making the bowl as deep or shallow as you want.
6. When it is thick enough on the balloon, gently lift the balloon out of the plaster and set it on the base. If it sits on its own, GREAT! If not, be creative and rig something up for it to lean on. If it isn’t as thick as you would like, you can take a spoon or popsicle stick and kind of frost it as you would a cake. You may think you are out of the woods for it to pop, but you are wrong, it can spontaneously pop, so beware! If and when it does, say whatever makes you feel better, wipe the plaster out of your hair and try again!
7. Allow to dry over night.
8. When dry, pop balloon and the entire thing should easily lift off of the parchment paper.
9. Be careful with it. It is very fragile!
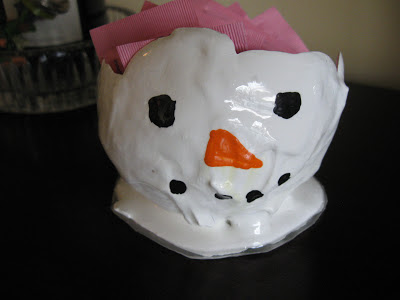
10. I painted 2 or 3 coats of white acrylic paint over the entire thing, inside and out. You can even do a couple of coats of Mod Podge, if you think that would help give it strength. Paint on your carrot nose with the orange acrylic paint. Then, paint on the coal eyes and mouth with the black acrylic paint.
11. Allow everything to completely dry.
12. Working on parchment paper – I think parchment paper may be my FAVORITE paper to work on – prepare your resin (according to package directions) and carefully drip and brush the entire thing with resin. My snowman had a hole in the bottom and I let the resin pool at the bottom and fill the hole. I threw some glitter in while the resin was still wet and now… no more hole!
13. Allow to dry overnight. Depending on how thick it is, you may or may not want to coat it with more resin. Up to you. You are at a critical time at around 12 hours after putting on the resin. You are working on parchment paper because the resin pulls right off of it. Yay! You will likely have resin pooling around the bottom, as I did, see video tutorial above. Now is the time to trim that off with scissors. It’s not wet anymore, but it’s still pliable and able to be cut with scissors. If you let it go longer and it’s fully cured, you would probably have to file or sand it down, which is a much bigger job!
Enjoy your snowman bowl! It makes a great gift for someone else or yourself!!
Thanks for stopping by! Happy Holidays and Happy Crafting!
Mona


Thanks for all your great link ups at my Pin Me Party this week. The Feather Boa didn't show an image.
Great idea! Would love if you'd join our Countdown to Christmas link party! Hope to see you there! Have a great week! 🙂
dixie-n-dottie.blogspot.com/2012_11_27_archive.html