To stay up on the latest, be sure to SUBSCRIBE to the Craft Klatch YouTube Channel HERE!
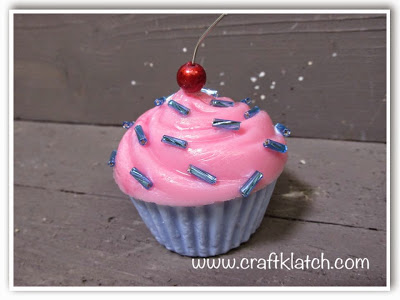
I have had this plastic mold for quite a while and have been wanting to use it with resin. I tried it once before and it did not work. This second time, it worked, but it wasn’t without its’ own challenges.

You will need:
– Plastic cupcake mold
– Vaseline
– Resin – I used Easy Cast
– Bugle beads
– Pigment dye – blue, red and white
– Clear drying glue
– Red bead
– Small piece of silver wire
Here are some items available through Amazon:
(affiliate links)
Here is the video tutorial:
Directions:
1. Take Vaseline and cover ALL parts of the mold that will come into contact with resin. Wipe off any excessive goopy parts.
2. Prepare your resin, according to the package directions.
3. Divide your resin into two parts and mix white resin dye into both, then add blue to one and red to the other to create the pink and blue parts.
TIP: Before pouring the resin, note on the mold there is a fill line. With a permanent marker, mark the fill line so you can still see it when you pour your resin.
4. Pour your resin and put on the second part of the mold – which should also be covered with Vaseline.
5. Allow to cure for 12 hours and unmold.
WARNING: Unmolding my be difficult. I put it in the freezer to try and help unmold it. I broke two of the three bottom cups because I had it in the freezer. The tops came out fine. For the third cup, I put it in warm water and I was able to peel it off of the mold.
6. Wash the pieces with soap and water to remove the Vaseline.
7. Use a clear drying glue to add bugle beads and a red bead as a cherry on top. Also add a piece of wire for a stem.
Now all you need to do is add a cute ring, or other trinket.
Thanks for stopping by! Happy Crafting!
Mona


Hi my love Mona. This is just too cute!! I have a few great-nieces that would love this. Oh heck, I'd even love it!! lol Thank you so much for sharing. Love ya' Patricia B